Every place I've ever lived has been designed for that "average American family," with lots of bedrooms, living room, dining room, family room, etc. The problem was that I was a single person, not an average family. I needed space, but for hobbies, not people. And because I'm over 6'2", bending over to use sinks designed for children was a constant frustration. Over the years, I collected a list of things I would change if I could have my dream house. As I approached retirement, I realized time was running out for that house; it was now or never.


Dreams are not always perfect, however. I could never afford my dream house, a spacious Southern California home overlooking the Pacific Ocean. But I could afford a modest ranch house, with a 20-mile drive to the beach. It was a very long way from perfect, but it had potential.


This blog documents the process of turning that small average house into something that matches my lifestyle. It will be as close to my dream house as I can make it. I'm doing all the work myself to stretch my resources. By not hiring contractors, I can afford high quality materials, and I'll know the job is always done right. The remodeling will be my primary avocation for a few years, even as I try to fit in my writing and other hobbies.


It promises to be an interesting journey, and a challenging one!

Wednesday, December 24, 2014

New Laundry/Mechanicals Room - Part 8

I've been plugging away on the laundry room, finishing off the drywall (as in joint compound and paint, not as in actually finishing it), installing trim on the window, and finally addressing the out-of-level floor.

I've been putting bullnose corner bead on all the drywall corners, 1) because I think it looks better, and 2) because I tend to cut corners when I'm walking in a house, with my shoulder often colliding with the sharp corner, finished with metal edging, and it hurts.  The round corner edge is much nicer.  This is what it looks like before joint compound and paint:


I finished the electrical panel installation, but before closing it in, I installed a flexible plastic conduit from the breaker panel recess through the wall up to the attic.  The breaker box now has one empty breaker slot, so if I want to add another circuit in the future, I won't have to cut open the wall—I can just unscrew the panel (see second photo below), and snake a new electrical cable through the conduit.


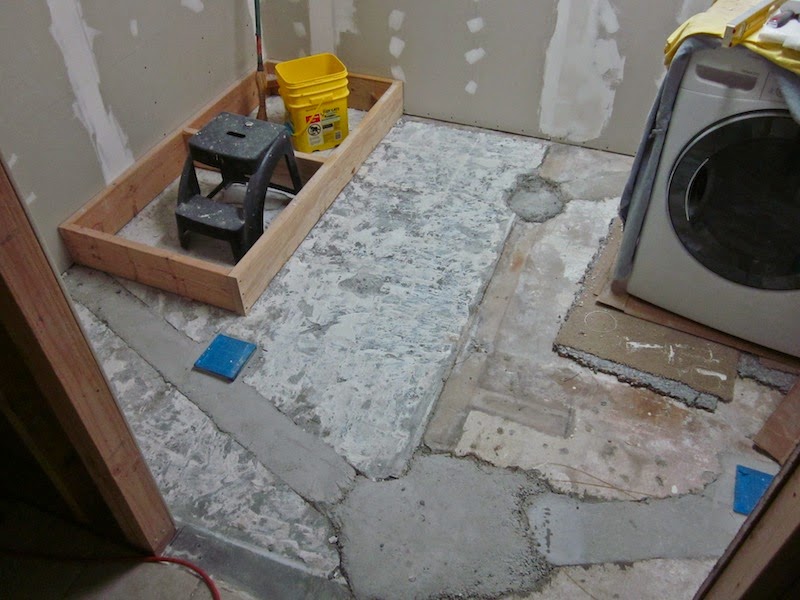
The second photo above also shows the bare concrete floor before leveling.  The left half of the floor needed to be raised about a half-inch to be flush with the floor on the right side of the room.  I used two types of masonry products to level the floor.  The "floor leveler" is a product that is mixed very thin and is poured out over the floor to be leveled.  It flows out like water, but thicker.  You have to spread it around over the area you want to level, but once you do that, it flows out flat.  I would have used just that product, but I would have needed about a bag and a half, and didn't want to buy two 50-pound bags (at about $30/bag) and have half-a-bag left over.

So first I mixed some thin-set mortar (used to install ceramic tile on a floor) and roughly applied about a quarter-inch layer on the part of the floor to be raised.  This didn't need to be level, because the leveler would go on top.  But it meant my one bag of leveler would be all that was needed.

This is the floor after the thin-set mortar went on:


And this is with the thinner leveler poured on top:


Nice and smooth!  The rest of the floor isn't all flat and level, but close enough to level the tiles by making adjustments to the thickness of the mortar.

Now I need to order the rest of the tile.  While waiting for that to come in, the plan is to build the platform for the washer and dryer, and scrape and stain the underside of the roof eves and fascia on the back of the house.

Friday, December 12, 2014

Window Work on the Back of the House

We got about an inch of rain today, after getting a couple of inches ten days ago, and they're forecasting more rain for the middle of the week (another five days).  After having almost no rain for the last eight months or so, this is amazing, and my yard has turned green overnight.  Today was also memorable as the first day in five-and-a-half weeks when there was no gas bubble inside my eyeball—nice!

I've been working on three windows in the back of the house.  The living room window has been in for some time, and finished off on the inside, but I've just repaired the stucco on the outside.  You can see it at the left edge of the photo.


Near the center of the photo above, high up on the wall, is the rear window for the guest bathroom.  There has been a sliding window in that location, above the bathtub; I had to inconveniently climb up on the tub to open or close it.  I bought a new fixed window to go there, with privacy glass; I'm recycling the old window for the laundry room.  In the photo below, I've cut through the stucco around the old window with a diamond-bladed circular saw, then blasted out the stucco with my electric demolition hammer.  I had to add spacers to each side of the opening because the new window is not a wide as the old one.


Amazingly, there is no plywood/sheathing under the stucco in this house.  They just strung wires tightly across the studs, and stapled roofing felt over the wires, then wire mesh (like heavy chicken wire), and then applied the stucco.  So from the inside the stucco is not flat (lots of bulges), which was a nuisance when reframing the wall for the new laundry room window (I had to cut down the new studs to fit over the high spots).  Making big holes in a concrete house is also a pain.  Cutting a new opening for a window in a wood house would have been much easier.  With stucco, it's diamond blade cutting and the demolition hammer again.  Demo in progress:


Putting the old recycled bathroom window in the opening was straightforward after removing the big stucco slab (deftly deflecting it as it fell, happily avoiding serious injury).  The window from the inside (no trim yet):


Then for all three windows, the exposed perimeter was filled with roofing felt, wire mesh, and two coats of stucco (scratch coat and brown coat).  Normally, a top/color coat goes on over that, but since I am coating the whole house with an "elastomeric" stucco paint, I will add the top coat stucco mix only where needed for touch-up and mild texturing.

The following two photos are of the living room window before and after stucco patching.  The stucco needs to cure for a month before I can apply the paint.


I plugged the clothes dryer vent hole in the laundry room, both inside with new drywall and outside with new stucco (I'm moving the dryer).  I'm putting the front-loading washer and dryer on a 24" high platform, and just installed the base for that platform.  I had to finally get around to blasting the old tile and mortar off the floor to do that, a prerequisite for pouring floor leveler over the left (garage) side of the floor to bring it up half-an-inch to match the right half of the floor.

Unfortunately, after the tile and mortar were removed, I discovered that the left side was lower only at the front of the room.  At the back of the room, it was higher!
I'm still trying to get my head around that one, and figure out how to fix that (short of renting a big water-lubricated concrete-grinding machine).  Sigh.


I may just kick that can down the road.  My laundry basket is overflowing and I need to get the clothes dryer back in operation, i.e. cutting a new hole in the wall in its eventual location.  I haven't decided whether to temporarily put the dryer up on the platform base (on a piece of plywood), or to move quickly to build the final cabinet/platform.

Or something else.  Stay tuned . . .

Saturday, December 6, 2014

New Laundry/Mechanicals Room - Part 7

I saw my eye surgeon a few days ago, four weeks after my detached retina was repaired.  He pronounced my eye fully healed.  The bubble inside my eye is getting to be pretty small; the gas should be completed absorbed within the next few days.  My vision will then be back to normal.  Hooray!

Work on my house remodel has just about returned to a normal pace.  After stripping out the circuits from the old laundry room sub-panel breaker box, I started running the new circuits, and hooked up a temporary 240 volt, 30 amp circuit for the clothes dryer.  The photo shows the old box on the left, and the nice new one on the right.  The new laundry window will be installed above the old breaker panel.  You can also see the furring strips for the new ceiling attached to the roof trusses.


This next photo shows the wall framed for the new window and new electrical cables routed through the studs underneath.  Some of the wires go through to the workshop on the other side of the wall on the left (where I've started stripping the drywall off the wall, and installing boxes for electrical receptacles above where the future workbench will go).  At this point, I've also put up the new ceiling drywall in the laundry room.


Once the new wiring was run through the walls, I added insulation.


And then put up drywall.  You may recall that I recently had (among other things) twelve sheets of drywall delivered.  It didn't last long, and I've run out again.  On the left side of the laundry room, I did not have a full sheet left for the last panel, but that worked out okay because I still need to install the new hot and cold water supply lines to the washer outlet box.  They go behind the wall.  The drywall on the right side of the room has been up for a week or so; I painted that part so I could finish installing the electrical receptacles over there (trying to get past running extension cords all over the house).  In the middle of the left-side photo, you can see the blue plastic electrical boxes for the washing machine and clothes dryer.  They are high up because the washer and dryer will sit on a 24" high platform.


  We're going to have good weather for the next five days (sunny and high in the 70s), so I'm going to work on putting in new windows (including the one in the laundry room).  After that, I'm hoping to resume progress on the laundry room floor.