A couple of years ago I started installing a new front walkway. The old one was rendered non-functional by my garage extension (blocking off the end of the walkway), and a Ficus Benjamina tree that overgrew that old walkway. I was happy to have a new walkway, since the old concrete one was narrow (36") and plain, besides being a walkway to nowhere.
I laid out a curved line for the new walkway to follow, calculated the number of pavers to order, and established the pattern I wanted to have. The new walkway would be wider (51"/130 cm) to comfortably accommodate me walking two dogs on leash. I also researched the procedure for putting down a paver walkway, discovering there was no one way.
To be sure, digging would be required, but because the old concrete walkway would be under the new pavers, at least for the first three feet, I simply used thinset mortar to adhere the first batch of pavers to the concrete.
And there it sat for two years. At first I was waiting for the rainy season to soften the rock-hard dirt (not good for digging). Then, I asked the first contractor (who didn't do my retaining wall) for a price for him to do it—$2000! That was even though I already had the pavers. Then I asked the second contractor (who did build my retaining wall), but he would have used heavy equipment to dig. No way, not after he destroyed my back yard.
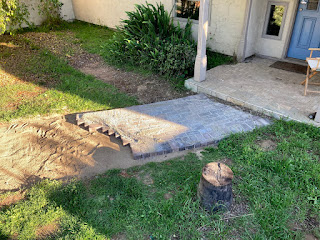
So back to doing it myself. Normally you would excavate for the whole walk, then put down gravel/fines or crashed stone, then sand, then pavers, so you know where it will end up. I preferred to do the job in small chunks—say about five feet at a time. You can see in this photo where the old walkway is, covered with dirt but without grass (parallel to the front of the house). The photo also shows my first extension past the initial mortared pavers.
Here's a photo of the whole walkway outlined by initial digging. Please note the pavers I laid down early on outlining the bend of the walkway, overgrown by grass.

There are a number different ways to install a paver walkway. This is the method I used, perhaps influenced by the climate (very little rain and no freezing temperatures, so no frost heave issues). This drawing illustrates the structure.

After you figure out where you want the top of the walkway, dig out far enough down for a few inches of gravel with fines, a couple of inches of sand, and the thickness of the pavers. Then put down and compact the gravel, then the sand (compacted), then grade and smooth the sand.

Since I chose not to prepare the foundation for the whole walkway at once, I had to estimate the trajectory for each section, so it would end up where it needed to be at the far end. I used three and four foot levels, and a long concrete float to smooth the sand. I started out with the grade being level, and also level from side to side, and before each new short section, I would check the level of the ground between there and where the walkway would meet the driveway, then gradually alter the slope and tilt to suit.


Once the sand was smoothed out (using levels and eyeball), the pavers could be set down fairly quickly.

You can use a plastic border to stabilize the edges of the walkway. These generally come with nylon spikes to secure it in the ground. In my case, the ground is basically impenetrable, so I opted for the concrete edge stabilization method. For this, wet the sand/gravel at the edge of the pavers, and then dig out that sand and gravel (wet so it holds an edge) from the original excavation—dug a few inches wider than the walkway. The concrete then forms a solid keyway to prevent the pavers (and underlying sand and gravel base) from spreading out.
In this photo, you can see the concrete along a section of walkway (at the right), and the sand yet to be dug out alongside the next section I was working on. The concrete comes about halfway up the side of the paver. After the concrete goes in, I filled in with dirt up to the top of the pavers.

Progress. I generally flooded each new section with water overnight to soften the ground for easier digging (likely not needed most places that get more rain).


