Every place I've ever lived has been designed for that "average American family," with lots of bedrooms, living room, dining room, family room, etc. The problem was that I was a single person, not an average family. I needed space, but for hobbies, not people. And because I'm over 6'2", bending over to use sinks designed for children was a constant frustration. Over the years, I collected a list of things I would change if I could have my dream house. As I approached retirement, I realized time was running out for that house; it was now or never.


Dreams are not always perfect, however. I could never afford my dream house, a spacious Southern California home overlooking the Pacific Ocean. But I could afford a modest ranch house, with a 20-mile drive to the beach. It was a very long way from perfect, but it had potential.


This blog documents the process of turning that small average house into something that matches my lifestyle. It will be as close to my dream house as I can make it. I'm doing all the work myself to stretch my resources. By not hiring contractors, I can afford high quality materials, and I'll know the job is always done right. The remodeling will be my primary avocation for a few years, even as I try to fit in my writing and other hobbies.


It promises to be an interesting journey, and a challenging one!

Tuesday, June 10, 2014

Master Bathroom - Part One

When I moved into my house, it had two bathrooms, and each of those had a two-sink vanity (but only one electrical receptacle), and a bathtub.  The old master bedroom has become my home theater, so the bedroom across the hall (on the front of the house) will become the new master bedroom, and the bathroom next to it will become the new master bathroom.  It had one small half-circle, non-opening window over the bathtub.  The toilet in this bathroom was okay, a 1.6-gallon flush model, although the first time I lifted the lid, I discovered the seat had become detached somehow and had gone missing.  (Another item on the list for Home Depot!)


The tub tile was, shall we say, scary, and the tub no better, so it had to go, along with that long two-sink vanity.  The toilet in the other bathroom was an antique 3-gallon flush model, and since that was the bathroom I would be using for awhile, I pulled the 1.6-gallon American Standard and moved it to the other bathroom, and took the antique to the dump.  Time for demolition!


I always loved houses with basements for easy access to the house's mechanical and electrical systems, and loads of unfinished space for projects.  Out here, in the land of eternal summer, I ended up with a house built on a concrete slab.  So all the drain pipes are buried under concrete.  All the things that would need drains would be needing them in a different location in my plans.  Not looking forward to that!


Master bathrooms are entered from master bedrooms, and not from main hallways, that's just the way it is.  So I knew the doorway to the hall was going away.  And I had need of that door elsewhere.  With the tub and toilet hauled away, and the door removed to its new location guarding my pottery studio, I found I had an empty space I wanted to fill, and new drywall was going up as part of my new kitchen work.  I couldn't close off the doorway entirely, because I didn't have my new doorway to the bedroom yet, and there was the matter of that entirely too long vanity that needed some way to get out.  Half a doorway would do just fine, thank you.


And my new bathroom stayed like this for a long time while I focused on other projects.  Procrastination, as I continued to think about getting that nine-foot-long mirror out of there, and blasting through the concrete looking for drain pipes.  I started taking out the tub in August 2013, worked a little in March 2014, a little more in April, before moving aggressively (?) on the project in May.  In the meantime, the old bathroom was home for my cats' litter boxes and new window storage.


I finally decided to install the new bigger window as a way of putting off the concrete bashing.  I figured I needed the extra light and fresh air before I could do that nasty work.  So out with the last of the drywall, insulation, nails and screws, and extraneous copper water supply lines and ABS drain pipes, etc.  Cut an opening in the outside wall, and a doorway to the bedroom (for the pocket door), and frame for the new Andersen slider—four feet wide and three feet high (rough opening).  I am going to put the new vanity unconventionally under the window (mirror on the side), and the four foot by five foot shower at the other end of the long bathroom (toward the inside of the house).


The window installation was straightforward.  I removed the ugly masonite shingles from the outside of the sheathing, then installed the window with sticky rubber membrane flashing to keep water out, and then replaced the shingles.  After I replace the rest of the windows on the front of the house, I will pull off all the shingles and apply stucco (which covers the sides and the back of the house—strange they thought those press-board shingles were apparently the prestige siding material).


With the new doorway cut into the bedroom, I could finally close off the opening to the hall.  Hooray!


Drywall around the new window on the inside—I need these little psychologically uplifting progress markers, little bits of finished house . . .


. . . before getting back to the subterranean explorations :  (

Friday, June 6, 2014

Old Kitchen Transformation - Phase Two (Walls & Ceiling)

I had contacted an electrician (recommended by a friend) to upgrade the electrical service from 100 amps to 200 amps, driven by my plans for an electric pottery kiln (a 50-amp circuit), my electric clothes dryer (a 30-amp circuit; they had been using gas), and my new all-electric kitchen (a 30-amp circuit for the wall oven, and a 40-amp circuit for the smooth-top cooktop, versus the old gas range that had been in the house).  I wanted to get the wiring sorted out before the electrician installed the new breaker box, and so pushed to get the room finished (most of the house wiring converged on the room because that was where the breaker panel was).  As it turned out, I had plenty of time, because the electrician apparently had other things to do.

I started out building inner stud walls two inches thick to add insulation (and 3.5 inches thick where the electrical panel was, to allow plenty of room for routing the electrical cables).  Because I wanted better access to run the new kitchen wiring later (rather than struggling to get all those circuits into the main outdoor panel), I bought a 100-amp sub-panel from amazon and surface-mounted that on a piece of 3/4" plywood on a partition wall (see photo).  Doing this, I could bring the cables in from the side of the panel, rather than pulling them all in from the top, where there was much less room.  I then added another stud wall to the little wall holding the sub-panel, doubling its thickness, so that the sub-panel would be flush with the finished wall.  I continued to reroute cables (that had been in the old removed drop ceiling) through holes drilled in the top plate of the new inner wall that I had constructed in front of the main panel.


I continued to add my two-inch thick inner wall all around the room, and began work in the ceiling.  In the first photo. you can see two recessed cans (for recessed lighting):  the distant one is directly over where a kitchen-size sink will go, and the closer one is directly over where the pottery kiln will sit.  There is a framed opening between those two lights where an attic exhaust fan will be placed; the kiln puts out a lot of heat, and at least in the summer, all that heat must be sucked out, in this case into the attic, where it will be pulled out through a wind-driven roof ventilator.  To the left of the fan is a blue plastic mounting box for a general illumination ceiling light.


This next photo is on the left side of the room, a drop soffit for four recessed flood lights that will illuminate a work bench.  The photo after that shows the first sheet of drywall up at the far end of the room, and at the near end of the ceiling, an opening for permanent access to this end of the attic (the other hatch is at the far end of the house, and because the roof is framed with trusses, it's hard to move around up there).


Drywall went up without a problem, and finally I could see what the room really looked like.


The drywall wasn't quite up everywhere, as I was still waiting for the electrician, who needed access to the inside of the main breaker panel.  And I was still rerouting cables and running new circuits.


None of the windows in the house had been trimmed out with jams and molding; they were cheaply finished with drywall over the rough framing.  Not a big fan of that, so I will trim out my new windows, complete with sills (to put things on, and the cats like them).


I built three shelf units to go over the future work bench, and installed those.  They will be used for pottery glazes and who knows what else; you can't have too much horizontal storage.  The rough workbench holding my temporary kitchen was originally built to test kitchen countertop height (40"), and depth (30"), which dimensions I will be keeping in my new kitchen (and also the finished cabinet/countertop for the pottery studio).  Oh, and did I mention the yellow paint?  The rest of the house (except for the home theater) will be off-white, so the pottery studio gets the token dash of color!


With the new electrical panel finally installed, drywall work could be completed.  I ran circuits for the new kitchen (oven, cooktop, refrigerator, dishwasher, and two 20-amp receptacle circuits) before closing up the wall.  I also installed blue plastic conduit from the sub-panel cavity up to the attic so I wouldn't have to tear off the drywall for future circuits (just feed the wire through the conduit/tubes).  I have since run two other sub-panel circuits through the conduit: a 20-amp GFCI circuit for the new bathrooms—the existing 15-amp circuit was flaky, and a 15-amp circuit for new hall/living room lighting.


This final photo shows what it looks like from the outside, with the stucco patched up around the new windows and breaker panel, with an elastomeric stucco paint applied (new color), and with the trim scraped and power-washed and solid-stained a new color to match the outside window color (all the old trim was white).  The whole house needs the same treatment.


Thursday, June 5, 2014

Old Kitchen Transformation - Phase One (Deconstruction)

The existing kitchen was a mess, and the more I looked at it, the more it became clear that it needed a complete gut job and rebuilt from scratch.  I started to think about the design of the new kitchen, but as time passed and I considered what I was going to do with the rest of the house, I realized I would have to think outside of the box.


The old cabinets were constructed from thin particle board, falling apart, with no decent drawers.  The appliances were mostly non-functional.  Thick concrete countertops covered with tile and dirty grout.  Everything was covered with a layer of grease that the seller's painters didn't even try to remove.


The windows were the cheapest I had ever seen: flimsy aluminum frames with a single layer of glass.


The base of the cabinets contained evidence of a mouse infestation,
but no sign of them since—not with five cats!
The old kitchen and small adjacent dining room just were not going to work well for the new kitchen (I had no use for a dedicated dining room).  I also wanted a pottery studio and was thinking about where I could put that.  It soon became apparent that the old kitchen/dining area would be ideal for my pottery studio, and the bedroom adjacent to the living room would make a much better kitchen.  So with that . . .


The kitchen had a drop ceiling (Why would they do that?) that left my 6'3" height feeling claustrophobic.  In California they mandate outside electrical breaker panels, with the breakers sharing the box with the meter, supposedly so the fire department can shut off power from the outside (but so can burglars).  The fire departments in the rest of the country seem to manage just fine with indoor boxes (they can shut power off from the outside by pulling the meter, if they have to).  So the breaker boxes are so cramped that most houses need subpanels for circuits that can't be accommodated by the outdoor box.  It also means that in a regular 2x4 stud wall, no insulation behind the box.  


So down came the drop ceiling, exposing a mass of loose wires that had been routed through that space.  Many were wires for kitchen circuits which were no longer going to be needed (garbage disposal, dishwasher, etc.)


I also discovered the water supply lines, haphazardly routed, and TWO sets of them, one gray plastic polybutylene, and one copper.  Which was active?  I discovered the polybutylene pipes were empty (a material judged to be defective); the copper were active but run without insulation in the attic for the full length of the house.  At first I couldn't understand why the "cold" water was scalding hot, until I went up in the attic where it was about 140˚ (no venting).  I ripped out all the old polybutylene and started on the copper, as I intended to replace all with PEX tubing, insulated, routed inside the house proper. 


The intense Southern California afternoon sun coming through the west-facing window did a great job of heating the room, so I deleted it, and also started to add a couple of inches of thickness to the wall for more insulation.


The sides and rear of the house were covered with stucco, but no sheathing underneath (just roofing paper over wires stretched across the studs.  I was shocked!  Went to old This Old House episodes and youtube for lessons on applying stucco. 


The little greenhouse window in the corner had to go; it worked as well as an oven to heat the room.  In fact, all the windows in the house had to go.  I ordered efficient Series 100 Andersen Windows (their value line, but very nice quality).


New window installed on the left; old one removed on the right.  In this case, the new
windows are the same size as the old ones, but installed 6" higher (because the drop ceiling was removed,
and my new countertops will be higher).  
So deconstruction came to a close, and the transformation of the old kitchen had started.  This first phase lasted late-July through November, 2013 (with other projects running concurrently).  Phase Two next time. 

Wednesday, June 4, 2014

The Home Theater - Phase One

When I moved into the house, I think my expectations were that it was going to be a little more livable than it turned out to be.  That was before I discovered the frights in the attic (little or no insulation, etc.), and a kitchen that literally had nothing in it worth saving.  I had thought the first things I would do would be to reupholster my sofa and matching chair, and to build a platform for my waterbed mattress.  Ah, so naive!

What I really needed was something to do in the evenings and some serious stress relief, and that turned out to be spelled h-o-m-e  t-h-e-a-t-e-r.  I had a small home theater set up in my parents' house's small dining room, using my old 5.1 speaker system.  It was fine, but I was serious about my movies, and wanted something exceptional.

When I read that my favorite speaker manufacturer—SV Sound, a small company privately owned by several audio enthusiasts who started out by building great subwoofers in Ohio—had just been bought out by a big corporation, I immediately ordered a full 7.1 speaker system from them:  their highly-rated MTS speakers and a 128-pound, 800-watt subwoofer.  All too big to fit my little dining room space, so the speakers sat in their boxes for a couple of years.

Once in California, I only had to find a dedicated space to put them.  The living room was big enough, but I needed a living room, and it had too many openings.  The master bedroom was almost as big, and had a ceiling that rose from eight feet in the back to twelve feet high at the front.  Twelve feet wide and sixteen feet front-to-back.  Not small, but for a home theater, it was marginal.  The side surround speakers should not be too close to the listener or the sound would seem localized, but since I would mostly be the only one listening, it would be okay,  Also, a 7.1 system has rear speakers that should be just as far behind you as the front speakers are, well, in front of you.  My Onkyo receiver supported nine channels, including two "height" channels, which I had read actually improved the sound field (and listening experience).  I had two smaller SBS speakers that would go up in the front corners of the room, almost twelve feet up, so I now had the makings of a 9.1-channel system.

The conversion of the master bedroom to my home theater would have to be done in two phases, because the room was open to the (old) master bathroom (which would become my only bathroom until the new "master" bathroom was completely gutted and rebuilt).  Phase two would wall off that opening and take care of some other finishing touches.

The big alteration I needed to do right away was to remove the closet at the front of the room.

I removed the mirror doors and sold them on craigslist, then started demolition.

Then patched the drywall.

While waiting for joint compound to dry, I started building the pedestals for the four surround speakers (side and rear), and the platform for the center-channel speaker (mounted above the TV).  Then some paint.  Ideal viewing of movies is in a completely dark room, and home theaters ideally should be painted dark gray, but I opted for blue walls and a gray ceiling (to minimize reflected light).


 Running and hooking up the maze of wires was no trivial task.

And then hang some sound absorbing materials, and declare the home theater operational.  The video quality on my 60" Panasonic plasma is exceptional, the sound system is awesome.  I love it!  For me, it has not been a luxury; it has kept my sanity, and it is very much used (and until the master bedroom is done, the home theater is also home to my temporary bed).


Sunday, June 1, 2014

Building "The Wall"


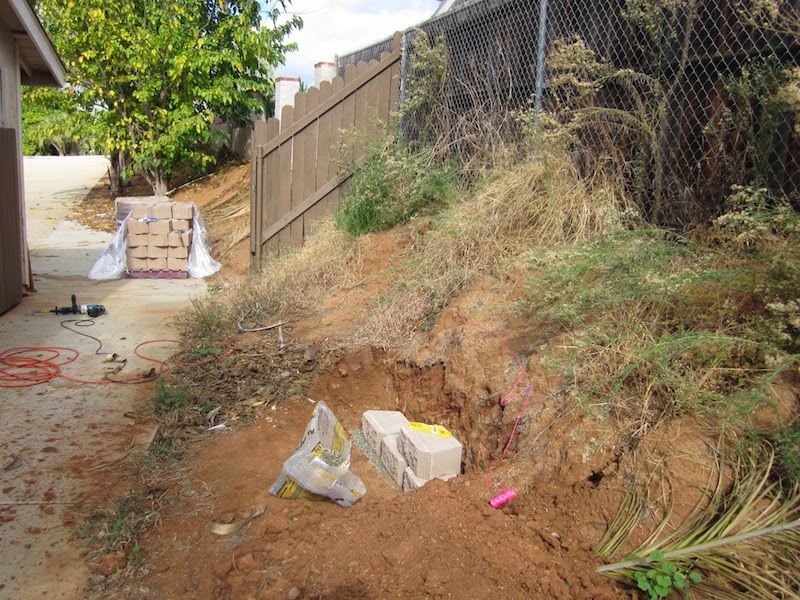
One of the first problems I noted with the house was that the embankment separating my house from my neighbor's was eroding away.  I didn't know if the next winter's rains would undermine the wall and fence separating our houses, but the consequences of that happening would be dramatic enough that postponing action seemed too risky.  

So in November,  I ordered a couple of pallets of 16" retaining wall blocks (90 blocks), enough for a good start, but not nearly enough for the whole wall.  

The TV home shows stressed the importance of good drainage to prevent freeze/thaw upset: a gravel bed under the wall, gravel behind the wall, and a garden fabric behind the gravel to prevent soil blocking the gravel.  That said, it never goes below freezing here, and we only get ten inches of rain in a good year.  The dry, heavy clay soil was so hard that in places I could not dig with my mattock (much less a shovel), and had to bring out my electric demolition hammer, fitted with a 3" flat tip, to chisel out the embankment!  I decided to take my chances without having to arrange for a truckload of gravel.  

Slow work, putting in the base course of block—level front to back and side to side, even with the block next to it, and following the chosen line for the wall.  The blocks have a lip on the bottom (at the back of the block), that keeps the pressure of the soil from pushing it off the block underneath, and provides the proper set-back for each course going up.  After the first course is in place, it's just a matter of setting the blocks on top of the ones beneath.  Assuming the base course was level and even, every course above it will be the same.  Backfill as the wall goes up, compacting the soil (clay crumbles).

After going through my initial two pallets of block, I started to bring home between six and ten of the 54-pound blocks every time I went to Home Depot.  This way, I didn't have to build the whole thing in one go (thankfully!).  

I started on November 20, and finished Phase One of "The Wall" on April 7, 2014.  

Six courses, six-inch high blocks, with the base block buried half below ground level.  


Eventually I will extend the wall out in the back yard to form a planting bed for my blueberry bushes (which are now in big pots).  I'll have to get a truck-load of topsoil to fill that walled area, because the ground is too hard and doesn't drain there.  (I started digging holes for the blueberry bushes, and filled the holes with water to soften to soil for easier digging, but found the water still in the hole the next day!)

Monday, May 26, 2014

Writing Update

Before starting to catch up on posting on my many remodeling projects, I had some things to say about writing progress (or lack thereof, depending on my frame of mind).

After the move to California, I did spend quite a bit of time completing two books that needed to be done.  The first was a non-fiction work chronicling the four years I spent taking care of my elderly parents during the last years of their lives:  Pushing Twilight: My Personal Adventure in Geriatric Home Care.  Not a fun task, and because of that, I needed to get it behind me (or it would never get done).

The other writing project was more enjoyable: Ripley's World:  A Samsara Prequel.  A too-short draft had been languishing for a few years, needing some filling out.  The lengthening made it a more complete story, and changed one character completely—a substantial improvement.

Which brought story development for Daughtry's World to the forefront.  Kevin Daughtry was a minor character—a detective—in Kenshi's World, but was interesting enough to merit his own book.  There was just some depth and complexity about him that said I should dig into his story.  Very often characters just show up, like real people.  That surprised me the first time it happened.  I had thought I would have to create every character, bit by bit.  It happens both ways; I can't explain it.

In any case, Daughtry had a pretty intense past, a past that incites his present (although the link is not immediately obvious).  In Daughtry's World, the events surrounding the missile attack on the Mars Helios colony again figure into the central spine of the story.  Readers of the Samsara series will be familiar with this pivotal tragedy; as with the other books in the series, Daughtry's World offers a wholly different perspective.

Daughtry's World is a murder mystery.  Developing the story follows a similar process to solving a crime.  It's like putting together a picture puzzle, except that you do not start with a box full of pieces.  You have to go out and look for the individual pieces, gather them up (write them all down), try to find connections, and then go out and look for more pieces (or clues).  After awhile, when you have enough pieces, you discover that many of the pieces do not belong to the puzzle you are trying to solve; they no longer fit with the newer, better pieces.  So you throw those bad pieces (plot elements/characters) away.

Eventually, it seems you have all the pieces to the story, and along the way, some old characters have suggested they have roles, and you have discovered some new essential characters.  They all have relationships that develop or are hidden, that will determine the path the story follows.  But even when you have the pieces, it remains to put them together in a structure that will tell a complete and compelling story, unpredictable but inevitable, suspenseful, and satisfying in its conclusion.

That's where I am now.  I know the characters, who's good, who's tragic, the pawns, the victims, who's the sociopathic villain, who will live, who will die, who will be changed forever.  What it means for the Committee, and what it means for the Resistance.

I'm looking forward to sorting it all out.  But first I have to sort out my priorities.  I still don't have a real kitchen (bits and pieces of kitchen things all over the house, but no oven, and no cooktop), after almost a year here.  My new master bathroom is a gutted empty room with a hole in the concrete slab exposing ABS drain pipes.

All I need is a little more house progress, and I can start to spend a little more time writing.  Sigh.

Sunday, May 25, 2014

My Writing Blog Becomes Mostly a House Remodeling Blog

I moved to Southern California from the East Coast almost a year ago, buying a small house (about 1400 square feet) on a third of an acre north of San Diego.  It's not on the coast; it's a 20-mile drive to get to the ocean.  I guess about the same distance heading east to get into the mountains.

The house was a foreclosure, but bought after the period when such houses could be had for pennies on the dollar.  Banks decided they could flip their real estate as easily as anyone else, so they spruced up this house and advertised at market value.  Even though the repairs were lipstick on a pig, demand drove the price up, but I persisted.  Why?  Great potential.  The house was in a decent neighborhood and had a decent size lot; closer to the ocean, lots are barely bigger than the house.  It also had what I called "big sky," on high ground in a town that was about 900 feet above sea level.  After living in well-treed East Coast neighborhoods where you could only see blue looking straight up, the atmospheric views here were amazing to behold.  The dry crystal-clear air gives you blue right down to the horizon; I can't see the Pacific, but I can see puffy clouds that are out over the ocean.

The house was a mess, but I could fix it, change it, make it my own.  But oh my goodness, it's going to take years!

When I moved in, I had my ideas about what I needed/wanted to do.  But most all of that has changed.  The longer I lived in the house, the more my ideas evolved.  The design progressed and changed, for the better.  I plan to live here for the rest of my life, so I'm not trying to make it marketable for the average home buyer.

Here are a couple of floor plans to finish out this post—a before and an after (I will explain in future posts).  Haven't gotten to the after quite yet, but working on it.  That's what this blog will be about henceforth (as well as progress on my novels).  Thanks for coming along for the ride!