Every place I've ever lived has been designed for that "average American family," with lots of bedrooms, living room, dining room, family room, etc. The problem was that I was a single person, not an average family. I needed space, but for hobbies, not people. And because I'm over 6'2", bending over to use sinks designed for children was a constant frustration. Over the years, I collected a list of things I would change if I could have my dream house. As I approached retirement, I realized time was running out for that house; it was now or never.


Dreams are not always perfect, however. I could never afford my dream house, a spacious Southern California home overlooking the Pacific Ocean. But I could afford a modest ranch house, with a 20-mile drive to the beach. It was a very long way from perfect, but it had potential.


This blog documents the process of turning that small average house into something that matches my lifestyle. It will be as close to my dream house as I can make it. I'm doing all the work myself to stretch my resources. By not hiring contractors, I can afford high quality materials, and I'll know the job is always done right. The remodeling will be my primary avocation for a few years, even as I try to fit in my writing and other hobbies.


It promises to be an interesting journey, and a challenging one!

Tuesday, February 2, 2016

Pottery Studio — Part 8

Oh me, oh my!

I continue to slug it out with my master bathroom, but trouble getting tile and a marble threshold, and grappling with the water and vapor-proof membrane has been frustrating progress.  Nevertheless, there has been progress, and floor tile in the shower will be going down in the coming days (warmer weather coming so I can roll my tile saw outside with high temps going up to 80˚—ah, southern California!).

So last time I mentioned I might work on the pottery studio's car stereo system, as a nice diversion, and that's what I've been doing.  The components include 1) the speakers mounted in custom boxes built onto the walls, 2) a wall-hung cabinet of shelves, and 3) the car stereo head and power supply built into the cabinet unit. 

First, I designed and built the speaker boxes, an important component for speaker performance.  You don't want the sound coming off the back of the speaker interfering with the sound waves coming out of the front.  There are closed (sealed) boxes, and ported (tuned) boxes.  For simplicity, I went with closed boxes, angled 5˚ inward, and with a 45˚ extension on the side.  A rectangular box is more susceptible to internal resonant standing waves that can adversely affect frequency response. 

I started by cutting out all the pieces of 3/4" plywood.  For both the speaker boxes and shelf cabinet, I managed to construct everything from plywood remnants (left over from other projects), using up almost all of it.  Hooray!


The speaker boxes and shelves are screwed to the studs behind the drywall, so I needed to screw the boxes on before fully assembling them.


The tongues and grooves on the parts were made so the lower half of the boxes are well supported when assembled to the half screwed to the wall.  Once assembled, the rough boxes were given the joint compound treatment to make them smooth and ready for paint. 


The boxes were then loosely stuffed with a sound absorbing acoustic polyfill.


Next the shelf cabinet parts were cut to size and biscuit slots and tongues and grooves cut.


The next photos show biscuit slots and grooves.


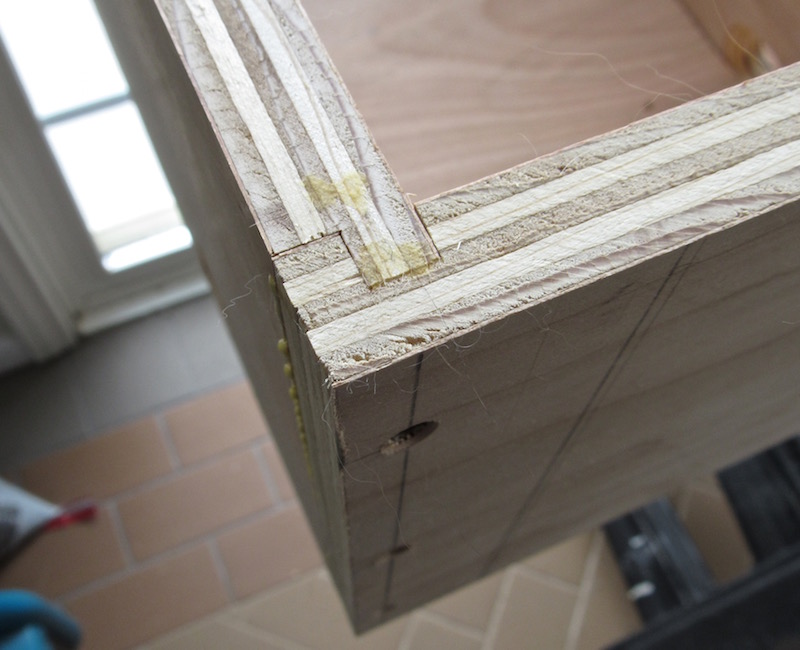
The corners of the cabinet are my usual tongue and groove, fastened with glue and screws.  The shelves are fastened with biscuits, glue and screws.

The assembled cabinet carcass is ready for trim. 


I covered the side with lacewood veneer, fastened with contact cement in the same manner as plastic laminate is glued on.  Then the inside of the cabinet was painted with an eggshell white, except for the stereo compartment, which got blue paint.  I used mahogany for the trim, as the color coordinated well with the lacewood veneer.  The trim, which covers the plywood edge, was fastened with biscuits and glue (no screws).  First on were the long side pieces.


After the side pieces were dry, the trim went on the edges of the shelves.  After all of that was dry and the clamps had been taken off, the front of the trim was machine sanded, then a router used to round over the edges, and then all of that hand sanded.  Then a coat of polyurethane, a light sanding with 220-grit paper, then a second coat of urethane. 


Next the Pioneer car stereo was adapted for its use in the cabinet.  I used a third-party mounting bracket (bought from amazon). 


Then I built a chassis out of wood that could slide in the designated stereo shelf.  The surround was also covered with lacewood veneer and trimmed on one side with mahogany. 


Installed, it looks like this (the 2.5 amp power supply sits on the right):


Here is the final result.  I hung the unit on the wall so I could mop underneath (important to remove the clay dust, which is not good to breath). 


And a wider view:


I didn't really know how it was going to sound, as it's a car stereo in a house, but I was actually blown away — it sounded great, much better than my most optimistic expectations. The speakers are 6" x 9" 3-way Polk Audio speakers.  Being mounted in the corner of the room, the bass response is enhanced.  Being in a mostly bare room with a ceramic tile floor added something.  It will go louder than I want, and the clarity continues at high volumes.  Very life-like sound.  I'm very pleased.  I've just played CDs through the system; I may or may not eventually add an antenna. 

Next post — back to the master bathroom shower. 

Tuesday, January 12, 2016

Master Bathroom — Part 5

The last couple of weeks have been extremely frustrating—almost infuriating.  But the issues never go away by themselves, so I've been the tortoise, slowly plugging away at the problems.

Early on, I decided to install a urinal in my bathroom, next to the toilet.  Apparently this is a rare thing for a residential bathroom, even though every public and business men's room in the country has a row of them, and I've never seen a man who will pass up an available urinal to pee in one of the toilets (in a stall).  The one I bought (Kohler) uses just a half-gallon of water per flush (and I read there are new regulations mandating just half-liter flushes for urinals).  Easier to keep clean, and certainly the toilet stays a lot cleaner if there is a urinal to use. 

But urinals in residences seem to be a taboo—like they don't even exist.  I got mine from Home Depot (on line, not in a store), and there were reviews from others who had them in their houses, so I'm not alone.  Home Depot (.com) also sells bidets, and while those are common in Europe and elsewhere in the world, not in the U.S.  Another taboo.  The Home Depot description for its Kohler bidet included this:  "Horizontal spray flows over the rim for localized cleansing of the body and aids in relief of certain health conditions".  Ah, euphemisms.  Wouldn't want children to figure out what a bidet is for! :-)

But I digress.  I was taking about frustrations.  With the millions of urinals installed in the country, you would think the installation process would be all sorted out and clear to someone new to the subject.  But no.  The absurdly abbreviated written instructions that came with the urinal and the separate flush valve were essentially useless.  Worse than useless, because they gave dimensions and data that did not match the hardware.  It would have been more honest to just say figure it out for yourself.  I looked on YouTube—which has instructions for doing anything, but not installing a urinal.  There were instructions on replacing a urinal, but that did not demystify the plumbing behind the wall.

So ultimately, I got out all the parts and put everything together sideways on a table and figured out the correct measurements, and then figured out how to hang it on the wall (and still hoping it will work).  

Early on, I talked to Kohler tech support about the required water supply, but they mentioned only water pressure and the size of the water line.  Half-inch PEX was too small; 3/4" would be good—I planned on using a full 1".  I had plenty of pressure, but a couple of days ago I reread the instructions (in fine print) for the flush valve, and even looked at the troubleshooting section, where it was revealed that you needed a water supply that kicked out a 35 gallon-per-minute flow rate.  Whoosh!  A couple of weeks ago, while I was researching water softeners, I noted that the model I was eyeing provided just ten gallons per minute (water running through a tank of ionizing resin beads tends to drag).  So instead of using soft water to feed the urinal, I would connect the supply line upstream from the water softener.  But yet another surprise.

Back to this post, and the pictures!  Starting with something easy—the vanity.  First, I installed the base, and routed the drain pipe and supply lines.  I also installed some insulation in the base, because the concrete below the vanity is the same concrete that forms the base of the outside of the house, and so is the same temperature as the outside.  To wit:


Next I started to build the vanity carcass, using biscuits and tongue-and-groove, but then discovered I had run out of half-inch plywood for the back.  That will come next time I summon a truck delivery from Home Depot, but in the meantime, I assembled what I had (but no glue or screws yet) and have been using it as a workbench.  I've since cut out the horizontal partitions, but not yet cut the biscuit slots for those.


You can see that I put a dummy toilet in place to see how the space would feel, and it works just fine.  I also finished putting up the cement backer board in the shower, painted the ceiling, and installed the overhead shower light to illuminate future work.  The shower gets a waterproof membrane applied over the cement backer board; the tile goes over that. 


The next photo shows where most of my frustrations have been centered.  After I had determined the position of the urinal output pipe (in three dimensions), and figured out how to accomplish that installation, I changed directions and did the black vent pipe.


It went up through the roof, although not without a couple of hiccups.


One of the challenges was figuring out how to position the urinal outflow pipe as far into the wall as needed.  Conventional ABS fittings that were available at Home Depot would not work (they stuck out too far, either elbows or tees, with a separate threaded fitting).  I finally found a 2" threaded PVC (white) elbow online—SupplyHouse.com, and used a special cement that would bond PVC to the black ABS pipe.


A brass attachment fitting that came with the urinal screws onto this PVC threaded elbow, and two bolts hold the urinal against this pipe.  Watertight integrity is provided by a thick rubber washer. 


The weight of the urinal is supported by a crosspiece attached to the studs.  A simple 2x6 would have done the trick, except for the 2" vent pipe occupying the same stud bay, so I had to fabricate something solid from six pieces of wood (shown in the photo of the plumbing wall).  The 1" PEX supply line for the flush valve runs down from the attic to the left of the black vent pipe; in the photo the hefty shut-off valve has been inserted into the line.  I can't actually connect the PEX supply line to the flush valve until the urinal is in place (because the precise positioning is still uncertain, and because this particular tight-quarters PEX connection needed special treatment).  I will therefore have to install the cement backer board on the lower half of the wall (up to where the flush valve is located), and tile that portion, then install the urinal, then connect the supply line, then cover and tile the top half of the wall.  Sigh.

Further to the right on the wall, you can see the half-inch PEX supply line running down from the attic for the toilet.  Easy peasy, that.

Frustration, part 2.  Tile.  Lots of different types of tile in the bathroom, but all needing to be pretty much the same shade of white.  Home Depot has a coordinated family of white tile—different sizes and shapes, trim, etc.  But no base cove tile—the lowest row of wall tile that butts against the floor, that curves around to meet the floor with a nice fillet.  Lowe's has those pieces, but a different brand.  Looking for matches.  For next time. 

I also now have the pieces for the pottery studio's built-in stereo (from automotive components).  Maybe I'll also start on that.  Sigh. 

Sunday, December 27, 2015

Master Bathroom — Part 4

This is an update on progress on the master bathroom, which has been my focus for awhile, and that will continue.  It's nice to do work you can see at the end of the day, versus work on water supply lines, electrical, and insulation in the attic that is out of sight (but very important, of course). 

When last I reported on work on the shower, I had taken a break after struggling with intractable concrete work (I thought I had been done with it!).  As you may recall, the drain piece that came with my shower pan kit had to connect with the 2" drain pipe a few inches below the surface, and needed a nominal 4" diameter hole around it for clearance (or so the instructions said).  My initial attack looked like this:


Trying to dig out the concrete with a cold chisel and hammer wasn't working, so it was back to the brute force method of cutting out a big hole with the old diamond-bladed circular saw. 


You'll note the thick dust, that, notwithstanding my best countermeasures, spread a thin coating throughout the rest of the house.  Full-face respirator required while sawing the 2" deep cuts.  Then attack with the 20-pound electric demolition hammer. 


The resulting hole was big enough to saw off the drain pipe 2.75" below the surface, using a shortened hack saw blade.  You'll note the 4" diameter sleeve in the photo above, to be placed in the hole before pouring new concrete to provide the requisite clearance around the drain pipe. 


But oh, they lied!  Four inches was not quite enough.  So attack with a router and straight-cutting bit to remove some of the white PVC sleeve.


I was now ready to install the tapered high-density plastic foam shower pan, after spreading thin-set mortar on the concrete floor (using notched trowel).  Easy-peasy.  Then after insulating the walls around the shower (to keep heat in and noise abatement), the cement backer board started going up.  Special screws used.


The ceiling doesn't get tile (just paint), so moisture-resistant (green) drywall was installed there (after more insulation).  The six 3'x5' sheets of 1/2" cement board I had went fast, so I turned to filling the walls at the other (vanity) end of the bathroom with plumbing, electrical, and insulation.


A couple of stainless steel grab rails are going in the shower, and those must be attached with long screws anchored in solid wood (no drywall inserts for that).  So that reinforcement was added before the cement board went up, and yes, it will be nice to remember where that is after the tile is all on, so I measured, wrote the measurements on the wood, and took photos.  Documentation.


So this is what the shower looks like now.  You can see the shower drain part that will be mortared and glued into the drain pipe.  You can also see sitting on the floor the plastic curb that will be mortared to the floor at the front of the shower pan (it has to be shortened a wee bit first). 


At the left of the photo, the side wall has been covered with drywall; it has a lot of screws in it covered with smudges of joint compound.  That's because it is not screwed to a solid stud wall, but rather to a pocket door frame—somewhat flimsy in a wall that's just 4.5" thick with room for a door inside.  So on both sides of that pocket door frame, I've screwed 3/4" plywood to the back of the drywall.  That stiffens the wall a lot, and on the bathroom side, will allow me to screw towel racks into something solid.  No drywall inserts here either. 

This next photo is of the other end of the bathroom—the vanity end, the outside wall end, the window end.  The drywall is up and painted.  I did this early so I could install receptacles and switches in the electrical boxes, so I could use them during the construction. 


I also painted the ceiling, so I could finish the heating/cooling register (new duct installed in the attic), and the two recessed lights (no trim rings yet).  I'm going to put up crown molding in the bathroom (nowhere else), just for fun.  The two lights are on dimmers; one also motion controlled.


The fourth wall still needs a mess of plumbing; I placed an order from SupplyHouse.com today to do that—that's where I get all my PEX materials.  Home Depot sells some PEX stuff, but it's for the crimp connection method, and I use the expander method, which requires special PEX-a tubing and ProPEX fittings.  


 I also bought more cement backer board today, so I can finish covering the shower area.  I need to go shopping and make some decisions about tile details.  Cement board will also go on the bottom half of the wall in the photo above (after plumbing is done), where tile will go.  Paint and regular drywall goes on the top half. 

The heavy base for the vanity cabinet goes in soon, and I may just build that cabinet while I'm at it, since I have the plywood on hand.  We'll see. . .

Happy New Year!


Saturday, December 12, 2015

Master Bedroom — Part 1

I’m now working on the new master bedroom, master bathroom, and new water supply system (mostly in the attic), all concurrently.  For the sake of clarity, I’m going to do separate posts on each of those over the next few months (more than one post each).  Since I’m starting to focus mostly on the bathroom and water supply lines, this post will be about work to date on the bedroom, and the complications associated with its expansion.

The master bedroom that came with the house, as you may recall, is now the home theater.  I’m turning one of the other smaller bedrooms (12’ x 9’) into the new master bedroom, by connecting the original adjacent communal bathroom directly with the new master bedroom (with a pocket door), and by moving one of the bedroom’s walls by two feet (into the garage), making the bedroom large enough to accommodate my California queen size waterbed (longer than a standard queen).  The expanded bedroom will be 12’ deep by 11’ wide. 

Here is the original floorplan, and the new plan:


Working on the new bedroom, and considering the incursion into the garage, I had to make some decisions (now) about the future of the garage.  Here is a photo of the area in the garage that will be annexed by the bedroom.  Note the old water heater that will be removed when the new water heater takes over (the wall therefore can’t be relocated until the new water system is done).  When I said I planned to take over two feet of space, that is actually between 20” and 25”, depending on how I deal with the constraints, and when. 


I could move the wall 20” as soon as the water heater is gone.  I could move the wall 22” if I also add some structure in the attic and move the bracket that holds up the back of the garage door rail.  To gain more than 22” width in the bedroom, I would need to move the garage door railing; in other words, move the garage door.  That is not practical, of course, if the garage stays fundamentally the same. 

The garage was originally much deeper.  One of the earlier owners added a four-inch concrete slab to the back of the garage, and a partition wall, to gain another bedroom (my workshop/music room-to-be).  (The previous owner actually put down carpeting in the front of the garage and was using that as yet another bedroom.)  But as a result, my Honda CR-V will only fit in the garage if the rear bumper is touching the back wall, and then the garage door will just barely close.  Not a good situation, as I need to open the garage door to gain access to the other side of the garage. 

So I had been considering adding to the front of the garage, but thought I could deal with that at some point in the future (thinking I may buy a Tesla Model 3 electric car in 2018, and not yet knowing whether that EV will be longer than the CR-V).  As the short garage bay in any case is a constant aggravation, I have made the decision to add six feet to the front of the garage, and to replace the wide 2-car door with a 9’-wide one-car door, and a window.  I could then move the wall 25".  The plan above reflects the addition on the front of the garage. 

Timing is still up in the air.  To go wider than a 22” bedroom expansion requires that I do the garage addition before the bedroom expansion.  Or I can do 20” or 22” soon and the garage addition later.  Still thinking, but no decision required before the bathroom and new water system are done.    

Back to the bedroom work already accomplished. 

I had mentioned that I removed the short partition wall, started here:


This shows the scars left from that operation.


This next photo shows the result after patching, and adding a new light switch and receptacle, and paint.  I also patched the ceiling where the ceiling fan had been, and added three recessed lights (each with a 10.5 watt LED flood light—very bright; I will need to add a dimmer before moving in the bedroom). 


The north wall of the bedroom also needs work, a complete restructuring to remove the old single-glazed sliding window, and add two high-efficiency Andersen casement windows.  The next two photos show the wall before and after removing the drywall.


No more immediate work on that wall until we get a bit of warmer weather (which could be mid-January; never know around here), because the wall must be removed and a new one built, leaving a very large hole in the house for a day.

Next post will be about the master bathroom; I’ve installed the pre-fab shower pan and will start putting cement backerboard up on the shower walls. 

Friday, November 27, 2015

Master Bathroom — Part 3

Okay, so you were expecting that this post would be about the new kitchen countertop (because that what I said was next), and I really thought it would be.   I did go to Home Depot and order the Corian countertop, gave them a diagram and all the details, and paid them in full.  They said their subcontractor would contact me within a day or two, but that didn't happen for four days, and then the subcontractor didn't seem to have any of the information about the countertop that I had given to Home Depot.  They asked: was this counter for a kitchen or a bathroom, among other things!  (I know Home Depot gave them the information; they just ignored it.)

They also said they would not be able to come out and measure for three weeks!  Disenchanted, I looked up the customer reviews for installed countertops on Home Depot's web site.  The reviews were for all over the country, but the reviews for the local installer were mostly one star out of five!  And one review said they would have given them zero stars if that had been possible.  Lots of nightmare stories.  Incompetence, indifference, lack of ethics.  Botched work.  One review said it took three weeks to get measured, and then another twelve weeks before the counter was actually installed—and even then there were installation problems.

I did not want my own nightmare story, so I cancelled.  I looked at some other countertop contractors, but did not find any that gave me a warm feeling, mainly because I could not find online reviews for most of them.  So I'm going to wait, maybe until January.

In the meantime, my work has been divided over a bunch of projects.

Scraping and painting the eves and fascias outside of the new shop.  Finishing the baseboards in the pottery studio.  More electrical and lighting work.  More work on the PEX water supply lines.  As the title of this post suggests, I'm trying to focus on the master bathroom.  But as the master bedroom shares electrical circuits (for both lighting and receptacles) with the master bathroom, I've also been working on the bedroom.

So where to start?

I wanted to make some visible progress on the shower.  The first step was to install the shower pan, but, well, there was the little matter of the drain coupling.  Way back when I was installing a new drain pipe for the shower, I assumed the drain fitting would be glued inside the 2" drain pipe.  Nope.  The Schlüter KERDI shower system kit I subsequently obtained supplies the pan and drain coupling, and the latter slides over the outside of the drain pipe.  The instructions suggest that for concrete slabs, a 4" sleeve be placed around the 2" drain pipe when the concrete is poured, leaving a gap for the drain fitting.  That would have been nice; what I've got is concrete right up against the drain.  Oops!

Here's what the drain fitting looks like, underneath half of the shower pan (held up so you can see what needs to go below the surface of the concrete).


And this is how I have started to dig out a 3.5" deep hole around the drain pipe (which will need to be cut off 2+ inches below the top of the concrete).  I've been drilling holes in a circle around the drain pipe, with the intention of then using a cold chisel to remove the concrete from around the drain pipe.


It hasn't been working very well, so I've been ignoring it.  When I decide I have to get it done, I'm thinking of getting my little jack hammer out again, and blasting out the concrete, setting in a 4" diameter sleeve, and pouring new concrete.  Sigh.

In the meantime, there was plenty of other work to be done in the bathroom.  For one, running electrical cables and installing boxes for the receptacles and lighting.  Three separate lights, each with its own switch, and two receptacles.  And in this photo, hot and cold water lines for the sink.


I also needed to extend the wiring to two receptacles in the adjacent bedroom, and to the bedroom lights (three recessed cans in lieu of the old ceiling fan light).  Before I could do that, I had to remove a small partition wall next to the door (example of small job escalating).


So that wall is now gone and a new wall switch box installed and cables run.  You'll see photos later.  This photo below shows more wiring for the overhead shower light, and the PEX water supply lines (hot and cold) for the main shower valve, and the lower secondary (identical) dog shower valve.  That valve feeds a quick-release hose fitting, to which a short length of garden hose with a hand sprayer is connected—very convenient for giving the dog a shower with warm water year-round.  You'll see more on this later.  The photo also shows some of the insulation going into the walls around the shower (to retain heat); the whole bathroom will be insulated.  Oh, and I've installed heavy backer boards where the two grab rails will be installed (thinking ahead to when I'm old and decrepit :-). 


So all of these wires and PEX lines run up through the ceiling into the attic.  It gets hot up there when the weather is warm, and during the last few days the temperature has cooled enough for attic work to start.  As I've mentioned before, it's not a nice place, and nothing gets done quickly up there.


The photo above shows the main part of the attic, taken from the garage part of the attic through a large hole I opened up in the partition (after installing a reinforcing beam).  The copper pipes running across the opening will be removed after the new water supply system is operational.  And right in front of this opening, in the garage section of the attic, is an open-at-the-top void space:


This space may have been intended for the furnace (now in the attic, originally in the garage) or the hot water heater (now in the garage), but for whatever reason, it was sealed up on the ground floor.  It will eventually be a closet for the master bedroom, but for now, I have to structurally close over the top before I can run PEX water lines over it.  More on that in a later post.

I have located and started to put in structural elements to support the water supply manifolds at the heart of the water distribution system.  Those manifolds will go in this part of the garage attic, roughly over the water heater and washing machine.  Not real pretty now.


In the photo below, the longer assembled manifold is for cold water, with a 1" line coming in from the water softener, and 1", 3/4", and six 1/2" water lines connecting.  The line at the end of the cold manifold goes to the water heater; the water heater outlet goes into the hot water manifold (the shorter one in the photo).


Not all work here.  On warm days when I need to go to Trader Joe's, I sometimes continue down the coast to the dog beach for a nice break (both for me and Sophie).


Next post?  Who knows?  Probably more of the same.