Every place I've ever lived has been designed for that "average American family," with lots of bedrooms, living room, dining room, family room, etc. The problem was that I was a single person, not an average family. I needed space, but for hobbies, not people. And because I'm over 6'2", bending over to use sinks designed for children was a constant frustration. Over the years, I collected a list of things I would change if I could have my dream house. As I approached retirement, I realized time was running out for that house; it was now or never.


Dreams are not always perfect, however. I could never afford my dream house, a spacious Southern California home overlooking the Pacific Ocean. But I could afford a modest ranch house, with a 20-mile drive to the beach. It was a very long way from perfect, but it had potential.


This blog documents the process of turning that small average house into something that matches my lifestyle. It will be as close to my dream house as I can make it. I'm doing all the work myself to stretch my resources. By not hiring contractors, I can afford high quality materials, and I'll know the job is always done right. The remodeling will be my primary avocation for a few years, even as I try to fit in my writing and other hobbies.


It promises to be an interesting journey, and a challenging one!

Thursday, September 16, 2021

Guest Bathroom — Part 10 (cement backer board, tile, finishing touches)

 Last time (Part 9) I installed the tub fixtures and insulated the walls.  In this part I finish the tub framing, finish putting up the cement backer board, installing the floor and wall tile, and installing three grab bars).  Plus installing the toilet.  

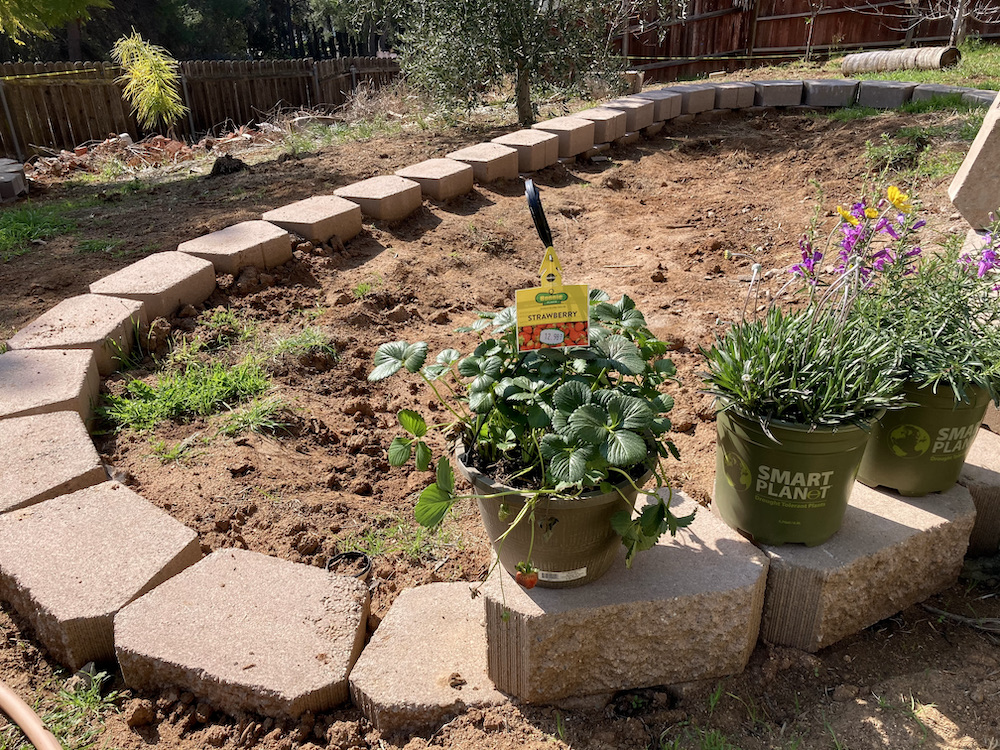
 All of this was actually done a while ago, as I have not been keeping up with my blogging—for this bathroom project, the raised gardens, the failed attempt to get a solar plus battery storage system installed, and currently phase two of the home theater.  Sigh.  

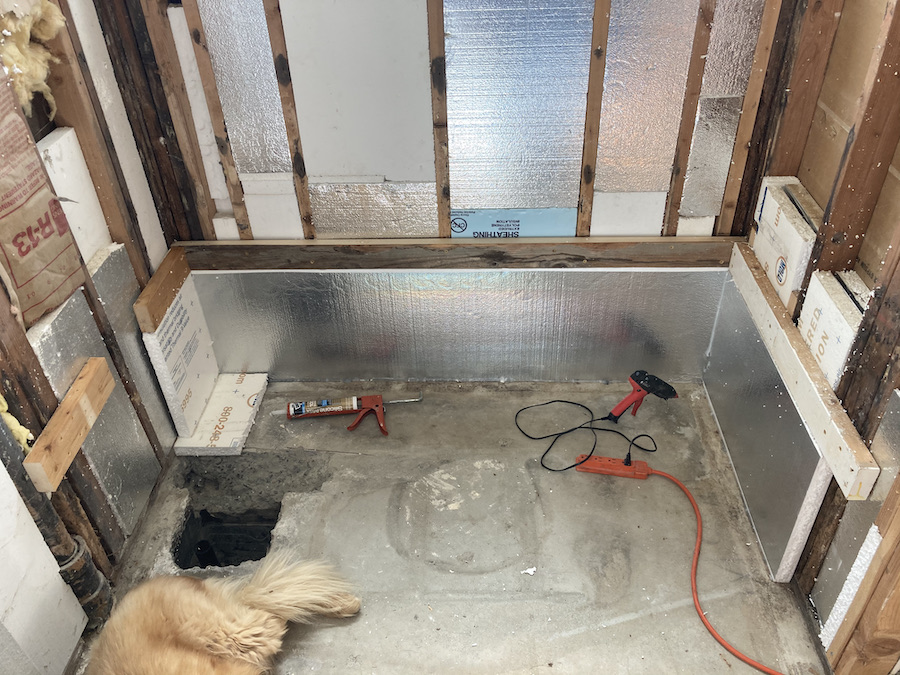
 So we begin, roughly where I left off last time, by framing the front of the tub enclosure, using 2x6s. This front wall is actually not supposed to support the side of the tub, according to Kohler (the tub sits on the concrete floor via a mortar bed), so I made it just come up to the tub edge, accounting for the thickness of the tile. 

With the rest of the backer board installed:

With the backer board on the front of the tub enclosure defining the edge of the floor, the floor tile could be installed.  Whole tiles were used at the front of the bathroom and along the side of the tub—the most visible parts of the floor. 


 Grouting was straightforward—easy on a horizontal surface.  And then the wall tiling began.

While applying thinset mortar to a floor, and spreading it with a notched trowel, is pretty basic, applying it to a wall is complicated by gravity, which wants to distribute the mortar at the base of the wall (on tub edge, finished floor, etc.).  Although perhaps not as fast, I found that applying the mortar to the back of each tile with a notched margin trowel was much easier/cleaner (and fairly quick).


So the wall tile goes up:

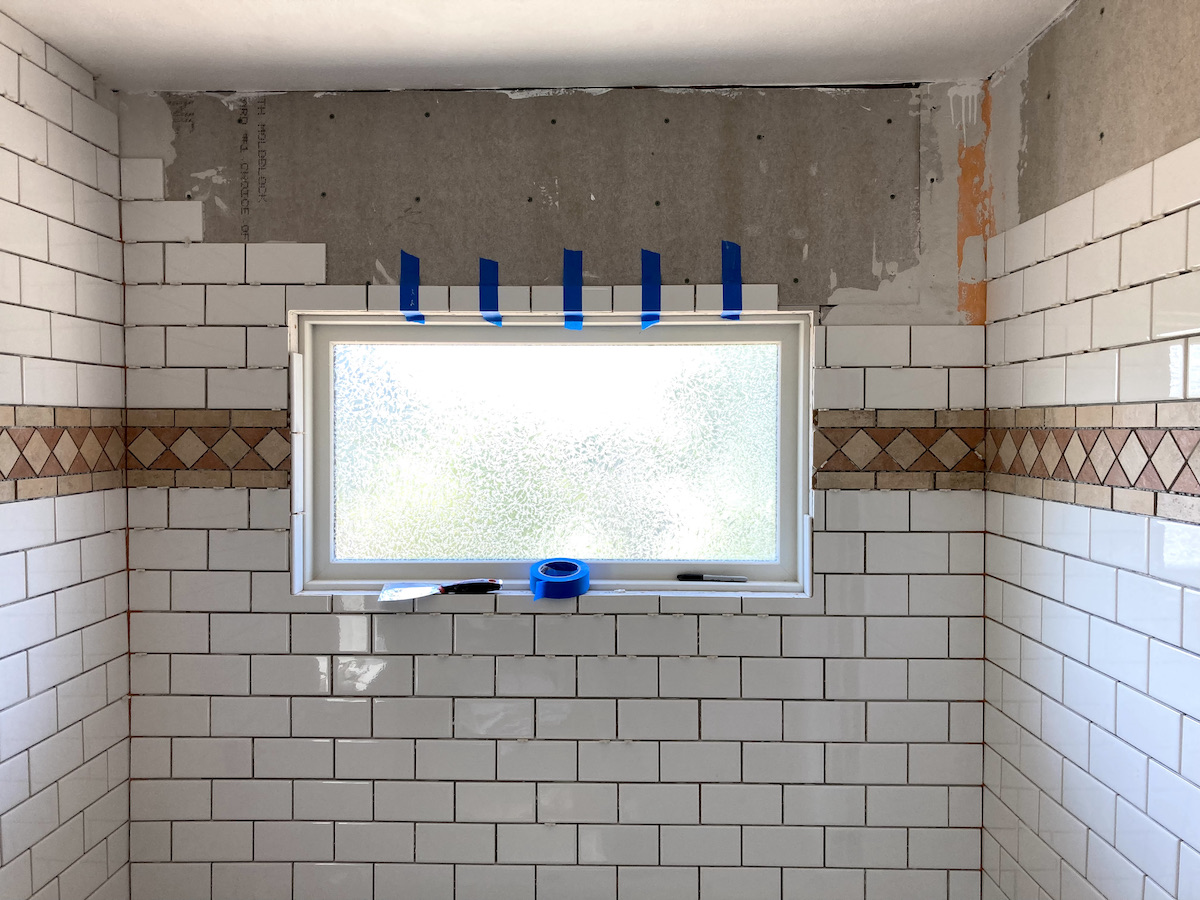
My brother donated the floor tile he had leftover from a project, so I used that for the floor.  He also had matching left-over accent tile, likely to be installed as a floor surround, but I used it instead for a wall accent stripe.  While I was going to use white grout for the white subway tile, the white grout did not work well for the accent stripe.  I ended up using the same tan grout for the stripe as I had used for the floor, matching the tan parts of the accent stripe.  So masking tape was required to keep the tan grout away from the white tile.


This is what the wall looked like after the tan grout was applied, but before the white grout went on. 


I used those little nylon spacers when putting up the wall tile, except at the top of the window, where there was no tile below to hold the tile in place while the grout set.  For that row of tile, I used tape to hold it in place.  Worked well.

So after all the grouting was done, it was time to install the three grab bars, each with six long screws.  It's absolutely critical that these screws go into solid wood under the tile, meaning you have to install backing framing before the cement backer board goes up.  And then you have to know where that backing is located, perhaps weeks (or months) after it's all covered up.  I figure out where I want the grab bars (and buy them ahead of time), and then install the backing wood, and then take a photo (with measurements written on the wood). 

I procrastinated installing the grab bars because boring the holes in the tile for the screws is challenging.  You just can't drill a hole in the tile with a masonry bit and hammer drill, because the bit won't stay put on the glazed surface.  First I used a dremel tool and ground a depression in the surface of the tile to keep the bit in place, then I used a diamond drill (hollow) to get through the tile (spraying water to lubricate).  Bit looks like this:

Then I used a masonry bit to go through the rest of the tile and the cement backer board.  Then a regular wood bit into the wood.  Probably I could have just used the dremel tool to make a depression in the tile surface and gone directly to the masonry bit, but didn't try that (fearing I might crack the tile).  In any case, three grab bars installed, ready to keep me from falling and breaking my hip once I become infirm (?).  Better to install them when remodeling than to attempt later when underlying framing is a mystery.

And not to forget the door trim.


And this is what it looks like today (after new floor installed in the home theater).  (The left half of the bathroom with the vanity and shelves I completed in a past post.)


Saturday, May 29, 2021

Raised Garden Beds — Part 1

 The dirt in my yard resembles concrete.  If we get enough rain over the winter, it almost softens enough to dig, but other than that, if I want to dig a hole, I have to get out my electric jack hammer.  I'm not kidding.  

But I like to grow stuff, and during the last year have channeled much of my home remodeling/renovation efforts to my front and back yards.  In the interest of growing stuff, I have created three raised garden beds and had trucked in a lot of nursery-grade amended topsoil—that is, dirt mixed with compost.  And by "a lot," I mean closing in on a hundred cubic yards of the stuff.  Some of it has been "premium gardening mix" (finely ground redwood bark, peat moss, perlite and compost).

You say that sounds like an awful lot of soil for three raised garden beds?  Well, okay, I'm also in the process of having a retaining wall built at the back of my steeply sloping back yard, and using the topsoil to backfill it level, creating in effect a giant new garden (trees, etc.).  A separate post will be forthcoming on that project after the contractor actually decides to start the work—maybe in a month.

This post is on the first of the official three raised garden beds, to wit, the official "garden."

The garden is located right outside of the back of my house, butting up against a small concrete patio, seven feet by about twenty feet, with rounded ends.  The garden wall is made from retaining wall block, but with the back lip knocked off, because I didn't want a setback.  A setback is good for a retaining wall because it helps support the load, and the lip keeps the block from sliding.  If there is a setback in a circular wall, however, each course is a slightly smaller diameter, and the blocks go out of alignment.  So I used mortar to secure each course to the blocks below it.  

But as they say, a picture is worth a thousand words.  Here's the start:


And this is it with the walls done, before any garden soil was added.  I dug out a good bit of the bad dirt to allow room for more good dirt.

Here it is with about half the soil shoveled in:

After a bit of time passed, things started to grow.  I also built a trellis for my grape vines (that had been in big pots), which did double duty as a frame to support a sun screen.  By the height of summer, the sun is so intense here that it literally scorches the leaves on tomato plants, etc.  Desert plants can take the heat, but not so much normal vegetables.


Here's a view from the end:


I mentioned that I was going to make my sloped back yard level, which means anything growing down slope will be buried in topsoil—not good for tree health.  I have a really nice flowering jacaranda tree I do not want to lose, so I built a retaining wall much like the raised garden, except in reverse.  Meaning the topsoil goes on the outside.  You'll see . . .


And then:


And as I continue to haul topsoil from my driveway to the backyard:


 Until the dirt reaches the top.


So this shows something about just how much new topsoil I'm bringing in—for the time being leaving room for the crew to build the retaining wall (6-7 feet at its tallest).


Friday, May 28, 2021

Guest Bathroom—Part 9 (Installing tub valve, spout, and shower supply lines)

 Last time I installed the tub and its drain lines—a big milestone.  This time I extended the hot and cold water supply lines from the attic down through the bathroom wall, and installed the valve and hardware for the shower and tub spout.  Another milestone.  Going forward, it's carpentry, wall and floor tile, etc. 

Building a new bathroom from scratch is much easier than starting with an old bathroom.  In my case, the bathroom was bounded on two sides by outside walls, and those walls had suffered significant water and insect damage, and had been poorly repaired, so the walls were in bad shape.  The studs were uneven in every respect, with many of them having been reinforced with partial doublers.  The first challenge was to shim out the wall where the plumbing would go, so it would be flat.

 This had to be done first because the hardware had to be positioned relative to the face of the finished wall tile.  Once I had calculated the various shim thicknesses, and installed those, the plumbing could go in. 

The valve body needed to be the first in.


 Then the pex tubing brought down from the lines previously run in the attic to a position above the bathroom ceiling.  I used 3/4" PEX tubing in the attic because the water flow would need to be maximized so as not to take forever to fill a 100-gallon tub.  Unfortunately, the valve body inlets were all sized at 1/2", so I used adapters down to 1/2" pex.

Since this is an outside 2x4 stud wall, I insulated with rigid foam as much as possible.

And then installed cement backer board over it all.  Next I will continue installing backer board and then tile. 


Tuesday, May 25, 2021

My Novels

 I've been taking a break from writing novels during the house remodel, but have five out as e-books (available from Amazon).  I would describe them generally as science-fiction political thrillers—all character driven.  Only $4.99 each.

https://www.amazon.com/dp/B004Q9TZLG 

A Wall Street Journal analysis concluded the last administration's "Moon, Mars, and Beyond" space exploration initiative was motivated not so much to send man to the planets as to send new business to the U.S. aerospace industry. In a bit of prescience, Dreams presents one harrowing answer to the question: What would be the reaction if U.S. dollars were supporting an international space program, and the consortium awarded the most lucrative contract to a foreign competitor?

Charles Xavier Fulton, the U.S. space program manager, is living a thankless existence under the thumb of Vice-President Savage (U.S. space policy czar). For Fulton, the question is: What if all your dreams came true, and then turned into the biggest nightmare of your life?


https://www.amazon.com/dp/B004TH08KC 

Night Frost is set in the recent past.

What if the U.S. unwittingly gave Iran title to the breakthrough technology of the century? What if the only man who can get it back is convinced the transfer was a legitimate business transaction?

Heavy-handed spy-chief Drago sets up brilliant CIA scientist Olcovich in Finland to tempt the Iranians with a bogus room-temperature superconductor, ostensibly to con them out of $billions for its "development." But Olcovich resents his treatment and pursues his own ambitions, leaving Drago in a two-truth clandestine fog. Is the technology real?

Washington lawyer Roger Piersig thinks it is. Recruited by Olcovich to promote the technology, he soon finds himself in the middle of a deadly conflict, pressured by the CIA to betray his new boss. Complicating Piersig's dilemma is the beautiful but headstrong Finnish intelligence agent Lotta Svärd, with her incendiary personal agenda.

Anti-hero Piersig struggles to remain his own man, even as the operatives around him play out their inevitable fates. But when Olcovich finally prepares to move the priceless technology to Iran, even Piersig is compelled to choose sides.


"turned out to be as good as the some of the best-sellers I've read . . . well worthwhile! I look forward to reading more by this author."


https://www.amazon.com/dp/B004KAAYWK 

The Samsara series is based on the dreams subplot in Dreams of the Iklax, a sci-fi/political thriller set in an alternative near-future.

Two-hundred years in the future, a partially deciphered message from an alien race is revealed by Earth's ruling Committee, then ignored. Maverick war hero Fulton, shocked and suspicious, demands a first-contact mission.

Shift five years later: Fulton and three others set out in a small, untested spacecraft, miraculously capable of traversing space-time. Fulton soon discovers they're heading into a galactic war, and realizes they've all been betrayed. They are lost, and the vagaries of space-time have moved them far into the future. There's no going home.

His secretive Diplomatic Corps second-in-command--Rachael, appearing mere minutes before their departure, then reveals the device found planted aboard is some kind of weapon, built to the aliens' specifications. They would know how to use it to save the galaxy from a powerful adversary.

Pressing ahead with their mission amid distrust and shocking revelations, the crew barely survives baffling attacks, then starts to wonder--just who is the real enemy? 


"The surprise was the haunting, parallel plot . . . that left me wanting more. . . . sprinkled with bits of humor . . . made me smile every time. Highly recommended!"


https://www.amazon.com/dp/B004KSQWX2 

Two hundred years in the future, multi-national corporations have grown enough in power and reach to see national governments as obsolete, creating political instability, burdensome rules and uneven tariffs, without any apparent benefit. Even most public services have been contracted out to global monopolies. This includes the World Vids, the source for all news and information. With technology now able to easily generate any virtual reality for the screen, the acceptance of "created" content has become universal. But recently, some of the more perceptive politicians have noticed a disturbing trend in incidents undermining their authority, and it's making them nervous.

Privileged political apprentice Toby Fitzgerald -"Kenshi"- is largely oblivious to all of this. But when he survives a dramatic terrorist attack on the Senate leadership, his investigation to find those responsible makes him a persona non grata with the corporate power elite, and soon plunges him into a world of nightmarish political upheaval.

Kenshi's World is the second novel in the Samsara sci-fi series, taking place almost three decades before Samsara. It spans the eighteen months of escalating terror preceding the global War that took the lives of six billion people.


https://www.amazon.com/dp/B00GFEZ6Z4 

Two-hundred years in the future, with their War to bring all governments into the World Union well underway, a confederation of global monopolies begins to suspect the rumored Resistance might in fact be real.

Fearing their leadership may be threatened, the Committee targets a suspected Resistance expert on sentient artificial-intelligence, Havana-based Margaret Ripley. If she steals the dangled bait--an A.I. uniquely able to exploit her revolutionary software--the Committee thinks it can expose the whole Resistance. Ripley seems willing to risk almost anything to realize her dream of creating a synthetic human. The Committee's operatives are counting on that, having imbued the A.I. trojan horse with insidious spyware and stubborn loyalty.

But when she discovers the ruse, Ripley is determined to turn the A.I. against the Committee by giving her a human physical and emotional consciousness, if only she can keep Johnnie isolated long enough for her humanizing modifications to take hold. That turns out to be easier said than done, even with the help of familiar Resistance veterans.

Ripley's World is the third novel in the Samsara series, picking up a year after Kenshi's World ends, and predating Samsara by about 27 years. 


In the pipeline:

A sci-fi murder mystery, Daughtry's World will be the fourth novel in the Samsara series. Its protagonist is Kevin Daughtry, a detective introduced in Kenshi's World, and a character just too interesting to let go. I'm excited about this one, and am now putting together the scene outline (after filling 100 single-spaced pages with plot elements and character development).

Two hundred years in the future, in the unsettled aftermath of a brutal, global political upheaval, commoner Kevin Daughtry is mysteriously pulled from his Criminal Investigative Service unit to find out who is behind the murders of three apparently ordinary people. It soon becomes clear to Daughtry that someone at the very top of the ruling elite knows secrets about the victims, and does not want that knowledge revealed, even to the corporate bluebloods.

Daughtry soon finds and deciphers a hidden "hit list" that had been in the possession of one of the assassins. Five names. The three who had been murdered, and the fourth: Alfred Donnerly, the head of Burning Rock Interplanetary Development, headquartered in the Helios colony, on Mars. The fifth name was Donnerly's daughter Melissa. She was 41, three years younger than Daughtry, and living in Shanghai.

It isn't clear why either of the two are being targeted, but Daughtry and Melissa very quickly develop a relationship, both emotional and professional. The bond grows after they barely survive an assassination attempt; she becomes his de facto partner in the investigation. What is clear to Daughtry, however, is that if he does not identify those behind the murders, both he and Melissa will be the next victims.

When he decides the answers to the mystery can only be found on Mars, Daughtry reluctantly heads for that planet. It is there that his greatest challenges are waiting for him.


Friday, February 19, 2021

Guest Bathroom—Part 8 (Installing new tub on concrete slab)

I wasn’t expecting the guest bathroom bathtub install to be my next post, as I have been working on a number of outdoor hardscape projects (retaining walls, raised garden beds, walkway, etc.).  But here it is—getting my Kohler 102-gallon soaking tub firmly in place.  A rocky road, it was.

The tub that was in the bathroom when I bought the house was enameled steel, shallow and wide and oval.  It struck me as a tub designed to hold several toddlers for their evening bath—it looked like a small wading pool.  Not a tub that met my needs, as I’m close to 6’3” (184 cm), and when I do want a bath, it’s to soak in hot water when I’m cold and tired—doesn’t help if most of my body is above the waterline.

So I bought a narrower and deep Kohler acrylic soaking tub—a couple of years ago.  It’s been sitting in my home theater, adjacent to the bathroom, since then.  Why?  Because the tub needed to be installed on a concrete slab.  If it was going in over a wooden floor, with access from below, I would have had it in place literally years ago.  With concrete, you have to connect the drain from above, but the tub itself precludes access.

My limited research suggested you’re supposed to assemble the drain pipes with the tub somewhere else using some three-dimensional voodoo measurements, then drop the tub in place and screw the metal top drain fitting (inside the tub) to the part underneath the tub.  Same with the overflow connection.  Yeah, right.  The drain on my tub was not close to the wall, and—by myself—I wasn’t going to try to pop the tub in place, and remove it, two or three times to get all the measurements and pipes precisely glued together.

There was a recess in the concrete under the old wider tub’s drain, but that old drain was some distance from where my new drain needed to be.  So I set to work with my electric demolition hammer (jack hammer) to blast open a new channel in the concrete.  


I discovered there was rebar in the concrete (of course) and cut that away. 


How I was going to connect the tub drain to the house’s drain pipe eluded me, so I started working on something I could visualize, that is, installing more rigid foam insulation and support wood supports.  


Then more insulation to keep the water hot.


And a waterproof membrane to keep any water leaks from soaking and rotting the studs (my renovation uncovered rot in both bathrooms).


Now what?  I thought if I could temporarily position the tub high enough above the floor for access underneath, I could get all the drain pipes measured and in place, then drop the tub down and make one final connection—somehow.  So I installed some shims at each end (about 10 inches of them—25 cm), and moved the tub into place.

The shims:


Moving the tub, on its side, through the doorway:


Tilting it up, resting on the end of the shims:


And then in place.  Unfortunately, my initial measurements of where the concrete slab needed to be opened up to accommodate the new drain were off a little, so I needed to reach in with cold chisel and hammer, etc. to manually chip away more of the concrete.  


I assembled the drain pipe following the directions that came with the Kohler drain kit, but with an elbow to move the drain away from the wall:


At first I assembled a new drain trap to the house’s drain line, with the intent that I would then assemble pipe from the tub drain to line up with that.  But then I saw that there was not enough room for all of that, so I cut it out.   It just wasn’t possible to join two horizontal pipes together.

So I decided to go with the tub and house drain pipe ends to both be pointed down, and I would then connect them with a “U” made up of two elbows connected by a short section of pipe.  For the tub drain part, I would measure and calculate how long the pipe should be after I dropped the tub to its final resting place.


The tub, which holds 102 gallons of water—heavy—needed to be supported on a bed of mortar.  


So in went the mortar, and out came the shims, one at a time.  Then I stood in the tub to seat it in the mortar.


The two down pipes needing to be joined:


Once the tub was in place, I realized there was not enough access for me to see or to get my arm in the hole to glue the connecting pipe in place.  


Bring in the electric jack hammer again to make a bigger hole.


Then I needed to cut a half-inch off the tub drain pipe because it was too close to the bottom of the hole (the PVC elbow did not fit).  Used a compact hack saw for that—tedious.  I test fit the elbows on each down pipe, then cut a wood piece to the exact distance between the two elbows, then used that simple jig to glue the connecting pipe to the elbows, so the “U” section actually fit!  Applied some glue and slid it in place.


 No leaks!


I’m not yet ready to continue with the tub, but when I am, it will be to install PEX hot and cold water supply lines, valve, tub fill spout, and shower head.  Supporting blocks for the grab handles (inside the wall).  Concrete backer board.  Tile.

So happy to have this job behind me.  It’s not perfect, but it will be okay.  Sigh.