Every place I've ever lived has been designed for that "average American family," with lots of bedrooms, living room, dining room, family room, etc. The problem was that I was a single person, not an average family. I needed space, but for hobbies, not people. And because I'm over 6'2", bending over to use sinks designed for children was a constant frustration. Over the years, I collected a list of things I would change if I could have my dream house. As I approached retirement, I realized time was running out for that house; it was now or never.
Dreams are not always perfect, however. I could never afford my dream house, a spacious Southern California home overlooking the Pacific Ocean. But I could afford a modest ranch house, with a 20-mile drive to the beach. It was a very long way from perfect, but it had potential.
This blog documents the process of turning that small average house into something that matches my lifestyle. It will be as close to my dream house as I can make it. I'm doing all the work myself to stretch my resources. By not hiring contractors, I can afford high quality materials, and I'll know the job is always done right. The remodeling will be my primary avocation for a few years, even as I try to fit in my writing and other hobbies.
It promises to be an interesting journey, and a challenging one!
Sunday, August 28, 2016
Master Bathroom — Part 10
More distractions, more delays, but progress, and I'm feeling the approach of major milestones.
First, distraction number one. A puppy has arrived in the household, a new family member. I've always had rescued dogs and cats, and wanted for once to get a puppy, untainted by abuse and neglect and lack of socialization, and the associated behavioral problems that need correcting with a lot of TLC over a long period of time. None of that with a puppy. Oops!
Wrong! Puppies are great, but they require minding and training and socialization and house training. And running interference with my other dog and the four cats. And getting up to take him outside three or four times during the night (and how often during the day?). And the chewing . . . :-( But he does help out at Home Depot :-)
A grand adventure while shepherding him through adolescence! So remodeling work has slowed.
Master bathroom — right!
The vanity Corian countertop finally arrived! First I measured the sink and cut out an opening in the plywood vanity top.
The vanity sits flush between two walls, and as it happens, those walls are not parallel. Fortunately, the opening is wider at the front, and I had the Corian top made to that wider dimension, which meant I would have to taper the sides (narrower at the back). That was done with a router and a top-bearing carbide straight cutting bit.
So, everything routed to close tolerances for a good fit. Unfortunately (again), too close to maneuver the top into position. I discovered the walls in front of the vanity were closer together by a little bit than they were at the front of the top. So more router work, and a bigger gap around the top that needed filling with caulk — more than planned, about an eighth of an inch, but acceptable (and more to the point: unavoidable).
I also had to drill holes for the faucet; the standard holes that the fabricator would have done were too big, so I ordered no holes. Fortunately, Corian can be worked with standard carbide woodworking tools.
Here's the vanity top installed:
The vanity of course screams out for drawers and a door, and I often anguish for drawers all over the house, but as always, higher priority projects must prevail.
Next, the plumbing for the vanity sink: 24" flexible feed lines for the faucet (had to order from amazon), and the drain connection. For the latter, I included an air admittance valve to ensure there were no problems with a slug of water traveling down the drain pulling a partial vacuum that could pull the water out of the trap. The bathroom already has two vent stacks running up through the roof; the air admittance valve makes having a third unnecessary. Looks like this:
You can see the perforations in the valve. Ordinarily, a weak spring keeps the valve shut so that air inside the drain system (sewer gas) cannot enter the bathroom. If a partial vacuum forms inside the drain pipe, however, it pulls open the valve to let air from the bathroom enter the pipe, and the water drains properly.
Here's a photo of the plumbing installed under the sink:
Now all I need is some water for the faucet!
We've had some cool weather the last week that allowed me to work up in the attic in the morning, and the new water supply system is now pretty much done. On the day of the transfer from the old system to the new PEX system, I will have to reroute temporary connections running to the pottery studio sink and the washing machine, and then connect the main 1" supply feed from the pressure reduction valve (where the water comes into the house).
I've also been getting ready to install the new gas line to the water heater, which is a vital part of the new water supply system. I decided to usurp the branch line feeding the gas furnace in the attic, and have obtained the required cut and threaded black steel pipes to do that installation. I'll need another cool morning to do prep work, and then a longer period to shut off the gas and make all the connections. We're heading into a period of warmer weather, so that may not happen for a week.
Since I will have to remove the gas line to the furnace, and I had to clear away the return ducting and part of the intake plenum to lay out the new gas line, it means the furnace has seen its last days (and must be removed — what fun!). Which also means I'm now committed to getting the new heat pump (and new efficient ducting) this fall.
After I get the new water system operational, I will make another go at getting the kitchen countertop fabricated (another big milestone). Once the new PEX water supply system becomes operational, it would indeed be nice to have a functional kitchen sink!
Next time, water?
Saturday, August 6, 2016
Water Softener
If you’re thinking about installing a water softener, keep reading. If not, maybe better to just jump down to the pictures :-)
I did some research before buying my system, but not enough. I just looked at the vendors’ web pages, and the advice they offer for proper sizing, programming, and operation — woefully inadequate. More questions than answers. After making the purchase, I found some forums that were much better.
I think my big mistake was in sizing the system too large. There is just one of me, and I’m not a big water user, but I wanted a good flow rate. A water softener is a big drag on water flow, and if your water pressure is already low, you could end up with some frustrations. Second, you can operate your system to be more efficient or less so. For greater efficiency, you should select a system with a larger nominal capacity than your water use might suggest. Third, you can get by with a smaller capacity system if you regenerate (backflush) more often. And fourth, a large capacity system doesn’t really cost too much more than a smaller one.
The water softener I bought seems to be mainstream. There are simpler (and cheaper) models that contain all the parts in a single container/tank. There are more expensive models with more bells and whistles, including those from name-brand suppliers (Culligan, etc.). Mine is pretty much a generic system from a small internet supplier; these tend to all use the Fleck 5600 SXT electronic controller bundled with the various other pieces needed to complete a whole system.
These systems generally work as follows: hard water comes into the house, enters the softener, where it is routed through a tank containing treated resin beads that bind with the minerals in the water (calcium and magnesium), removing them from the water. The softened water then continues through your house.
Obviously, the resin beads gradually bind with so much mineral that they lose their potency. The electronic controller then isolates the resin tank and uses salt water from a second (brine) tank to flush the minerals off the resin beads, restoring their potency. The salty flush water, loaded with minerals, is then pumped down the drain, and a new cycle starts. This process is called regeneration.
How does the electronic controller know when the system should be regenerated? Older and simpler systems initiate regeneration based on time — say, every week. This works well enough if your use of water is consistent, but a better solution is to measure how much water has gone through your system (using a meter), because that is the real measure of how much of the system’s softening capacity has been used.
The Fleck 5600 SXT uses a meter, but also has a timer backup.
During regeneration (when the salt water is flushing the resin beads) the control valve directs the hard water coming into the house to continue through the system without being treated, so people program the regeneration to occur during the middle of the night, or any time nobody will be using water.
As mentioned, the system uses salt water (brine) to flush the minerals off the treated resin beads. The brine tank must be filled with salt at regular intervals, so this is not an install-and-forget type of thing. You can buy bags of salt from home centers or water treatment companies. There are different kinds of salt — both in the size of salt granule and the chemical composition. The most common and cheapest is sodium chloride (NaCl), the same as table salt, although you could not actually use table salt because the granules are too fine. If you use sodium chloride, you would have to send the flush water down a drain; if you sent it outside, it would kill the plants.
I am going to use potassium chloride because it is environmentally more friendly, and I initially had intended to pump it outside to irrigate my palm trees because I read that potassium is a nutrient that plants like. I had gone so far as to run the flush discharge line out through the wall to the backyard, but overnight while in a semi-dreamlike state, I remembered my calculations on the amount of salt used (close to 200 pounds over the course of a year), and imagined what that would look like next to the discharge pipe after the water evaporated. Especially after ten years. Hmmm. Now it will go down the drain.
Water softeners come in various capacities, expressed in grains of minerals to be removed. Most common are 32,000, 48,000, and 64,000, which is how many grains of minerals they can remove before the system needs to regenerate. How big should you get? It depends on how much water you need to treat, and how hard your water is.
The how much water question is per regeneration cycle. If you have a well, they say you should regenerate every week (about), and if you are on city water (less iron to degrade the resin beads), you should regenerate every two weeks. These seem to be rules of thumb only—a lot of fudging in this business. Since my system has so much extra capacity, I’m going to base my set-up on a three-week cycle (we’ll see how that works out!).
So, say you’re on city water and you plan to regenerate twice a month, and you know how much water you use every month (from your water bill). Let’s assume you don’t plan to treat the water you use outside to water your yard, so subtract that amount (or use a water bill from the middle of winter). Divide that number of gallons by two, which gives you gallons of water per regeneration cycle.
Next, you need to know how hard your water is — that is, how many grains per gallon of minerals. Soft water has no more than 3 grains per gallon; very hard water has more than 10. (My water is extremely hard, with 26 grains per gallon.) Multiply the water hardness in grains/gallon by the number of gallons used per regeneration cycle, and that gives you the number of grains your system must remove. But we’re still not done.
Say you need to remove 32,000 grains of the bad stuff. Choose a 32,000 grain capacity system? Well, no. That system could remove that much hardness, but it would waste a lot of salt. The same system rated for efficient operation would have about half the capacity, so maybe you would then want to buy a system rated for 64,000 grains.
Systems are also rated for flow rate in gallons per minute. Pushing all that water through a tank filled with tiny resin beads really slows down the flow. That’s why I ended up sending unsoftened water to my urinal (which has a very high flow rate requirement). It’s also why I bought a system much bigger than my modest water usage would seem to dictate, although after further research I would have gotten a smaller capacity system (had I to do it again).
Physically, nominal system capacity is determined by the volume of resin beads contained in the main treatment tank. A 32,000 grain system uses one cubic foot of resin beads, 48,000 uses 1.5 cubic feet, and 64,000 grain systems have a tank that will hold two cubic feet of resin beads. Bigger tank, larger diameter, higher flow rate—at least that seemed to be the result.
Anyway, how the system works is a function of how you program the controller, and the instructions that come with the systems, and internet instructions, tend to be over-simplified and generic. It’s a complex subject, and at times my research pointed to more art than science.
There are some things that are important when programming the controller. First is system capacity. A lot of instructions just say enter the nominal advertised system capacity — not very efficient, but the people giving instructions would have to go off on complex tangents to do a good job (assuming they understood the science). They just want to tell you what numbers to enter in their three-minute video. Easy typically wins out over optimum (and complex).
But for efficiency, if you bought a 64,000 grain capacity system (like me), you might want to input something like 40,000 for efficient operation (as an example).
There are a number of other fairly straightforward inputs, and then there are a few more critical items, like brine fill time. Brine fill time is basically how much salt you want to use per regeneration, a measure of efficiency. This is expressed in grains of hardness removed per pound of salt. In California, water softeners must be able to remove at least 4000 grains per pound of salt (although they can be operated much less efficiently). If you operate them carefully, you can achieve significantly greater efficiency. There are limits, of course.
I’m aiming for 5000 grains of minerals removed per pound of salt used. More practically, the calculation will be made for pounds of salt per cubic foot of capacity. I’m looking to use 5 pounds of salt per cubic foot (of resin) capacity (this number comes from internet forums on water softeners; you can do better, but then setting up and operating the softener more efficiently gets to be pretty fussy). Since my system is two cubic feet, that means 10 pounds of salt per regeneration. Brine fill time determines salt usage. One gallon of water will dissolve three pounds of salt, or 3.3 gallons will dissolve 10 pounds of salt. The rated brine flow rate of my control valve (can vary depending on size of nozzle) is 0.5 gallons per minute, so I will program the controller for a brine flow time of seven minutes. So during the regeneration, the controller pumps salt water from the brine tank into the resin tank for seven minutes, introducing the ten pounds of salt (in solution).
If you really want to control how your softener will operate, you have to do these relatively simple calculations. You can actually get into a lot more complexity, or you can just plug in the values that the generic instructions provide. If only there was an app for this . . .
But the ultimate test is in the testing, that is, get a test kit and measure how soft your water is after the softener has been operating for awhile. Measure in the middle of cycle and again at the end of a cycle (just before regeneration), and then make adjustments. Trial and error.
Alternatively, you can hire a local water treatment company to do the whole thing for you.
Sigh.
And now for the good part of this post — the pictures.
This is the set-up; the water softener is in the laundry/utility room, opposite the washer and dryer and water heater. The tall cylindrical tank holds the treated resin, and has the electronic controller on top. The unsoftened water comes down from the attic through the 1" white PEX line on the right and the softened water goes through the PEX line on the left back up to the attic for distribution. The tall rectangular container is the brine tank; this is where you dump the salt (the controller fills the tank with water up to the correct height via a shut-off valve inside the tank).
This is a view from the left side. The air handler for the future heat pump will be installed to the right of the water softener, and there will be a laundry folding table to the left. The controller pulls the brine from the brine tank into the resin tank through the thin black tube you can see to the right of the tank. To the left is the blue PEX line going into the white PVC pipe mounted to the wall—initially out through a hole in the wall to outside discharge. That will now be changed.
The PVC flush line that will get disappeared:
This is the one of the floor drains in the laundry room, with the grate modified by gluing a short section of 2" ABS pipe to it to keep discharge water from splashing on the floor. In this photo, the clear plastic tube is the overflow line from the brine tank (which should never be used unless there is a malfunction of the shutoff valve inside the brine tank). I will soon be routing the flush line into this drain, and after the heat pump air handler is installed, its condensate drain line will also be routed into this floor drain.
This is the control head for the water softener. Once it is plugged in, it will read out the remaining gallons of water before regeneration starts, and other useful information. It is also where you program the controller, using the three buttons.
The next photo shows where the water enters and leaves the control valve. Toward the left, the domed shaped section fastened with four screws and with a gray wire exiting from its top, is the water meter. There are two types of meter — this "paddlewheel" variety and (I believe) a more current and much smaller "turbine" meter. You have to program in which type of meter you have, and the instructions may tell you the wrong one. I think I was sent an older device, and the instructions tell you to program the code for the turbine meter. Be sure to check.
Toward the right is the manual "bypass valve" which allows you to send your water through your house without it going through the water softener. This particular one is plastic and is threaded for 1" pipe — interesting because the vendor advertised that the water softener I ordered would come with a stainless steel bypass valve threaded for 3/4" pipe.
Last photo — I installed a couple of pressure gauges to show both intake pressure and discharge pressure, thereby indicating the pressure drop through the system. The more clogged the resin beads (with minerals), the greater the pressure drop. When no water is flowing through the system, the pressures will equalize (be the same), but when water is flowing, you can read the pressure drop. This is a non-essential addition, but perhaps useful.
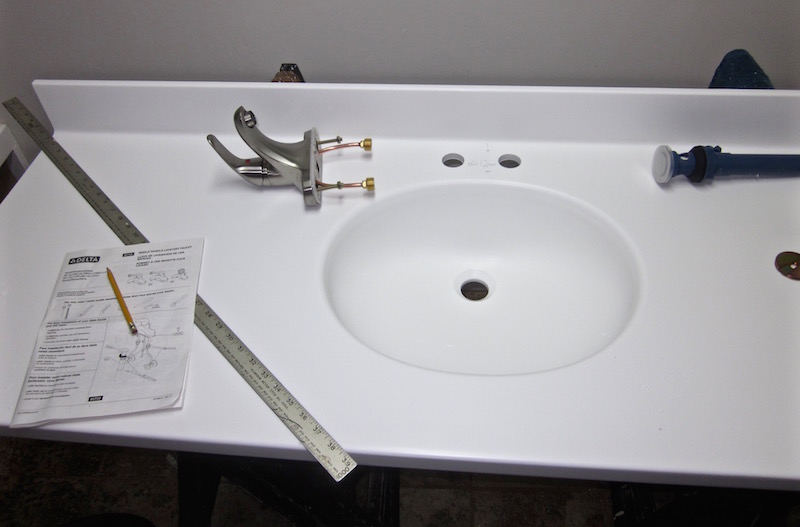
Coming up next: I've ordered the master bathroom vanity top from an internet fabricator (after first getting an estimate from a local contractor — almost 100% higher bid). That should be here in about ten days, maybe. In the meantime I will be working on the water supply system (nighttime temps down to around 60˚should enable some morning attic time), although I just had to order some more fittings, and two of them are back-ordered 3-4 weeks. I'm also going to start working on connecting the gas line for the new water heater — more attic work.
Wednesday, July 20, 2016
Bumps in the Road . . .
I was moving forward with the order for the solid surface material with which I was going to fabricate my kitchen countertop, when I was again met with frustration. The same internet dealer also fabricates Corian bathroom vanity countertops, so I was going to also order those from the same place. (Corian used to sell integral vanity tops in various sizes, but I just discovered they dropped that line sometime in the last year.)
I placed my order for the kitchen countertop — tools and adhesives, plus a full sheet of material and a partial sheet (a remnant), and thought I was set. Next day I got an email saying Formica had reformulated their solid surface material — the whole new sheet would likely not match the remnant (which I needed to extend the top 6" and for the backsplash). What were my instructions?
I cancelled, and after a couple of days decided to buy two whole sheets of the Formica solid surface and use the extra for a couple of other future projects. Each 12-foot by 30" sheet would weight significantly more than 100 pounds.
Delivery to a residence added $110 to the already considerable amount for shipping, so I was looking at close to $400 for shipping alone for the kitchen part of the order! The vanity tops would add more than $400 to that! If I picked it up at the freight terminal I could save the $110 for each part of the delivery.
Rent a U-Haul and pick it up at the freight terminal? But where was the terminal? I asked the sales rep that question and others, but she did not know most of the answers and said she would get back to me "tomorrow."
Never happened.
Now planning to find a local fabricator, but waiting for awhile for my frustrations to abate.
In the meantime, I had my new supply of PEX parts, and did some more work in the attic. But now we've hit a stretch of warm/hot weather, so the attic has become too hot.
I did manage to solve one challenge — the unobtainable marble thresholds. I found a stone/marble contractor that had a remnant room and went to see them. The woman in the front office did not know what a (marble) bathroom threshold was, but I found an almost perfect piece of marble in their back room — 8.5" wide by 33" long (and 3/4" thick). $45. Sold!
I cut it to 31" long, and managed to cut it lengthwise in half using my tile saw. The sliding table had just enough travel, but cutting the bevels on the top edges was something else. I had to remove the sliding table and build a temporary (long) stationary table.
The finish on the bevel was good enough that I did not really need to buy the set of diamond polishing discs ($50) to make the bevel shiny. Not really an issue, because you can't tell without getting down on your hands and knees for a close inspection.
Another task wanting attention was the trim around the bathroom door. My quirky master bathroom has become the repository for my bucket list of architectural fancies — things I've seen on This Old House over the years and wanted to replicate. This retirement house is the last chance I'll have to do that before I die, but for the most part there was no good place for those extravagances. The bathroom, however, is small — perfect for the token flourishes.
The door trim fell victim. Fancy molding and corner medallions!
But the pocket door frame was too thin for finishing nails, so the molding went on with trim adhesive and wood glue. (Oh, goodie — no nail holes to fill!)
With the base medallion glued on, I was able to cut to size and mortar on the last pieces of cove base tile (and then grout them the next day).
This is what it looks like at the bottom, also showing the marble threshold.
And at the top, where you can also see the crown molding (another flight of fancy, to be found nowhere else in the house).
Unfortunately, I was unable to install the door trim on the left side, because it protrudes from the wall. The vanity top has to fit flush between two walls, so anything that sticks out will prevent it from being set into place. (I may even have to temporarily remove one of the electrical receptacles.)
Yes, so waiting to get that vanity top :-(
With the new batch of PEX fittings, I was able to start work on the water softener installation. The main resin bead tank is tall and narrow and will be full of water (that is, heavy). In Southern California, that means attaching it to the wall so it doesn't topple over if we're hit by errant tremors. So build a bracket (later, metal bands around the tank will be attached).
I connected enough of the 1" PEX supply/discharge lines to see how far the tank needed to be from the wall. Black bits sticking out of the back include meter and bypass valve.
Various brackets go on the wall to support the plumbing; more of that to come.
In the photo above is the tall cylindrical tank holding the treated resin beads that the calcium and magnesium ions in the hard water attach themselves to. Every couple of weeks the control valve backflushes the resin beads with salt brine, which washes the calcium and magnesium ions off the resin beads, flushing it out a discharge pipe into the drain (if sodium chloride is used as the salt), or outside if you use potassium chloride (doesn't hurt the plants, but costs more).
The shorter, square tank holds the salt brine. You have to load salt into that container periodically — a consumable. It will be connected to the other tank with a flexible tube.
At this point, it looks like the water softener will get my near-term attention. The next post therefore may be all about that, or not.
Sigh.
Sunday, July 3, 2016
Master Bathroom — Part 9
In the meantime, I continued tiling the master bathroom shower, and have now finished that, so that's what this post is about (more on the kitchen counter at the end). This photo shows, more or less, where the tile was when last I reported:
My routine every morning was to mark the next batch of tile for cutting (either using a tape measure or by holding a whole tile up to its designated position), using a Sharpie marker. I would do a batch of about ten or twelve; beyond that, there would be no installed tiles to measure against. A large portion of the tiles I put up needed cutting, so I didn't do large batches (although a professional would have to keep putting up all day). Then I would take my pile of marked tile out and cut them on my diamond-blade sliding-table wet tile saw ("wet" because it sprayed water on the cut to lubricate and keep the blade cool). Then the cut tile would go back to the bathroom for test fitting, and if needed, go back to the saw for minor adjustments. Then I would mix a batch of mortar, and start putting tile on the wall. When the tile was up, time to clean my tools, then back in to clean up any mortar gone awry.
Next morning, the mortar would be hard. Repeat the process, except when I ran out of tile, when I would do some grouting.
When I was putting tile on floors (big horizontal areas, with mostly whole tiles), I spread the mortar on a fairly large area with a notched rectangular trowel. Bare tile would be set in the mortar (most of the time, although sometimes a thin coat of mortar would be spread on the back of the tile—"back buttering"—if tile adhesion was in question). For the shower walls, with all the cuts and edges, I left the wall bare and spread the mortar on the back of each tile as it went up with a small notched margin trowel. That way, I wouldn't have to scrape mortar off the wall beyond where tile was placed. It worked very well. Neat and tidy.
One of the tricky areas was the shelves, which had concave-rounded cove base tile and convex-rounded bullnose tile. Here, I'm installing those pieces, and will add the flat 4 x 12" filler tile in between after the mortar is dry.
Another place that took a few days to complete (installing a couple of pieces, letting the mortar dry, before adding the next couple), was the inset for the dog shower outlet:
I would work on several small areas in different parts of the shower at the same time, and many of the cut tiles were similar in size, so I lettered the location and the back of its corresponding tile. When I brought my pile of cut tiles back in, I was sure where each piece belonged.
This is what my tile saw looked like, with the red laser line showing where the cut would be made: (having the right tool makes a huge difference!)
I also used diamond hole saws to cut round holes in the tile. I cut the hole for the shower arm before putting up that tile, clamping a piece of plywood with a proper sized hole to the piece of tile to guide the bit. I could then spray water into that recess to lubricate and cool the diamond hole cutter. Without the plywood guide, the hole saw would tend to skip around on the tile's hard glass glaze. The resulting hole was very smooth:
The two grab bars for the shower needed six screws each, and each screw had to penetrate the tile and fasten into the underlying wood backer. A regular masonry bit would work for the cement backerboard, but would have trouble getting through the tile glaze without cracking it — so another smaller diamond hole saw (1/4") was used. I had to drill these holes after the tile was up (and vertical), so it was more important than ever to stabilize the bit until it got started. Here's the hollow bit, and my improvised hole guide (the tape just kept the wood roughly in place; I had to hold it firmly with my left hand until the bit had made a good start):
The stainless steel grab bars have covers that snap over the screws. In this photo you can see the three finished holes in the tile.
So the shower is finished! Hooray! (although still no water supply for it). This is the left side, showing a vertical grab bar and the two shower controls (the one for people on the top, and the one on the bottom is for the dogs).
There are shelves on both sides. The one on the right side is wider (for shampoo, soap, etc.). Although I do not feel the need for grab bars now, this is my retirement home, and eventually (when I'm really old and feeble) I may appreciate them (and better to install them now).
And the whole shower, with compression curtain rod installed:
And the dog shower, for those who have never heard of such a thing . . . The water outlet has a quick-release hose fitting; a short hose with a multi-spray garden nozzle can be easily connected. Works well all the time, but especially in the winter.
What's next? So many projects—it's hard to say. I've just ordered another batch of PEX supplies for the new water supply system; I hope this will give me all the parts I need to complete it. So that's coming up soon. I cleared out the laundry room today to make room for the water softener installation, so that's coming up soon. And I have physical and internet places sorted out to visit to move ahead on the countertops for kitchen and bathrooms (and those pesky, unobtainable marble bathroom thresholds).
The plan is now to fabricate my own kitchen countertop, using Formica solid surface material (instead of Corian brand). Still have a couple of things to check out, but it could save a couple of thousand bucks, and with a better result . . .
Tuesday, June 14, 2016
Guest Bathroom — Part 4
So after installing the new PEX pipes in the wall, and insulating everything, I put up drywall.
You can see the beginnings of the soffit in the upper left of the photo. I could not do more of that until the drywall was up; neither could I install the cabinet base (lower left) until the drywall was in. The soffit would house the heating duct, and because of its structural duties, would be built of plywood. In the photo below, I've installed the old ductwork (you can see the flexible duct going up into the attic). As it turned out, the old metal duct was sized 3.5" x 10", and had been inserted into the top of the wall separating two parts of the old bathroom, with registers exiting both sides of the wall. I didn't think to change to a larger size duct, and that came back to bite me when I discovered there were no 3.5" registers for sale. More on that later.
In the upper right of the photo is the patched hole for the old square light fixture. That will be covered with joint compound, sanded and painted.
With the ductwork securely in place, I fastened plywood to the bottom of the soffit, including a piece of 2 x 4 that would anchor the future partition wall between the vanity and the shelf cabinet. The partition will house the light switches and the electrical receptacle (can't put them on the left side of the vanity because the pocket door fill that wall).
In this followup picture, the window on the right has been trimmed out, and drywall screwed to the plywood soffit. Joint compound has also gone on. The lower edge of the soffit has plastic bullnose corner bead applied; it's designed for right-angle corners, but is flexible enough for larger angles as well — in this case, 120˚. You may notice that my improvised PVC pipe towel rack is still on the wall.
Apply some paint:
By now, I've leveled the cabinet base and screwed it into the wall, and then screwed the vanity cabinet into the base and wall. I then built the open shelf unit carcass (still needs interior paint and cherry trim, as does the vanity cabinet). For now, it's just sitting in place.
Since there was no register that would fit inside the duct, I bought a 6" x 10" return vent grille (smallest size available) and screwed that over the duct. That looks bad, so I will custom build a cherry grille for the duct.
That's where the guest bathroom stands. I need to mill some cherry for the trim on the cabinets, and my planer blades are dull. I have new blades, but can't find the special steel tool to set the blades accurately, so I'll have to build a wooden jig (eventually). I also need the Corian countertop (with integral sink and backsplash), and a larger version of the same for the master bathroom. So progress stops.
Meanwhile, I've been putting up tile in the master bathroom shower. This is where that stands:
The blue tape on the floor is to keep the white grout off the floor tile (and its light gray grout). I need to press the white grout under the cove base wall tile. Close up:
At this point, I can't really do more on the bathrooms (other than shower wall tile) until I get the marble thresholds (that go on the floor under the doors) and the vanity countertops. All of that, as well as the big kitchen countertop, will have to come from the same contractor. I'm hoping I'll be able to find a competent and honest company, not a trivial matter, but that's the next task ahead. Starting tomorrow.
Saturday, May 28, 2016
Master Bathroom — Part 8
Ubiquitous in all public and commercial men's restrooms, but uncommon in residential bathrooms. I suspect the primary reason for this (aside from any Victorian reservations) is manufacturers don't make it easy for home installations. That, an understatement. There was an instruction sheet, but it was so simplistically vague as to be laughable.
I bought a Kohler urinal and a Kohler flush valve, thinking they would work well with each other. Not. I discovered I needed to modify the interface to make them go together (filing and grinding).
I talked to the Kohler technical people, and discovered there were minimum pipe diameter requirements (at least 3/4"), as well as water pressure mandates (at least I had plenty of that). I later discovered in an obscure note in one of the technical sheets that there were also minimum flow rate requirements (a lot more than my water softener would allow). So I ran a separate 1" PEX line to the urinal, upstream from the water softener (which dramatically reduces flow rate).
The technical spec sheets gave comprehensive dimensions for mounting everything, although the critical dimensions were ranges (huh?). It was clear that one specific measurement was required; perhaps the range was to accommodate components from other manufacturers, or different models. Who knows?
Early on I decided on the proper height for the outflow pipe, and that dictated everything that followed. In the photo below, you can see the brass fitting that screwed onto the 2" outflow pipe. The weight of the urinal is supported by two steel hangers, each affixed to the wall with two large screws. But how high should these brackets go, and where exactly did holes for the screws need to be drilled? I checked the dimensions in the instruction sheet, and measured the urinal—they did not jive. So I mounted the urinal on a piece of plywood using my measurements, and then made slight changes. I discovered while the ceramic urinal body was precisely cast, the tabs that hang over the brackets were placed on by hand (before the piece was fired); the left side and right sides ended up at slightly different heights. I made adjustments.
I then transferred the final measurements to a piece of tape, and used a diamond cutter to start the holes through the hard tile surface, then drilled through the tile and cement backboard into the wood support piece.
Then screwed the brackets to the wall.
Hanging the urinal on the brackets, I discovered the brass outflow bracket was a little too high (bolt holes did not line up), so I added a couple of plastic shims to the brackets and everything lined up perfectly! The bottom of the urinal bolts to the brass bracket, compressing a soft gasket around the outflow passage to make a waterproof seal.
I left the white 1" PEX water supply line long and unattached until the urinal was hung. Then I assembled the pieces of the valve and cut the PEX to suit, and connected the PEX line to the valve. Because the PEX line didn't provide a rigid support, I squirted in some expanding foam insulation (trimmed after it cured).
There is a shutoff (quarter-turn ball) valve for the 1" supply line in the wall a couple of feet up, which needed an access door. I installed wooden support pieces for that and then the drywall went up. The metal access door frame screwed into the wood, and joint compound added to blend metal to drywall. (No flushing the urinal for now, until the new water supply system is complete — half-gallon flush.)
Moving right along, finally, I installed crown molding at the top of the wall (only place in the house that gets this molding). I first screwed nailing blocks to the underlying structure.
Here's what the crown molding looks like after some paint.
Before moving back to the guest bathroom, I added the mahogany edge trim to the vanity carcass. With all the work going on, the vanity/workbench got pretty cluttered.
Cleaned off, as occasionally happens:
I did some more grouting, but Home Depot ran out of the 4" x 12" tile I'm using for the shower wall, so the tiling has temporarily come to a halt. But this is a view of the current state of affairs:
I had dreams of building drawers for the vanity cabinet, but thought better of that, since drawer-building could run for a couple of months (if the kitchen and laundry room drawers are included). So the plan is to resume work in the guest bathroom.


