Two more raised garden beds in this post. The first was created by extending the retaining wall I built when I moved here in 2013 to keep my neighbor's yard from falling down into mine (building lots are terraced running up the hill, often poorly). I extended the retaining wall into the back yard, and built it out away from the fence line for more growing area. Specifically, I wanted this bed for my blueberry bushes, which have been living in pots all these years (the ones that survived), as they could not grow in the regular concrete dirt. Sigh.
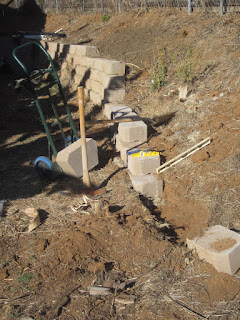
So, here are the first added blocks:
The first course is all the work, digging out a trench of sorts, some gravel, and careful leveling. After the first course has been put down, there is practically no opportunity to correct alignment and level mistakes, so it takes a bit of time, with the usual assortment of tools.
And just plug away at it.
You have to add fill/topsoil as the wall goes up. I placed landscape material behind the wall to allow the water to flow through, but not the dirt. The landscape sheeting is pulled up as the topsoil is loaded in behind the wall.
This is what a truckload of topsoil looks like.
Shoveled into my garden cart by hand and unloaded behind the wall, which grows bit by bit.
Until it's done, more or less.
The plants have gone in since then, and I'm in the long-term process of adding a cap on top of the wall (not a high priority at this point).
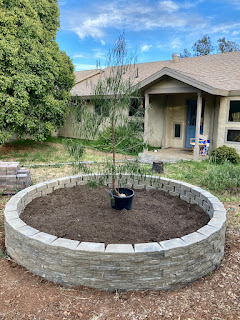
In the front yard I wanted another tree, and wanted to avoid the difficulties of the rock-hard dirt and the voracious gophers (eating roots of whatever is available), so after seeing something similar in a photo of another house, I decided to add a tree island. To wit, a raised circle filled with good topsoil/garden mix, and planted with a tree and other things.
So start by laying out a circle, and leveling it, and adjusting it to take a whole number of wall blocks.
The available block styles were limited; I found something I liked, but it had a lip on the back for stacking into a retaining wall, with each course being set back a small amount to resist pressure from the backfill. But with a circle, if I had used the lip, each course would have a slightly smaller diameter, and hence slightly fewer blocks, or in this case, a fraction of a block. I wanted to have the same diameter, and the same even number of blocks in each of the five courses. So I chipped off the lip with a hammer and used thinset mortar to adhere the courses of block together.
Here it is with the dirt loaded in, and the heat/drought tolerant Australian Willow planted.
A matching cap at some time was manufactured for this block, but was no
longer available. I finally found cap pieces that would look reasonably
well with the block, but they were rectangular. I used my diamond
blade tile saw to angle each end of each block, but could only cut
halfway through at a time—so four cuts for each cap piece. But with
time, all pieces were done, and again, adhered with thinset mortar.
That other greenery is a Southwest Desert Wildflower seed mix I planted, which turned out to be mostly Coreopsis tinctoria, with lesser amounts of about ten other species.
I'm now working on phase two of the home theater; phase one was the first thing I did when I moved here, to give me something to occupy my evenings (phase two a bit more refined). Also building a few more drawers.


No comments:
Post a Comment