Huh?
In the spirit of Jeopardy, the response, in the form of a question, is "This is the second post in a row that was promised to be about progress on the master bathroom shower—but wasn't; what happened?"
Blame it on the Omega Block. That's not a new sci-fi novel I've started, but rather it's a weather phenomenon, a big stationary high-pressure zone, with low pressure areas to the east and west. Circulation around high pressure zones (in the northern hemisphere) is clockwise; around low pressure zones, it's counter-clockwise, so the flow with the high plus two lows is:
This flow is shaped like the Greek letter Omega, hence the name. Well the "block" part is because it prevents storms and such from their normal west-to-east journeys. Those journeys typically follow the jet stream, which because of the block is now shunted to the north, something like this:
So the weather systems that form out in the northern Pacific get routed up to Seattle and parts — that's where the rain is going. But this year we have a strong El Niño that's supposed to be bringing rain and cool weather to central and southern California. It was starting to do that, but the Omega Block formed and is proving to be stronger. Without the block, the jet stream this year would look more like this:
That would take the cool, rainy weather systems down the coast and we would be getting that weather — and we did start feeling the El Niño effects some, but with the Omega Block, not so much. And with the high pressure zone where it is (to our east), the winds have been from the east — those are called Santa Ana winds, and they typically bring warm temperatures and clear skies.
So to the point (at long last), previously I mentioned that I would be installing new master bedroom windows when we got some warm weather here, because I had to remove a section of the outer wall for the better part of a day. Wait for Spring? Well, summer has come early to southern California — February has been dry and warm. Wait, did I say "warm"? Highs in the 80s, with some pushing 90˚ — that's hot! (but nicely cool at night)
Dry? We've been in a years-long drought, but our historical average for February is 3" of rain. We've got nothing so far, and the only rain forecast through the end of the month is a 50% chance of morning showers on the 18th. Where is this El Niño when you need it?
Oh, yeah — the windows.
So at the end of Part 1, I had stripped the drywall off:
On any of these projects, I always make drawings; they don't have to be fancy or to scale, etc. Just something to keep me a little organized. For this project, this was my sketch, and it was a working document. I made changes as I went along.
So after removing the insulation, I worked on framing for the casement window on the right (which I could do without opening the wall, so I did that the day before). I determined which of the old studs could remain, and which had to be removed, and where new parts had to be added.
Then the next day, I removed to the old window, and the heavy header over it, and put in new framing, and sheathing on the outside where needed.
Then the new windows were installed from the outside, with the appropriate membrane flashing. From the inside, this is the result.
From the outside, the process started by removing the old simulated-shingle masonite siding.
It looked like this after the restructuring.
And with the windows installed and flashed, and the first layer of roofing felt installed:
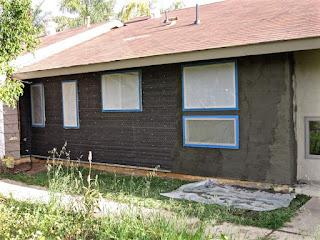
With these last two new windows installed in the front of the house, and with the warm dry weather set to last for weeks, I prepared to apply stucco to the rest of the front wall. First, a second layer of roofing felt, then a metal channel along the bottom of the wall, and two layers of wire mesh (fastened with heavy-duty staples, and furring nails into the studs—these have little spacers which hold the mesh slightly away from the wall). Last, I masked the windows with plastic to keep them clean. The photo shows the start of the stucco going on, right to left. I'll need two coats of stucco, then wait 30 days and finish with two coats of elastomeric stucco paint.
Next post — progress in the master bathroom! Well, maybe, maybe not.


No comments:
Post a Comment