Every place I've ever lived has been designed for that "average American family," with lots of bedrooms, living room, dining room, family room, etc. The problem was that I was a single person, not an average family. I needed space, but for hobbies, not people. And because I'm over 6'2", bending over to use sinks designed for children was a constant frustration. Over the years, I collected a list of things I would change if I could have my dream house. As I approached retirement, I realized time was running out for that house; it was now or never.


Dreams are not always perfect, however. I could never afford my dream house, a spacious Southern California home overlooking the Pacific Ocean. But I could afford a modest ranch house, with a 20-mile drive to the beach. It was a very long way from perfect, but it had potential.


This blog documents the process of turning that small average house into something that matches my lifestyle. It will be as close to my dream house as I can make it. I'm doing all the work myself to stretch my resources. By not hiring contractors, I can afford high quality materials, and I'll know the job is always done right. The remodeling will be my primary avocation for a few years, even as I try to fit in my writing and other hobbies.


It promises to be an interesting journey, and a challenging one!

Wednesday, April 20, 2016

Guest Bathroom — Part 2

I don't think there was actually a Guest Bathroom — Part 1, but I did previously move a wall, insert a pocket door, and replace the window over the tub in that room, so it didn't seem right to call this Part 1.  And why am I working on the guest bathroom anyway, when I once (or twice) said it would be the last project in the house remodel? 

First, I guess because it's the only working bathroom in the house, so it's not like I can ignore its primitive condition.  Second, because I started to work on the new water supply system (again), and felt the need to run the new water supply lines to that water-intensive room.  Third, I wanted to get the last of the heat/AC ducting installed in the guest bathroom—a prerequisite to getting the new heat pump and air handler.  That bathroom register is going in a soffit above the future vanity, and the temporary water line to the toilet (hanging through the ceiling) prevented that installation.

These are the sorts of motivations and hurdles that one encounters in a whole-house remodel.  Sigh.

So I needed to replace the temporary water line to the toilet with a more permanent one run down through a wall.  Because the current water line to the toilet also services the backyard water spigot/faucet, and the latter needs to be separate from the softened water supply, I also needed to run a separate un-softened water supply line from the main water line coming into the house.  To wit:

This is the new wall I built separating the new guest bathroom from the new laundry room, built about 1.7 years ago.  The piece of plywood on the wall is actually what the electrical sub-panel is mounted on (the other side), recessed into the wall.  On the left, you can see the new hot and cold water lines that will feed the new sink; they are covered with pipe insulation, except at the bottom (red and blue PEX).  Hanging down in front of the wall are two electrical cables (to the switch for the overhead light, and to a future GFCI receptacle), and the offending white PEX temporary water supply line feeding the toilet (covered with black insulation toward the bottom). 


And here's a photo of the wall to the right of that.  Note the newly installed casement window (replacing the old, flimsy, single-pane double-hung window).  The major required plumbing work lies mainly behind the toilet, where the supply line for the toilet emerges (on the inside), and where the same line continues to the outside of the wall for the hose faucet.  This is totally inaccessible without removing the toilet, which is not difficult, but hmmn, time is a consideration.  Lines need to be cut, PEX-to-copper adapters need to be soldered, the wall insulated, and then drywall hung, joint compound applied, and the wall painted — all while the toilet is sitting elsewhere.  Did I mention that it's currently the only operational toilet in the house?  I need a plan — a good, fast plan.


This photo shows where the temporary PEX line was connected into the old copper, so long ago.  Now I need to run TWO lines down through the same bay.


And this is the copper behind the toilet — to be replaced:


Here's where the water comes into the house (in the garage).  Since the irrigation system was defunct when I bought the house, and its supply branch line has its own shutoff valve, I am going to use this line to supply the hose faucets in the front and back yards.  The water for the house's domestic/inside supply will be pressure regulated and softened.


Regarding water pressure, I'm assuming the neighborhood system pressure is too high, hence the pressure regulator.  I just bought a pressure gauge; the "regulated" (reduced) pressure measures 68 psi.  That's high; I've read that optimal/normal household pressure should be about 55 psi, so my pressure regulator may be broken.  If not, I can adjust the pressure with the regulator; of course, there will be some pressure drop through the water softener, so that will also be a factor.  Once I run the new "outdoor" lines, I can measure the pressure upstream from the pressure reducer to get a better idea what's going on.  (The gauge I have screws onto a hose faucet.)

Hard water, soft water?  The water here is hard, very hard.  I recently read that water in the San Diego area is the hardest in the country.  Mineral deposits ruin water heaters and other appliances, inhibit soap suds, make the water taste bad (although I'm now used to it), make clothes and hair scratchy, etc.  Calcium and magnesium.

Water hardness is measured in various units.  Water softeners are typically programmed using the archaic water hardness measure of "grains per gallon" (gpg).  "Grains" are a measure of weight, like "stone" used by the Brits for body weight.  Hmmm.  "Gallons" are less archaic, but still baffling.  Water authorities tend to use milligrams per liter (mg/l).  But I digress.  Soft water is defined as having a mineral content of 0 - 3.5 gpg, moderately hard water: 3.6 - 7.0, hard: 7.1 - 10.5, and very hard: 10.6 or higher.  I just bought a water hardness test kit and measured my water: 26 gpg!  Yikes!

I'll have a whole post on the water softener later.

I just received a new shipment of PEX fittings, so no excuse for no progress.

This post is a mish-mash.  Here's some of the mish and the mash.  The outside of the new Andersen window, before I applied the stucco around the outside:


While I was waiting for the PEX parts to come, I worked on vanity carcasses.  This photo shows the one for the guest bathroom, just sitting there (not leveled or fastened); it can't be installed until the pipes go in the wall and the drywall goes up behind the toilet (that wall).  And when the drywall goes up (wall on right side of the photo), I can also finish the soffit and install the heater duct.


And here is the vanity carcass in the master bathroom, fastened to the base and wall, with supply lines and drain pipe in place.  The front will be trimmed with mahogany — with one door where the cubby is painted white; everywhere else will have drawers.  Like the vanity in the guest bathroom, this master vanity will get a white Corian countertop with integral sink and backsplash.  Once I get those, I can make the sink cut-outs in the vanity cabinet tops.


So, near-term, I'll be working on the water supply system, and also hope to resume work on the master bathroom shower tile. 

Tuesday, March 29, 2016

Living Room — Part 2

This is the sequel to The Fireplace Must Go!  With the inside part of the fireplace gone, I rebuilt the west living room wall, adding the missing 3.5" of thickness.  After removing more of the old drywall, I discovered there indeed was a stud wall underneath (not just the chimney).

But first, some updates.  I managed to trim out the new windows in the master bedroom:


And I applied the elastomeric stucco paint to the new outside wall.  Here is a photo of the front of the house when I bought it (summer 2013):


And here is what the new stucco looked like before the two coats of paint:


I sort of liked that look, but the paint nevertheless went on:


Clearly a different look.  New tan shingles will replace the reddish ones, and there eventually will be a small covered porch protecting the front door.

And now back to the new living room wall.  This is what I saw as the old drywall came off:


I also found some severe insect damage, but it was confined to one board (replaced), and there was no sign of insects.


With all the old drywall removed from the recessed section of wall, I built a new 2x4 stud wall flush against the existing wall, and attached to it.  I had to chip away some more fireplace brick that protruded a little too far, and cut and chisel part of the warped header that was over the old fireplace for the same reason.  The whole process was relatively straightforward.


I tacked the wall bracket for the TV onto the studs to show the doublers I had to add so the ends of the wall mounting plate could be lag screwed into solid wood.  It was designed to be attached to two studs, but as it turned out, the center of the base fell squarely on a stud, and it wasn't quite wide enough to span three studs.  While the wall was open, I also wired two new electrical receptacles (obviously there was none in the fireplace, where the TV will now go).  I also ran speaker wire (inside the wall) to where the two surround speakers will go.  They should ideally be mounted on the side wall (or rear wall), but the left wall was crowded and inaccessible, and there was no right wall (open to the kitchen and foyer for the bottom eight feet).  The ceiling is twelve feet high at the right end of the living room, but there is a "wall" between eight and twelve feet.  Because of the difficulties, I chose to mount the surround speakers on the front wall, aimed to bounce their sound off the side walls, such as they are.  A compromise, to be sure, but the living room TV is for casual viewing only, so no biggie.

Moving along.

Walls are for insulation.  Here it's almost all installed, and showing the fireplace underneath.  Later, when I take down the chimney, I will fill in the fireplace opening with studs and insulate, for a total of seven inches. 


The drywall went up.


The corners around the sliding glass door got the bullnose treatment.


The seams and screw heads were filled in with joint compound.


And here is the finished wall (save for a couple of details).


The 52" (for scale) TV is operational, although the main left-right and center-channel speakers are not in place in the photo, and I need to build a suitable low cabinet to house the receiver, blu-ray/CD player, and center-channel speaker.

This is the first time I have wall-mounted a TV.  I used a simple fixed unit, that installed easily.  The wall bracket lag-screwed into the studs.


Two hanging brackets screwed into the back of the TV.


The TV just hangs onto the wall bracket, and a locking bar slides in from the side to keep it in place.

At this point, I would have liked to put down the bamboo flooring in the living room, added baseboard, and called it done.  But before that can happen, the bamboo in the long main hallway has to go in, after all that ceramic tile blasted away.  Not ready to do that.

I've started work on the guest bathroom infrastructure — water supply lines, heating duct, electrical — with the vanity cabinet and adjacent shelves coming along for the ride.  I just bought the new casement window for that bathroom (final new window in the house, except for the garage); that should go in soon.  The back yard's water supply now comes off the same line as the guest bathroom toilet water supply.  I need to run a separate line for that when the wall is open; outdoor water will not go through the water softener (when that is installed).

And work on the master bathroom shower tile continues in fits.

Sigh.

Sunday, March 6, 2016

The Fireplace Must Go!

But why?  Doesn’t everyone like a crackling log fire to take the chill off a cold winter’s night?  Never mind that the fire is sucking all the warm air in the house up the chimney, and to replace that air, sucking in frigid outside air through all the little leaks in the rest of the house.  Never mind having to haul out the ashes.  Never mind that the extra carbon dioxide produced contributes to global climate change.  And never mind that the smoke rising up through the chimney pollutes the air, so on those (mild) southern California winter nights when I take my dog for her bedtime walk in a neighborhood full of fireplaces, I feel like I’m sitting on the downwind side of a campfire. 

But no.  My fireplace is big and ugly, and with its big hearth, occupies a lot of space — space I’d rather use for something else.  And then there’s that strange 3.5” jog in the living room wall, next to the fireplace.


I wanted to make that wall flush across the room (a novel idea?), making the wall thicker in the process for added insulation.  Seems like whoever did the plans didn’t intend such a strange thing.  Seems like the builder might have sensed the opportunity for a short-cut, a chance to save a few more bucks on each of the matching tract houses on the street (3.5” is the width of a 2x4 stud wall).  Whatever the reason that odd jog was there, I was determined from the day I bought the house to make it straight! 


I had not intended to get rid of the fireplace until after more of the higher priority projects had been completed (bathroom, kitchen, bedroom, etc.), but it just sat there in front of me every day — the elephant in the room — taunting me with mocking sarcasm — for years.  Tons of solid brick and mortar, a veritable bastion, always the only thing standing after fire razes a house — it let me know it was not threatened by mere flesh and blood.

An exquisite challenge?  The Berlin Wall was taken down with hammers and cold chisels.  And I had a Makita electric demolition hammer.  Ha!


Still, a daunting task. 

I started thinking I could just remove the front of the fireplace and fill in a short stud wall where that had been, extending down from the wall that must be just above the mantle.  Then insulate and put up drywall and add paint.  Tearing out the back of the fireplace (the base for the chimney) could wait for another time.  But after getting started, I discovered there was no wall back there.  There was just drywall slapped on to the chimney, probably with construction adhesive.  The missing 3.5”?  And so much for insulation.

I continued on, pulling off the bricks that had protruded into the living room, until I could look under and see the damper — jammed open, probably jammed open since the house was built.  It did not close easily, its mechanism clogged with decades worth of crud.  So essentially there has been a big hole in my house during the heat of summer and cold of winter.   Hmmm.


Seemed like a good place to stop.  Probably not wise to remove the base of the chimney while the the part above that was still up there. 

The Chimney Must Also Go

The base from the outside:


The part above:


So up on the roof I went.  The top of the chimney was pretty strong, resisting my attack with hand tools, but my little electric jack hammer made quick work of it.  After a couple of rows of brick were gone, the part below came apart pretty easily.  I was a little surprised to find there was nothing behind the chimney (other than the inside of the house) — no plywood/sheathing, but that was consistent with there being nothing behind the stucco.  Sigh.


With the chimney out of the way, there was a pretty big hole in the edge of the roof that needed filling.  I installed backing lumber to give continuity to the upper and lower sections of the roof edge, and then added some plywood and the missing fascia.


Add shingles and paint, and some badly needed plywood to the wall below:


At this point, I stopped due to two days of rare rain on the way (the Omega Block had moved on and El Niño was again taking control), and covered the open wall with plastic.  Removing the remainder of the chimney will take some planning, since there is no existing wall to separate my living room from the outdoors, once the bricks are gone.

So what’s next?  I’m working on trimming the new windows in the master bedroom.  Running water supply lines to the guest bathroom is also coming up; that will require some other work in the guest bathroom (which had been planned for the end of the remodel).  My structured six-month master plan has fallen apart, but I’m now good with that.  Ad lib is the new plan. 

Master Bathroom — Part 6


 Yes, here it is, finally!  (although yes, it’s a small post, but I wanted to get it off the table, as it were, because it might be some time before there’s more to show) 

When last we left the subject, the master bathroom shower had been lined with cement backerboard, and was waiting for the Kerdi waterproof membrane to go on.

The corners are the most vulnerable places where water can infiltrate into the wall (where planes intersect: two planes or three).  Where two planes intersect (two walls, or wall and floor, etc.), a band of waterproof membrane is applied, using a thin layer of mortar.  Then a sheet of the membrane goes on the wall (or floor), overlapping the corner bands.  In the three-plane corner, there is a pre-formed piece that is mortared in, overlapped by the bands and then the sheets.


So, after the walls were covered, the drain depression in the molded plastic foam shower pan was filled with mortar, then the black plastic ABS drain part was cemented to the underlying 2” ABS drain pipe, while pressing it into the mortar bed—a critical operation.  All good, fortunately.


The 2” hex mosaic floor tile then went down, using thin-set mortar.  The tile came in square-foot sheets, held together with a thin mesh.  There was yet another, smaller drain fitting that had to be installed at the same time.  A little tricky, and the small tiles had to be individually cut to fit properly around the 4” square stainless steel drain cover.


After letting the mortar cure for three days, I grouted the tile with a light platinum gray unsanded grout.  Ordinarily I would have preferred sanded grout for 1/8” spacing between tiles, but the gap between some of the tiles ended up being a little less.  Sanded grout is recommended for gaps 1/8” and larger; unsanded grout is used for 1/8” and smaller gaps.  I tend to leave 1/8” gaps, where either type should work.  (The sand makes the grout stronger; the unsanded is more easily pressed into narrow gaps.)


The floor in the rest of the bathroom will get the same tile and grout color.  I expect to alternate between putting tile on the shower walls, and tile on the bathroom floor.  Probably not logical, but the change is nice.  


Sunday, February 14, 2016

Master Bedroom — Part 2

Blame it on the Omega Block!

Huh?

In the spirit of Jeopardy, the response, in the form of a question, is "This is the second post in a row that was promised to be about progress on the master bathroom shower—but wasn't; what happened?"

Blame it on the Omega Block.  That's not a new sci-fi novel I've started, but rather it's a weather phenomenon, a big stationary high-pressure zone, with low pressure areas to the east and west.  Circulation around high pressure zones (in the northern hemisphere) is clockwise; around low pressure zones, it's counter-clockwise, so the flow with the high plus two lows is:


This flow is shaped like the Greek letter Omega, hence the name.  Well the "block" part is because it prevents storms and such from their normal west-to-east journeys.  Those journeys typically follow the jet stream, which because of the block is now shunted to the north, something like this:


So the weather systems that form out in the northern Pacific get routed up to Seattle and parts — that's where the rain is going.  But this year we have a strong El Niño that's supposed to be bringing rain and cool weather to central and southern California.  It was starting to do that, but the Omega Block formed and is proving to be stronger.  Without the block, the jet stream this year would look more like this:


That would take the cool, rainy weather systems down the coast and we would be getting that weather — and we did start feeling the El Niño effects some, but with the Omega Block, not so much.  And with the high pressure zone where it is (to our east), the winds have been from the east — those are called Santa Ana winds, and they typically bring warm temperatures and clear skies.

So to the point (at long last), previously I mentioned that I would be installing new master bedroom windows when we got some warm weather here, because I had to remove a section of the outer wall for the better part of a day.  Wait for Spring?  Well, summer has come early to southern California — February has been dry and warm.  Wait, did I say "warm"?  Highs in the 80s, with some pushing 90˚ — that's hot!  (but nicely cool at night)


Dry?  We've been in a years-long drought, but our historical average for February is 3" of rain.  We've got nothing so far, and the only rain forecast through the end of the month is a 50% chance of morning showers on the 18th.  Where is this El Niño when you need it?

Oh, yeah — the windows.

So at the end of Part 1, I had stripped the drywall off:


On any of these projects, I always make drawings; they don't have to be fancy or to scale, etc.  Just something to keep me a little organized.  For this project, this was my sketch, and it was a working document.  I made changes as I went along.


So after removing the insulation, I worked on framing for the casement window on the right (which I could do without opening the wall, so I did that the day before).  I determined which of the old studs could remain, and which had to be removed, and where new parts had to be added.


Then the next day, I removed to the old window, and the heavy header over it, and put in new framing, and sheathing on the outside where needed.


Then the new windows were installed from the outside, with the appropriate membrane flashing.  From the inside, this is the result.


From the outside, the process started by removing the old simulated-shingle masonite siding.


It looked like this after the restructuring.


And with the windows installed and flashed, and the first layer of roofing felt installed:


With these last two new windows installed in the front of the house, and with the warm dry weather set to last for weeks, I prepared to apply stucco to the rest of the front wall.  First, a second layer of roofing felt, then a metal channel along the bottom of the wall, and two layers of wire mesh (fastened with heavy-duty staples, and furring nails into the studs—these have little spacers which hold the mesh slightly away from the wall).  Last, I masked the windows with plastic to keep them clean.  The photo shows the start of the stucco going on, right to left.  I'll need two coats of stucco, then wait 30 days and finish with two coats of elastomeric stucco paint.


Next post — progress in the master bathroom!  Well, maybe, maybe not.

Tuesday, February 2, 2016

Pottery Studio — Part 8

Oh me, oh my!

I continue to slug it out with my master bathroom, but trouble getting tile and a marble threshold, and grappling with the water and vapor-proof membrane has been frustrating progress.  Nevertheless, there has been progress, and floor tile in the shower will be going down in the coming days (warmer weather coming so I can roll my tile saw outside with high temps going up to 80˚—ah, southern California!).

So last time I mentioned I might work on the pottery studio's car stereo system, as a nice diversion, and that's what I've been doing.  The components include 1) the speakers mounted in custom boxes built onto the walls, 2) a wall-hung cabinet of shelves, and 3) the car stereo head and power supply built into the cabinet unit. 

First, I designed and built the speaker boxes, an important component for speaker performance.  You don't want the sound coming off the back of the speaker interfering with the sound waves coming out of the front.  There are closed (sealed) boxes, and ported (tuned) boxes.  For simplicity, I went with closed boxes, angled 5˚ inward, and with a 45˚ extension on the side.  A rectangular box is more susceptible to internal resonant standing waves that can adversely affect frequency response. 

I started by cutting out all the pieces of 3/4" plywood.  For both the speaker boxes and shelf cabinet, I managed to construct everything from plywood remnants (left over from other projects), using up almost all of it.  Hooray!


The speaker boxes and shelves are screwed to the studs behind the drywall, so I needed to screw the boxes on before fully assembling them.


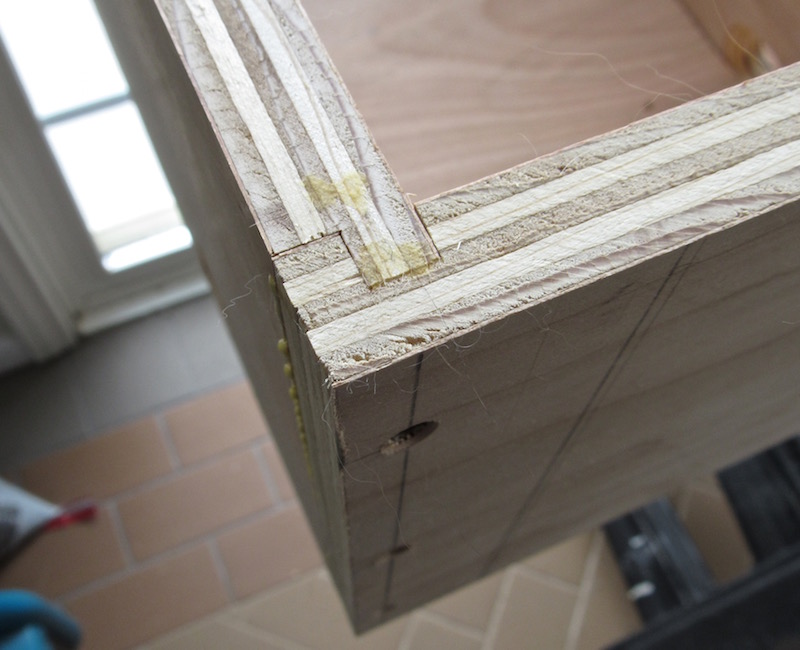
The tongues and grooves on the parts were made so the lower half of the boxes are well supported when assembled to the half screwed to the wall.  Once assembled, the rough boxes were given the joint compound treatment to make them smooth and ready for paint. 


The boxes were then loosely stuffed with a sound absorbing acoustic polyfill.


Next the shelf cabinet parts were cut to size and biscuit slots and tongues and grooves cut.


The next photos show biscuit slots and grooves.


The corners of the cabinet are my usual tongue and groove, fastened with glue and screws.  The shelves are fastened with biscuits, glue and screws.


The assembled cabinet carcass is ready for trim. 


I covered the side with lacewood veneer, fastened with contact cement in the same manner as plastic laminate is glued on.  Then the inside of the cabinet was painted with an eggshell white, except for the stereo compartment, which got blue paint.  I used mahogany for the trim, as the color coordinated well with the lacewood veneer.  The trim, which covers the plywood edge, was fastened with biscuits and glue (no screws).  First on were the long side pieces.


After the side pieces were dry, the trim went on the edges of the shelves.  After all of that was dry and the clamps had been taken off, the front of the trim was machine sanded, then a router used to round over the edges, and then all of that hand sanded.  Then a coat of polyurethane, a light sanding with 220-grit paper, then a second coat of urethane. 


Next the Pioneer car stereo was adapted for its use in the cabinet.  I used a third-party mounting bracket (bought from amazon). 


Then I built a chassis out of wood that could slide in the designated stereo shelf.  The surround was also covered with lacewood veneer and trimmed on one side with mahogany. 


Installed, it looks like this (the 2.5 amp power supply sits on the right):


Here is the final result.  I hung the unit on the wall so I could mop underneath (important to remove the clay dust, which is not good to breath). 


And a wider view:


I didn't really know how it was going to sound, as it's a car stereo in a house, but I was actually blown away — it sounded great, much better than my most optimistic expectations. The speakers are 6" x 9" 3-way Polk Audio speakers.  Being mounted in the corner of the room, the bass response is enhanced.  Being in a mostly bare room with a ceramic tile floor added something.  It will go louder than I want, and the clarity continues at high volumes.  Very life-like sound.  I'm very pleased.  I've just played CDs through the system; I may or may not eventually add an antenna. 

Next post — back to the master bathroom shower.