Every place I've ever lived has been designed for that "average American family," with lots of bedrooms, living room, dining room, family room, etc. The problem was that I was a single person, not an average family. I needed space, but for hobbies, not people. And because I'm over 6'2", bending over to use sinks designed for children was a constant frustration. Over the years, I collected a list of things I would change if I could have my dream house. As I approached retirement, I realized time was running out for that house; it was now or never.


Dreams are not always perfect, however. I could never afford my dream house, a spacious Southern California home overlooking the Pacific Ocean. But I could afford a modest ranch house, with a 20-mile drive to the beach. It was a very long way from perfect, but it had potential.


This blog documents the process of turning that small average house into something that matches my lifestyle. It will be as close to my dream house as I can make it. I'm doing all the work myself to stretch my resources. By not hiring contractors, I can afford high quality materials, and I'll know the job is always done right. The remodeling will be my primary avocation for a few years, even as I try to fit in my writing and other hobbies.


It promises to be an interesting journey, and a challenging one!

Monday, July 22, 2019

Garage Extension — Part 5

The roof is on.  It's been three weeks, so not as long as I thought.  Fortunately the weather has been comfortable, so time on the roof was not bad.  I finished up this morning under mostly cloudy skies which kept the heat away.  Unfortunately, starting this afternoon we're in for HEAT.  Hot during the day, and not cool at night.  It's been going down to about 58˚ F every night so I could open up the house and turn on a big fan; by morning the indoor temperature would be about 68˚.  By 3 p.m. I would turn the air conditioner on, but for just an hour, because at 4 p.m. the summer peak electricity rate goes up to 53¢ per kWh, which is obscene.  Can't wait for the solar panels and battery storage.  Sigh.

But back to the roof.

The first piece I put up was the 4-foot-tall beam supporting the ridge beam.  The ridge beam supports the rafters.  Tall beams (I-beams) are very stiff because the flange strength is proportional to the cube of the distance from the neutral axis (for symmetrical beams, that's half the beam height).  In this case, the beam's "web" is a sheet of 5/8" plywood, and the flanges are, on the bottom, a 2x4 ceiling joist, and on the top, the 2x8 ridge beam.  What matters is that it's unconventional construction but hugely strong.

 
In the photo above the top "flange" (the ridge beam) is not yet in place.  The large piece of plywood lying on the deck (above) will position the ridge beam.  It was cut out from a full-scale layout on my garage floor (derived from the plans I had drawn).


That piece of plywood is the first piece of the center section of the front wall; it will be securely fastened to that main plywood beam with screws and urethane glue.  I used all 19/32" plywood (about 5/8") which is pretty heavy, and trying to lift it into place and fastening it at the same time would be folly, without some temporary cleats to hold it in place (or else it would surely fall to the ground).


Looked like this when it was in place:


The next step was to attach the front rafters, but before that I had to lay out the rafters full scale on my garage floor (as part of the earlier full-size layout).  I then cut the angle on the top of one rafter and the notch on the other end, and used this one rafter as a template for cutting all the others.  It pays to be very precise when making this template.


The ridge beam is set in the notch in the plywood, and then the rafters at the front go on first.


Once this rafter pair is on, I cut and installed the notched studs for the upper front wall (cutting the notches using my table saw).


Then the other rafters can go on.  I marked their position on the ridge beam beforehand, and on the top plates of the side walls as well, so they went on quickly (3" screws and nails).


I cut the rafters long, and cut them off at the ends after they were installed, using a straight edge across the top of all of them, and then a level to plumb a vertical line on each one.  I then cut them off with a circular saw.  The idea is for the 2x6 sub-fascia to line up perfectly with the end of each rafter.  I beveled the top of those 2x6s at the same 22˚ rafter angle.

I screwed another 2x4 to the wall below the rafters, the bottom of which was at the same level as the 2x6 tying the rafter ends together.  The soffit on the sides of the roof will then be fastened to these two pieces of wood.


These two pieces of wood also extend out from the front wall to support the "flying" rafters, which creates the roof overhang.  The ridge beam also extends out the same amount (about 16").  The first rafter pair I installed at the front of the wall were 2x8s (7.5" wide).  I fastened another pair of 2x6 rafters directly to these; the soffit at the front is nailed into the underside of this second 2x6 rafter (the plywood front was fastened to the bottom 2" of the 2x8 that extended below the 2x6).  (Forgot to take a photo to illustrate.)

I installed 2x6 braces/spacers on 16" centers between the inner 2x6 rafter and the "flying" outer 2x6 rafter.  These are absolutely essential to give the overhang its strength, combined with the plywood on the roof (the upper flange) and the soffit (lower flange).  It forms a very strong box structure.


The 2x6 structural members on the periphery of the overhangs are not pretty.  On the outside of these goes 1x8 finished boards.  Besides presenting a nice smooth surface, these boards extend above the 2x6s to contain the plywood roof decking, and extend below to hide the edges of the soffit.


I beveled the tops of the 1x8 fascia boards to the same 22˚ roof angle.  Installing the plywood then becomes easy.  Butt the edges against the inside of the fascia board — no worries about it sliding out of position.

But before I could nail down the plywood, I had to get the heavy sheets up on the roof, by myself.  What worked quite well was to slide the plywood up my fiberglass extension ladder, placed at a relatively low angle against the roof.


While the bottom of the rafters that were over the new part of the garage were fastened to the top of the new extended garage wall, there was no convenient place to fasten them on the angled old roof, so I beveled long 2x6s and placed them to correctly locate the bottom end of the rafters for that part of the new roof (where the old and new fascias met).


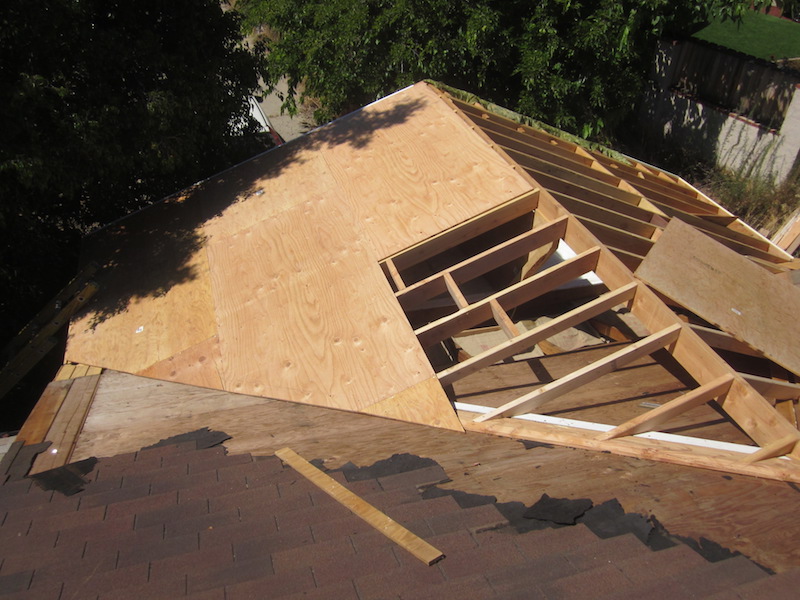
Rafters could then be installed (not notched at the bottom end, but angled appropriately).  Again, I installed 2x6 spacers between adjacent rafters, which distribute point loads on the roof to adjacent rafters (making for a much stronger roof).  Incidentally, the old roof was constructed using 2x4 trusses spaced on 24" centers, with thin plywood (closer to 3/8"), so it tends to be a little springy when walking on it.  By contrast, my new roof has 2x6 rafters spaced on 16" centers with 5/8" plywood, so it's solid.

Before putting the plywood on, I also took the opportunity to install attic insulation on top of the new ceiling, as that part of the attic would not realistically be accessible after the roof is on.  You can see some of the white insulation already installed in the above photo. 

So the plywood and rafters go on:


And with all the plywood on:


And from the front:


Next step is to strip the remaining shingles off the front part of the garage roof, then apply new shingles (after all the preliminaries (roofing felt, drip edge, starter course, etc.).  And then repeat for the back of the garage roof.  Not going to go real fast with the hot weather headed my way.

After that, apply stucco to the walls.  Then finish the inside of the garage.  None of these projects is trivial.  But they'll all get done if I keep plugging away.  Sigh.

Tuesday, July 2, 2019

Garage Extension — Part 4

This is the garage door and opener post.  Will be a short one, since mostly it's just assembling parts and following instructions provided by the manufacturers (and they also now have videos).  Not much point in regurgitating all of that. 

The slower parts are figuring out and executing on the ceiling hangers, from which both the door tracks and the garage door opener are suspended.  The instructions pretty much leave that to the homeowner to figure out.  More on that later. 

The garage door arrived with four door panels, vertical and horizontal track, a spring kit, and a box of parts:


The first step is screw the hinges (and some other parts) on the bottom door section, and then stack it in the door opening.  To prevent it from falling down, you secure it with nails or screws in the door jamb.  These don't go through the door sections, just angled against the edges.  The upper hinges are then screwed into the top edge of the door section, and that section is stacked on top of the bottom section. 


The hinges from the top of the bottom section are screwed into the bottom of the second section.

Repeat that with the third and fourth sections, then insert the rollers.


The vertical track is then fitted over the rollers, adjusted for side-to-side travel, and lag-screwed into the side jambs (the 2x6s installed in the last post). 


Then it gets slightly trickier.  The horizontal tracks are now bolted to the top of the vertical track, but the back ends at this point are just floating in mid-air.  Well, they have to be supported somehow.  I chose to screw some hooks in the ceiling and dangle the ends of the track from these hooks with thin rope.  At this point you manipulate the position of the track ends so that the left and right tracks are level, the same (and correct) distance apart, and square to the front wall (the closed door).  All this so the door can glide up and back on the horizontal track without twisting or binding. 

Then you need to fasten punched metal angle hangers to structural elements (joists) above your ceiling (or if you don't have a drywall ceiling, you can skip the ceiling part 😉 ).  These metal ceiling hangers (the punched angle bars) are made from three pieces.  You can buy the stock and cut to the appropriate length, or do what I did — buy the hanger kit that has the six pre-cut bars and all the hardware (lag screws, bolts, nuts).  I got mine at Home Depot, Clopay brand, same as my garage door).  Then it was just a matter of positioning everything so that it can be securely fastened to the joists above the ceiling, and the bottom hanger ending up exactly where the end of the door tracks need to be. 

So this whole process was tedious but otherwise uneventful.  Lots of measuring and marking lines with a Sharpie.  Photo:


Oh, I forgot to talk about the springs.  I got the torsion spring option with the spiffy electric drill winding mechanism (in lieu of hand-winding with the two metal bar things, which I used to remove my old door).  Follow the supplied directions, look at the video.  More straightforward than doing the hangers. 

But we're not done with those punch angle hangers.  The door opener has to be hung, assuming you're not going old-school like I've been doing for the last six years — manually opening and closing. 

Assemble the opener per manufacturer instructions.  Gets you just about to this point, with the track fastened at the front wall, and the motor assembly propped up on a ladder. 


My new Ryobi opener required very particular placement of the hangers, a placement that did not contemplate joists running front to back (like mine).  So I had to position the drive unit close to the ceiling, then take precise measurements and make all the appropriate marks on the ceiling with my Sharpie.  Then drill holes through the ceiling, so when I went up in the hot attic to add supplemental 2x4 structure, I would know exactly where to put it. 

Then cut all the pieces of steel, screw and bolt everything together, and hope for the best.  Then install a new electrical receptacle above the drive unit (back into the hot attic), so that the motor, radio receiver, pretty lights, etc. would all actually function. 

I installed a garage door opener back in the mid-1980s, and it was a bit simpler.  Now there are safety requirements; the government doesn't want the door to close on any little toddlers or semi-grown-ups, crushing them, so now you have to install safety sensors, one on each side of the door.  If the sensors are omitted or not aligned properly, the door will not operate.  Sigh. 


So here it is, fully functional, with the wireless indoor control pad electronically paired to the opener (by pushing a sequence of buttons).  I still have to pair the car transmitter to the opener's brain.  I'm going to pass on programming the wi-fi elements to work with an app to control everything from your smart phone (as I have no smart phone), and after all, I'm graduating from manually lifting my old door up and down, so that's good progress.  Not sure why a smart phone app would be easier than just pushing a button — maybe so your garage door opener can be hacked. 🙂


It has an LED light that comes on when you enter the garage (like my bathrooms).

All I need now is a roof to keep it all dry.  Once I build the roof, all that wood sitting on the floor of the garage will be, well, the roof, and I'll be able to put my car in there.  Hooray!

Due to some waits for parts during the garage door/opener phase, I've actually started cutting out pieces for the roof, and will start installing those tomorrow.  So there should be some good progress.  The next post will see the roof structure and plywood go up.  Shingles for the post after that.  Hopefully soon after that — stucco on the outside of the new walls.