Every place I've ever lived has been designed for that "average American family," with lots of bedrooms, living room, dining room, family room, etc. The problem was that I was a single person, not an average family. I needed space, but for hobbies, not people. And because I'm over 6'2", bending over to use sinks designed for children was a constant frustration. Over the years, I collected a list of things I would change if I could have my dream house. As I approached retirement, I realized time was running out for that house; it was now or never.


Dreams are not always perfect, however. I could never afford my dream house, a spacious Southern California home overlooking the Pacific Ocean. But I could afford a modest ranch house, with a 20-mile drive to the beach. It was a very long way from perfect, but it had potential.


This blog documents the process of turning that small average house into something that matches my lifestyle. It will be as close to my dream house as I can make it. I'm doing all the work myself to stretch my resources. By not hiring contractors, I can afford high quality materials, and I'll know the job is always done right. The remodeling will be my primary avocation for a few years, even as I try to fit in my writing and other hobbies.


It promises to be an interesting journey, and a challenging one!

Friday, September 17, 2021

Raised Garden Beds — Part 2

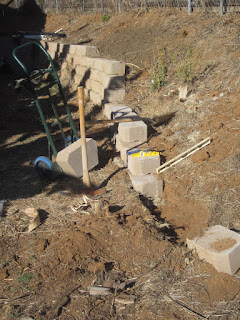
Two more raised garden beds in this post.  The first was created by extending the retaining wall I built when I moved here in 2013 to keep my neighbor's yard from falling down into mine (building lots are terraced running up the hill, often poorly).  I extended the retaining wall into the back yard, and built it out away from the fence line for more growing area.  Specifically, I wanted this bed for my blueberry bushes, which have been living in pots all these years (the ones that survived), as they could not grow in the regular concrete dirt.  Sigh.  

So, here are the first added blocks:


The first course is all the work, digging out a trench of sorts, some gravel, and careful leveling.  After the first course has been put down, there is practically no opportunity to correct alignment and level mistakes, so it takes a bit of time, with the usual assortment of tools.
 

And just plug away at it.
 

You have to add fill/topsoil as the wall goes up.  I placed landscape material behind the wall to allow the water to flow through, but not the dirt.  The landscape sheeting is pulled up as the topsoil is loaded in behind the wall. 

 This is what a truckload of topsoil looks like.


Shoveled into my garden cart by hand and unloaded behind the wall, which grows bit by bit.
 

Until it's done, more or less.
 

The plants have gone in since then, and I'm in the long-term process of adding a cap on top of the wall (not a high priority at this point).
 

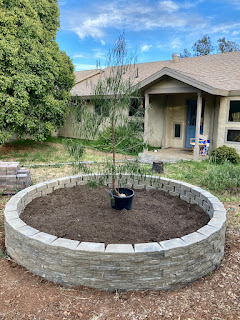
In the front yard I wanted another tree, and wanted to avoid the difficulties of the rock-hard dirt and the voracious gophers (eating roots of whatever is available), so after seeing something similar in a photo of another house, I decided to add a tree island.  To wit, a raised circle filled with good topsoil/garden mix, and planted with a tree and other things.  

So start by laying out a circle, and leveling it, and adjusting it to take a whole number of wall blocks. 


The available block styles were limited; I found something I liked, but it had a lip on the back for stacking into a retaining wall, with each course being set back a small amount to resist pressure from the backfill.  But with a circle, if I had used the lip, each course would have a slightly smaller diameter, and hence slightly fewer blocks, or in this case, a fraction of a block.  I wanted to have the same diameter, and the same even number of blocks in each of the five courses.  So I chipped off the lip with a hammer and used thinset mortar to adhere the courses of block together.  
 

Here it is with the dirt loaded in, and the heat/drought tolerant Australian Willow planted.


A matching cap at some time was manufactured for this block, but was no longer available.  I finally found cap pieces that would look reasonably well with the block, but they were rectangular.  I used my diamond blade tile saw to angle each end of each block, but could only cut halfway through at a time—so four cuts for each cap piece.  But with time, all pieces were done, and again, adhered with thinset mortar.  
 

That other greenery is a Southwest Desert Wildflower seed mix I planted, which turned out to be mostly Coreopsis tinctoria, with lesser amounts of about ten other species.

I'm now working on phase two of the home theater; phase one was the first thing I did when I moved here, to give me something to occupy my evenings (phase two a bit more refined).  Also building a few more drawers. 


Thursday, September 16, 2021

Guest Bathroom — Part 10 (cement backer board, tile, finishing touches)

 Last time (Part 9) I installed the tub fixtures and insulated the walls.  In this part I finish the tub framing, finish putting up the cement backer board, installing the floor and wall tile, and installing three grab bars).  Plus installing the toilet.  

 All of this was actually done a while ago, as I have not been keeping up with my blogging—for this bathroom project, the raised gardens, the failed attempt to get a solar plus battery storage system installed, and currently phase two of the home theater.  Sigh.  

 So we begin, roughly where I left off last time, by framing the front of the tub enclosure, using 2x6s. This front wall is actually not supposed to support the side of the tub, according to Kohler (the tub sits on the concrete floor via a mortar bed), so I made it just come up to the tub edge, accounting for the thickness of the tile. 

With the rest of the backer board installed:

With the backer board on the front of the tub enclosure defining the edge of the floor, the floor tile could be installed.  Whole tiles were used at the front of the bathroom and along the side of the tub—the most visible parts of the floor. 


 Grouting was straightforward—easy on a horizontal surface.  And then the wall tiling began.

While applying thinset mortar to a floor, and spreading it with a notched trowel, is pretty basic, applying it to a wall is complicated by gravity, which wants to distribute the mortar at the base of the wall (on tub edge, finished floor, etc.).  Although perhaps not as fast, I found that applying the mortar to the back of each tile with a notched margin trowel was much easier/cleaner (and fairly quick).


So the wall tile goes up:

My brother donated the floor tile he had leftover from a project, so I used that for the floor.  He also had matching left-over accent tile, likely to be installed as a floor surround, but I used it instead for a wall accent stripe.  While I was going to use white grout for the white subway tile, the white grout did not work well for the accent stripe.  I ended up using the same tan grout for the stripe as I had used for the floor, matching the tan parts of the accent stripe.  So masking tape was required to keep the tan grout away from the white tile.


This is what the wall looked like after the tan grout was applied, but before the white grout went on. 


I used those little nylon spacers when putting up the wall tile, except at the top of the window, where there was no tile below to hold the tile in place while the grout set.  For that row of tile, I used tape to hold it in place.  Worked well.

So after all the grouting was done, it was time to install the three grab bars, each with six long screws.  It's absolutely critical that these screws go into solid wood under the tile, meaning you have to install backing framing before the cement backer board goes up.  And then you have to know where that backing is located, perhaps weeks (or months) after it's all covered up.  I figure out where I want the grab bars (and buy them ahead of time), and then install the backing wood, and then take a photo (with measurements written on the wood). 

I procrastinated installing the grab bars because boring the holes in the tile for the screws is challenging.  You just can't drill a hole in the tile with a masonry bit and hammer drill, because the bit won't stay put on the glazed surface.  First I used a dremel tool and ground a depression in the surface of the tile to keep the bit in place, then I used a diamond drill (hollow) to get through the tile (spraying water to lubricate).  Bit looks like this:

Then I used a masonry bit to go through the rest of the tile and the cement backer board.  Then a regular wood bit into the wood.  Probably I could have just used the dremel tool to make a depression in the tile surface and gone directly to the masonry bit, but didn't try that (fearing I might crack the tile).  In any case, three grab bars installed, ready to keep me from falling and breaking my hip once I become infirm (?).  Better to install them when remodeling than to attempt later when underlying framing is a mystery.

And not to forget the door trim.


And this is what it looks like today (after new floor installed in the home theater).  (The left half of the bathroom with the vanity and shelves I completed in a past post.)