When I first installed it, instructions were not very helpful. Urinals are still not mainstream in residences, so it's a commercial plumber thing. I did talk to the Kohler people who said 1/2" supply lines would be inadequate, and at least 50 psi pressure would be required. So I used a full 1" PEX supply line, and set my water pressure at a fairly standard 55 psi. So far, so good.
But then I found a fine print mention that the urinal flush valve needed a 30 gallon per minute (GPM) flow rate. That would ordinarily not be a problem with 55 psi and 1" supply lines, but I had a water softener. That works by running the incoming mineral-laden hard water through a large tank full of resin beads, which slows the flow rate to just 10 gpm.
The only solution that came to mind was to take the urinal water supply from the line before it passed through the water softener. The downside to that is the minerals in Southern California's very hard water would clog the valves inside the flush unit and also coat the porcelain inside the bowl, allowing stains to stick.
Well, a few years after installing the urinal, the valves did indeed become clogged, and the flushing became ineffective. I had dealt with the staining by using an acid cleaner to dissolve the mineral deposits, but that was a constant cleaning chore. So what to do?
I remembered from a house I owned many years ago, that I had installed a large water pressure tank so the submersible pump did not have to start and stop every time I used some water. Instead, the pump would half-fill the water pressure tank (half air and half water, separated by a rubber membrane). When you turned on a faucet, or flushed the toilet, the air pressure would force water from the tank out the faucet without the pump needing to turn on (until after you used 10 or 20 gallons of water).
With the urinal, I could install a two-gallon pressure tank between the water softener and the urinal. So when I flushed, the pressure in the line would drop a little, triggering the air pressure in the tank to force its water into the supply line, supplementing the inadequate flow from the softener. Since the urinal flush valve only uses a half gallon of water, a two-gallon pressure tank is plenty big.
So where to start?
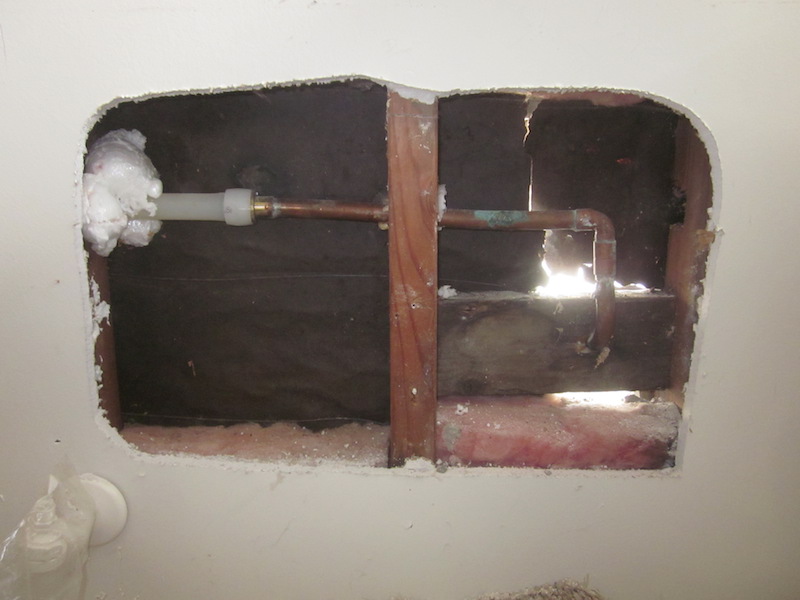
First, plug up the old 1" line upstream from the water softener. It's the line branching off to the left.

Cut it and add a plug.

Next, insert a tee-fitting in the 1" PEX line coming from the water softener, and connect the new supply line to the urinal (it's the one heading off to the lower right).

Then add the pressure tank to that new supply line.

And then just replace all the insulation. Done.
A couple of days after I ordered the parts for that job, I noticed water coming up from between the side of my house in the back where the outside faucet is, and the concrete apron next to that. I also noticed that my water usage for the month of December was about a thousand gallons higher than it should have been. Ouch!
The problems with the PVC irrigation circuit that came with the house were 1) the PVC pipe and its connections are weak, and 2) the outside water supply (irrigation and hoses, etc.) branched off the main water supply pipe coming into the house before it passed though the pressure reduction valve. I had replaced that valve because the one I inherited was broken. The city water pressure is very high (110 psi). I suppose that is desirable if you have a large high-volume sprinkler system (I didn't), but not at all desirable for the integrity of the outside plumbing (my neighbors are constantly repairing leaks).
No doubt this extremely high pressure contributed (or caused) the leak in my back yard water pipes, so I decided to fix the high pressure problem first and then attack the back faucet replacement.
So this is what the water supply lines looked like where they enter my house (in the garage). Most is new I installed; the old copper is at the bottom. Going straight up at the left is the main 1" PEX water line for the inside of the house. On the right going up is the 3/4" PEX supply for the front faucet and continuing up goes to the back yard.

What I decided to do was to run all the water (inside and out) through the one pressure reduction valve rather than adding a second pressure reduction valve for the outside water. ( I decided I was going to set the pressure the same for both, so the one valve was good). So I needed to cap or plug the outside line bypassing the pressure reduction valve, and tap into the main 1" PEX line downstream from the pressure reduction valve (line going up from the valve in the photo) for the new outside water.
Here's a closeup of the old lower section (below). In the best of worlds, the line would be capped close to where it branched out from the main water line coming into the garage (from underneath the concrete slab), at point A. That would involve cutting off the copper pipe and cleaning it up, then soldering on a cap. But that old pipe is a mess, and the inlet pipe can't really be drained of water, so heating up the pipe with a torch would be problematic, and if a problem ensued, the house would be out of water for the duration.
The shutoff valve for the outside water supply (B) leaks, so that was also a problem, but it was going to be replaced in any case. I decided to cap the line in another location, to wit — "C". That's one of the new PEX lines, and easy to plug.

The new PEX water supply is shown in the photo below. The new outside line is now taken off the pressure regulated main 1" PEX line. A new shutoff valve is installed in the cross PEX line, and runs into the outside lines.

So now that the outside water line pressure was under control, it was time to repair the back yard faucet, which was a mess. This was the last bit of the original water supply lines that I had not replaced. Notice the PVC pipe leading down from the broken faucet, into the concrete.

The handle on that old outside faucet had broken off years ago, so I was using another faucet connected to the underground PVC irrigation system (that I never used). A few years ago I dug down a bit to see how much buried PVC pipe was was (there was another faucet at the back edge of the yard). There seemed to be some leakage at that time, but I stopped digging for some reason. But this is the faucet I've been using:

But back to that broken faucet — cut off — and stucco cut open:

On the inside of the wall you can see how I connected (a few years ago) the new PEX line from the garage to the copper pipe feeding the outside faucet:
And here is the replacement supply line, with new faucet:

This photo shows this last new section of the puzzle (before installation):

What it looks like from the outside, installed:

I'm now in the process of replacing the drywall on the inside and adding new stucco to the outside.
Now that my leaky water supply problem is fixed, I can get back to work on the garage.