Every place I've ever lived has been designed for that "average American family," with lots of bedrooms, living room, dining room, family room, etc. The problem was that I was a single person, not an average family. I needed space, but for hobbies, not people. And because I'm over 6'2", bending over to use sinks designed for children was a constant frustration. Over the years, I collected a list of things I would change if I could have my dream house. As I approached retirement, I realized time was running out for that house; it was now or never.


Dreams are not always perfect, however. I could never afford my dream house, a spacious Southern California home overlooking the Pacific Ocean. But I could afford a modest ranch house, with a 20-mile drive to the beach. It was a very long way from perfect, but it had potential.


This blog documents the process of turning that small average house into something that matches my lifestyle. It will be as close to my dream house as I can make it. I'm doing all the work myself to stretch my resources. By not hiring contractors, I can afford high quality materials, and I'll know the job is always done right. The remodeling will be my primary avocation for a few years, even as I try to fit in my writing and other hobbies.


It promises to be an interesting journey, and a challenging one!

Sunday, February 22, 2015

The Washing Machine Makes a Move

When I began work on the new laundry room in earnest, tearing out the old copper water supply lines and digging up the old drain pipes (all in a wall being removed), the washing machine had to go.  Since I wanted very much to continue using it, it had to go someplace with a drain and with a hot and cold water supply.  I had just finished putting in the new drain pipes in what would be the new master bathroom, so that is where the washing machine would go—sitting in the middle of the shower.  I added about 30" of vertical 2" ABS pipe to the shower drain stub (no glue), and ran temporary hot and cold PEX supply lines to that location.  Then I built a dolly to wheel the washer in; it's been there since last August.  (I'll now be able to continue work on that bathroom.)


Here is another look at the new floor plan for the house.  I disconnected the washer and wheeled it out of the new master bathroom-to-be, down the hall, and into the new laundry.  That was the easy part.


The raised platform makes the washer and dryer much easier to use, but getting them up there by myself was less than straightforward.  While the dryer was light enough to push up a makeshift ramp, the washer is much heavier.  I bought a couple of 8-foot 4"x4" posts and cut them into six 32" pieces, and added those to some other wood I had, with the idea of building a crib (not the baby kind) on top of the dolly to give the washer some altitude.  Then I lifted one side of the washer at a time, adding an inch-and-a-half each time, until the washer was even with the platform.  Then I inserted a piece of plywood and some cardboard, and carefully pulled and pushed until the washing machine was in place.  It took most of the morning.


I plugged it in, hooked up the hot and cold water and the drain line.  Sha-zam!  Did a load of laundry.  Fantastic!  (Cheap thrills!  I've been waiting a year-and-a-half for this.  Just wait until I get the master bathroom finished—or the kitchen!)

Friday, February 20, 2015

The New Water Supply System - Part 1

The new water supply system will consist of a new water softener (there is none now), a new high-efficiency water heater (in a new location), and PEX water supply pipes distributing hot and cold water all over the house (replacing copper pipes).  The softened water will go to two new bathrooms, the new kitchen, the pottery studio sink, and to an outside faucet dedicated to car washing (the hard water leaves white spots all over the car after washing).  Water for the trees and other plants will bypass the softener.

I still haven't ordered the water softener, but have decided it will be a Fleck system (more on that later).  There is enough to do now with the water heater and the PEX pipes that the softener can wait for a little while at least.

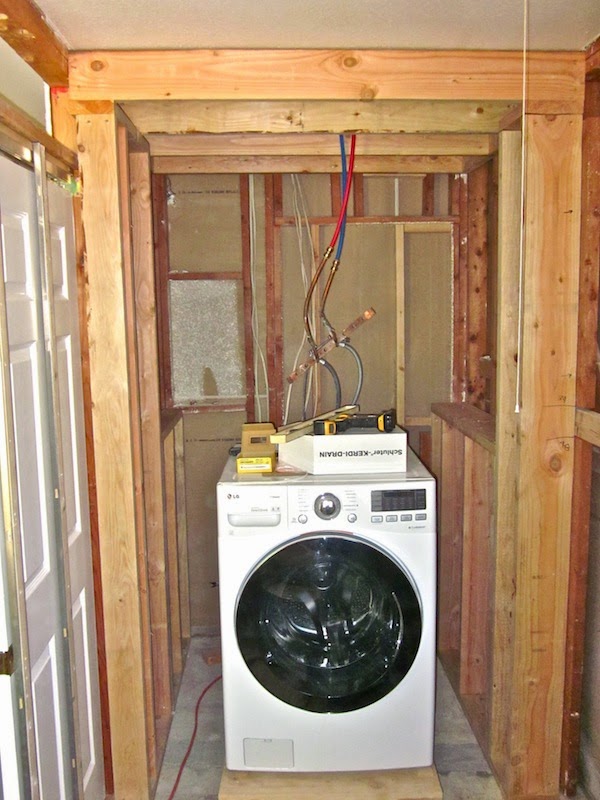
I had planned to complete the new pipe installation before switching over the washing machine (now sitting in what will be the master bathroom shower) and the pottery studio sink (which will be the only sink in the house for awhile), but the plan is now to make temporary connections for those things.  That will take the urgency out of completing the system.  And yes, maybe there needs to be some urgency, but I'm supposed to be retired.  And I don't want to wait any longer for my washing machine to be in its permanent position, and a sink in the pottery studio (my temporary kitchen) will make food prep and cleanup easier.  And with the washing machine out of the shower, it will be a lot easier to run the pipes and install the shower valves.

So, PEX pipes for the washing machine.  I am using a recessed "outlet box" for the washing machine—it contains the hot and cold water valves (quarter-turn ball valves) as well as the drain pipe opening.  You may recall I left the wall uncovered in that spot; here it is with the PEX installed (I've shown the pipes mostly without the pipe insulation; I'm using the insulation for both hot and cold water lines—it's cheap, and cold water should also be protected from temperature extremes.)(You can also see the ABS vent pipe for the washing machine in the same stud bay—to the left.):


And here is a photo of the outlet box, with drywall finished and painted, and the included trim ring installed (and note the opening for the washing machine's discharge pipe):


In the last post you saw the new water heater sitting in place.  Due to the earthquake risk in California, it has to be strapped to the wall.  I built "saddles" to help keep it in place, here under construction:


Here is a photo of the water heater with the metal strap in place, as well as new 2" PVC pipes running up through the ceiling.  They bring in outside air for combustion, and take the just-warm exhaust gases out through the roof.  You can see the electric blower fan on top of the water heater.  It's an extremely efficient unit.  I've temporarily screwed on the color-coded cold and hot flexible stainless-steel water pipes to the top of the water heater (just in case you were wondering about those red and blue things).


The 2" PVC air inlet/exhaust pipes run up through the roof, but they are too close together coming off the water heater, so in the attic, I inserted a couple of 45˚ elbows to put more distance between them.  Of note, I had to order these elbows and the ones I needed for the top of the pipes from amazon; ABS use is customary out here, and Home Depot's selection of PVC fittings was pathetic.  You can also see the black ABS vent pipe in the photo.


Up on the roof, the pipes give the appearance of a spaceship.  The water heater was supplied with special end elbows with wire mesh inside to keep out the birds, and the inlet pipe elbow came fitted with a "wind vane," no doubt to prevent undue pressure fluctuations from strong winds blowing past the opening.


The dark stain under the left pipe opening came from my open can of PVC cement falling over.  The shingles are about due to be replaced, something I will do after the rest of the house is done.

At the end of the last post, as I was starting to build the cabinet for the pottery studio sink, you may recall my plywood had delaminated (Home Depot gave me a full credit).  I had more delivered, and started over.  This is the cabinet under construction in my garage (the car banished to the driveway for a couple of days).


You can see the old water heater strapped to the wall in the background, up on its mandated platform (I suppose because it has an open pilot light, and gasoline fumes were probably common in garages at one time, concentrated down near the floor).

Because of its odd shape, and because much of this cabinet will be open, it has a frame of solid lumber (rather than more typical monocoque plywood construction).  It doesn't look pretty now, but it will be covered with painted cabinet-grade plywood and birch trim.

It's pretty big, and already heavy at this stage, so I decided to move it to the pottery studio to finish it before it became too wieldy.  Here it is on a dolly for the trip around the back of the house to the west side door.


And with a little more work, it's in place in the pottery studio.  It will have conventional sink cabinet doors in front; the side openings will each get a mid-level shelf (and will stay open).  The top will get another layer of plywood, covered with white plastic laminate, and of course, an opening cut for the sink.


You may be wondering (or not) why this cabinet is part of a water system post.  Well, the pottery studio sink (black granite) is now temporarily in the new kitchen (in a temporary cabinet), and is blocking the wall where the new PEX lines need to go for the new kitchen sink (undermount stainless) and dishwasher.  So the water supply line installation cannot move ahead (much) until the pottery studio sink becomes operational.  Don't worry, the topic will come together quickly—this post covers the preliminaries—call it an introduction, if you would.

This next little bit has nothing to do with the water system, but it had nowhere else to go (it missed the "Miscellaneous" post).  With the delivery of plywood from Home Depot came more drywall, some of which went up quickly in the main hallway.  Here's the before and after:


I will continue work on the sink cabinet, but I really need to start ordering more supplies:  PEX plumbing fittings and pipe, plastic laminate for the sink cabinet top, the water softener, etc.  I am also feeling an urge to build some more kitchen cabinets, so I need to order the five-foot-wide commercial stainless steel countertop that goes next to the oven (because I need the exact dimension before building the cabinet that supports it).

Until next time . . .

Tuesday, February 3, 2015

Miscellaneous

Nothing major in this post, but often remodeling requires catching up on the details.  And every so often, someone throws a log in the road.  Sigh.

I finally made a list of the little things needed doing—things that kept getting put off.  Putting them on a list (that was staring at me every day) provided the incentive to get them done and off the list.

I had put up new lights in the workshop-to-be, and removed an inefficient heating register in the ceiling.  This left two gaping holes.  Filling them was not a difficult thing, but it was also something that did not bring a significant psychological reward.  No matter.  Done!  Ceiling paint will have to wait for the rest of the room renovation, so now the evidence of the repair is a slight difference in color where the joint compound it.


The ceilings in this house are all mildly hand textured (not the popcorn spray, but something applied with a trowel), so that means a perfectly smooth repair is not appropriate (works for me :-).  The two windows visible in the corner are going to be removed and the wall filled in; the new window will be in the center of the wall on the right, looking out over the back yard.

Now that I have installed many of the new Andersen high-efficiency double-glazed (two-pane) windows with their beefy solid frames, I really notice how awful the old windows are.  They have just one pane of glass, and flimsy aluminum frames.  When I walk in the workshop to clean the cats' litter boxes (under the two windows in the above photo), I can hear the outdoor noises like the windows were open.  If it's chilly outside, you can feel it.  Good windows really do make a big difference!

Moving on to some attic work (how I love it! not!).  I mentioned some time ago that I had planned to relocate the air return register from the hall to the new laundry room.  The furnace was originally in the garage (before someone converted the back half to a bedroom); when they moved the furnace to the attic, they left the old return register where it was and just ran a longer flexible duct, which meandered through the attic, through a partition into the garage attic, and finally over to the old register.  By relocating that register, I was able to shorten the duct by this much:


Full of dust, I might add, because the last owners never changed the thick in-furnace filter, and didn't put a filter in the register (made to hold one).

With all that excess ducting out of the way, it will be easier to run and insulate the new water supply lines.  The new short attic ducting:


And the new return air register (to the left of the new attic access hatch):


The ventilation in the attic was non-existent when I bought the house.  I very quickly installed a wind-turbine ventilator in the roof of the main section of the house, and soon after bought another identical ventilator for the garage attic.  Unfortunately, it sat in its box for about a year before I put it on my new list, even though it was a relatively easy install.  Done!


The new special-order, high-efficiency, forced-air gas water heater arrived at my local Home Depot.  I went to pick it up, and when they brought it out from the back, it was HUGE!  At least the box was.  Even with the bottom of the box cut away (with integral wooden pallet), and the front seats of my CR-V moved all the way forward, it still did not quite fit (and neither did I!).  But with the rear hatch tied down, I made it home.  Took about 90 minutes to get the six-foot unit into place—will take a lot longer to get all the connections made.  And since this is Southern California, I have started building cradles to strap it to the wall—an earthquake measure.


The other project needed before the new water lines go in is the relocation of my temporary kitchen/bathroom sink.  Right now it's in the new kitchen, but it's blocking the unfinished wall where the new water supply lines are going.  I'm moving the big sink to its permanent location in the pottery studio, which calls for the construction of a sink cabinet.

The new free-standing sink cabinet is going in an odd corner, so I first made a heavy cardboard template to use for cutting out the top and bottom of the cabinet.  I put it on saw-horses to get a feel for the size (the finished cabinet will be about 3" higher), and made adjustments.


I then used the template to build the recessed base, after tearing up the old floor tile.


Then used the template to cut out the 3/4" plywood cabinet bottom, except, oops.  The sheet of cabinet grade plywood was showing a couple of small delaminations along one edge, so I cut out my piece from the other side.  I had ordered three sheets of that plywood as part of my last delivery, and the other two sheets also had some delaminations, but I was able to salvage at least half of those other sheets.  Not this one.


Frustrating.  So I will need to take my receipts and photos and go back to Home Depot for more plywood, and drywall, and maybe some concrete backer-board for the new master bathroom.   And hoping they will give me a credit for the bad plywood.  In the meantime, I'm shifting work to the earthquake bracing for the new water heater.

And checking my list.