I wasn’t expecting the guest bathroom bathtub install to be my next post, as I have been working on a number of outdoor hardscape projects (retaining walls, raised garden beds, walkway, etc.). But here it is—getting my Kohler 102-gallon soaking tub firmly in place. A rocky road, it was.
The tub that was in the bathroom when I bought the house was enameled steel, shallow and wide and oval. It struck me as a tub designed to hold several toddlers for their evening bath—it looked like a small wading pool. Not a tub that met my needs, as I’m close to 6’3” (184 cm), and when I do want a bath, it’s to soak in hot water when I’m cold and tired—doesn’t help if most of my body is above the waterline.
So I bought a narrower and deep Kohler acrylic soaking tub—a couple of years ago. It’s been sitting in my home theater, adjacent to the bathroom, since then. Why? Because the tub needed to be installed on a concrete slab. If it was going in over a wooden floor, with access from below, I would have had it in place literally years ago. With concrete, you have to connect the drain from above, but the tub itself precludes access.
My limited research suggested you’re supposed to assemble the drain pipes with the tub somewhere else using some three-dimensional voodoo measurements, then drop the tub in place and screw the metal top drain fitting (inside the tub) to the part underneath the tub. Same with the overflow connection. Yeah, right. The drain on my tub was not close to the wall, and—by myself—I wasn’t going to try to pop the tub in place, and remove it, two or three times to get all the measurements and pipes precisely glued together.
There was a recess in the concrete under the old wider tub’s drain, but that old drain was some distance from where my new drain needed to be. So I set to work with my electric demolition hammer (jack hammer) to blast open a new channel in the concrete.

I discovered there was rebar in the concrete (of course) and cut that away.

How I was going to connect the tub drain to the house’s drain pipe eluded me, so I started working on something I could visualize, that is, installing more rigid foam insulation and support wood supports.

Then more insulation to keep the water hot.
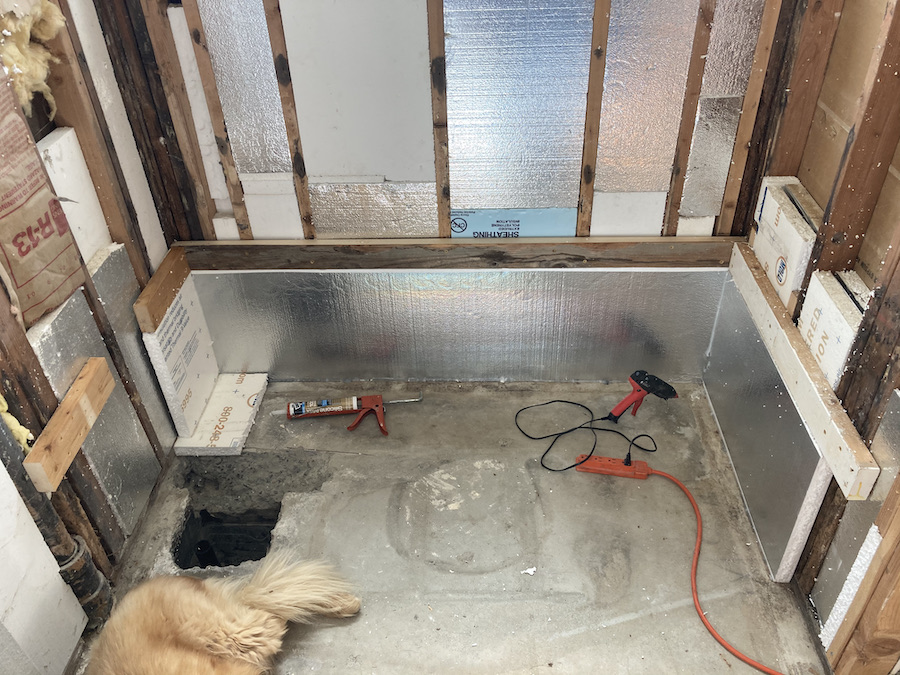
And a waterproof membrane to keep any water leaks from soaking and rotting the studs (my renovation uncovered rot in both bathrooms).

Now what? I thought if I could temporarily position the tub high enough above the floor for access underneath, I could get all the drain pipes measured and in place, then drop the tub down and make one final connection—somehow. So I installed some shims at each end (about 10 inches of them—25 cm), and moved the tub into place.
The shims:
Moving the tub, on its side, through the doorway:

Tilting it up, resting on the end of the shims:

And then in place. Unfortunately, my initial measurements of where the concrete slab needed to be opened up to accommodate the new drain were off a little, so I needed to reach in with cold chisel and hammer, etc. to manually chip away more of the concrete.

I assembled the drain pipe following the directions that came with the Kohler drain kit, but with an elbow to move the drain away from the wall:

At first I assembled a new drain trap to the house’s drain line, with the intent that I would then assemble pipe from the tub drain to line up with that. But then I saw that there was not enough room for all of that, so I cut it out. It just wasn’t possible to join two horizontal pipes together.
So I decided to go with the tub and house drain pipe ends to both be pointed down, and I would then connect them with a “U” made up of two elbows connected by a short section of pipe. For the tub drain part, I would measure and calculate how long the pipe should be after I dropped the tub to its final resting place.

The tub, which holds 102 gallons of water—heavy—needed to be supported on a bed of mortar.

So in went the mortar, and out came the shims, one at a time. Then I stood in the tub to seat it in the mortar.

The two down pipes needing to be joined:

Once the tub was in place, I realized there was not enough access for me to see or to get my arm in the hole to glue the connecting pipe in place.

Bring in the electric jack hammer again to make a bigger hole.

Then I needed to cut a half-inch off the tub drain pipe because it was too close to the bottom of the hole (the PVC elbow did not fit). Used a compact hack saw for that—tedious. I test fit the elbows on each down pipe, then cut a wood piece to the exact distance between the two elbows, then used that simple jig to glue the connecting pipe to the elbows, so the “U” section actually fit! Applied some glue and slid it in place.


I’m not yet ready to continue with the tub, but when I am, it will be to install PEX hot and cold water supply lines, valve, tub fill spout, and shower head. Supporting blocks for the grab handles (inside the wall). Concrete backer board. Tile.
So happy to have this job behind me. It’s not perfect, but it will be okay. Sigh.