Every place I've ever lived has been designed for that "average American family," with lots of bedrooms, living room, dining room, family room, etc. The problem was that I was a single person, not an average family. I needed space, but for hobbies, not people. And because I'm over 6'2", bending over to use sinks designed for children was a constant frustration. Over the years, I collected a list of things I would change if I could have my dream house. As I approached retirement, I realized time was running out for that house; it was now or never.
Dreams are not always perfect, however. I could never afford my dream house, a spacious Southern California home overlooking the Pacific Ocean. But I could afford a modest ranch house, with a 20-mile drive to the beach. It was a very long way from perfect, but it had potential.
This blog documents the process of turning that small average house into something that matches my lifestyle. It will be as close to my dream house as I can make it. I'm doing all the work myself to stretch my resources. By not hiring contractors, I can afford high quality materials, and I'll know the job is always done right. The remodeling will be my primary avocation for a few years, even as I try to fit in my writing and other hobbies.
It promises to be an interesting journey, and a challenging one!
Thursday, December 29, 2016
The Chimney Comes Down
I thought this post would include covering the wall where the chimney had been with stucco, as the weather forecasters were promising a long string of sunny days. But all we got were a few, and then four days of much needed on-and-off rain. The 2.25" we got was very much needed, but that interrupted the chimney work (that and other diversions), and now, after three days of warm sunny weather (80˚ today), we're getting even more rain. So the stucco will have to wait, but this post will not.
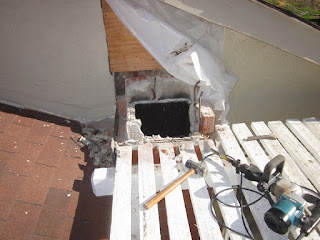
In this first photo, you can see how much of the upper chimney I demolished almost a year ago; it's marked by the plywood that has covered the guts of the house, and the plastic sheeting that has been keeping the weather out. The new demolition resumed just below that.
The major part of the chimney remaining can be seen from ground level — it's a lot of brick and mortar!
Midway through now. I usually loosen some brick with the electric demolition hammer, and then use a full-size crowbar to pry the brick apart (not as exhausting and dusty). I spread this work out over a number of days to let my body recover; it's hard work.
Getting down near the bottom, it wasn't clear exactly what sort of foundation there was. It could be a real challenge, or relatively straightforward — I was hoping for the latter.
I had to cut off the rebar as I went down to the base (always threatening to impale me), which was finally revealed as a poured layer of concrete over a row of the large bricks laid on their sides.
When I got those bricks out, I was surprised to find an empty chamber of sorts, with some cross supports. Rather than hauling the pieces of brick and rubble that I was still pulling out, I started dumping them in the hole.
With the demolition finished, I built the partial rear stud wall needed to fill in where the fireplace opening had been (remembering that I doubled the thickness of the surrounding part of the living room wall). I used a pressure-treated 2 x 4 for the base of that new section of wall.
After adding insulation to the new wall, the 1/2" sheathing went on. Again remembering that the house as originally built had no plywood covering the studs, just wire, roofing felt and stucco! Building standards?
Since I need to buy more roofing felt to cover the plywood (before stucco wire and stucco), and because it's supposed to rain tomorrow, I temporarily covered the plywood with plastic (hopefully not going to be there for another ten months :-). I also need to buy a metal-cutting blade for my angle grinder in order to cut away the steel flashing that was installed around the chimney (nasty stuff):
The new stucco can then be blended in with the old. I also will need to pour new concrete to cover the hole where the chimney had been, level with the patio slab. And there's the matter of disposing of the old brick and mortar :-(
So what's next? After the stucco, or perhaps intertwined? Still working on the master bedroom baseboard, and there's the waterbed base, and the pottery studio cabinets and countertop. And the pottery kiln installation (although when the pottery studio becomes operational, remodeling work could just possibly become intermittent.
And drawers! I'm planning to start building the more than hundred needed drawers this winter! Which will make life so much better.


No comments:
Post a Comment