Every place I've ever lived has been designed for that "average American family," with lots of bedrooms, living room, dining room, family room, etc. The problem was that I was a single person, not an average family. I needed space, but for hobbies, not people. And because I'm over 6'2", bending over to use sinks designed for children was a constant frustration. Over the years, I collected a list of things I would change if I could have my dream house. As I approached retirement, I realized time was running out for that house; it was now or never.
Dreams are not always perfect, however. I could never afford my dream house, a spacious Southern California home overlooking the Pacific Ocean. But I could afford a modest ranch house, with a 20-mile drive to the beach. It was a very long way from perfect, but it had potential.
This blog documents the process of turning that small average house into something that matches my lifestyle. It will be as close to my dream house as I can make it. I'm doing all the work myself to stretch my resources. By not hiring contractors, I can afford high quality materials, and I'll know the job is always done right. The remodeling will be my primary avocation for a few years, even as I try to fit in my writing and other hobbies.
It promises to be an interesting journey, and a challenging one!
Sunday, May 14, 2017
Work Resumes — Waterbed Base
My eye pressure is too high now, though, likely due to all the procedures, meaning a risk of developing glaucoma. The intra-ocular pressure was not so high to pose a high risk, but I nevertheless have an appointment next month with a glaucoma specialist to see what's going on. Sigh.
Last post I mentioned there was a bubble of gas in my eye, part of the treatment to press the retina against the underlying tissue to enable it to heal, and it did that during the first week. The bubble remained in my eye, however, for a full six weeks, growing smaller and smaller over that time until it disappeared. While it was in there, always rising to the top of the eye, I could see over it, as long as I was looking straight forward. When I looked down, however, the bubble floated to the back of my eye, and so right in the middle of my field of view. So no clear view of anything through my right eye when I looked down, and that meant — no clear view if I tried to work on anything (measurements, working with tools, etc.). If I closed my right eye, I could see with my left eye clearly, but without any depth perception.
So six weeks of enforced idleness.
And now back to work! Back to work on the base for my waterbed mattress. I mentioned that the base will be built up from a number of assemblies. What I'm working on first are the two drawer sections that will support the 1500-pound mattress. The plywood pieces have all been cut out, and I've been getting the first one ready for assembly, but today discovered I'm out of the required 1 5/8" drywall screws. Since it's been so long without a post, I decided to report on progress now.
Since the drawer bases will support so much weight, I'm building them from 3/4" plywood, and doubling that for the vertical support drawer dividers (so 1.5" thick). Since drawers will only slide in and out smoothly if the dividers are all parallel and vertical, it is important that they be positioned accurately. To do that, I carefully marked out the locations, and then used biscuits to lock them in position while gluing and screwing the cabinet together. Like this:
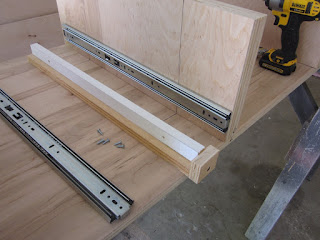
For the ten drawers to move smoothly, the metal drawer slides also have to be located precisely. That means a jig, to position them consistently the same distance from and parallel to the bottom of the cabinet.
First I screwed the jig to the bottom of the drawer dividers while those were lying on their sides, then held the slide against the jig and drilled holes (starting them with an awl), and screwed the slides to the plywood. You can see one of the screws, not yet driven in all the way.
A pair of drawer slides in position, waiting for its drawer:
Here's the one drawer cabinet assembled, but not yet glued and screwed together. Waiting to buy more drywall screws tomorrow. So what's important is that I installed the drawer slides before assembling the cabinet. The openings for the drawers are pretty small, sized for just one drawer, and deep. Trying to position the slides, precisely drilling the holes for the screws, and screwing them in, would be impossibly awkward if I had to do it after the fact through the small opening (especially the back screw!). I can attest to that from past frustrating experience :-(.
So tomorrow buy more screws and glue it up. Then do the matching drawer unit for the other side of the bed (oh wait, I just ordered the next five pairs of slides, so I'll have to wait on that — so I'll build the center section next). Back in a couple of weeks . . .
Ten-year-old Sophie:


No comments:
Post a Comment