When I moved to the West Coast in 2013 upon retirement, with friends and family still on the East Coast, I had very limited options for what to do with my evenings. During the day I was fully occupied with the house remodel and some writing, but at the end of the day, not so much. First thing was to get the living room TV operational—meaning putting up the antenna, since I was one of the rare people who still got their programming over-the-air. Then, since I'm a big movie fan, I purchased a second, larger TV and converted the "master bedroom" into a dedicated home theater. Very basic, as there was other restructuring still to do.
That was Phase One.
Fast forward eight years, and the house was ready for Phase Two of the home theater makeover.
The original master bedroom had no overhead lighting. The light switch inside the door operated an electrical receptacle, likely used for a lamp. Not my style, so I wired that receptacle with full-time power and plugged in a lamp next to my viewing chair that I could turn off after the movie started. But the light was always inadequate for inserting blu-rays into the player, etc.
I needed overhead lights that I could turn on from the original light switch next to the door, as well as from my viewing chair. I found a dimming switch that came with a remote, and installed three recessed LEDs in the ceiling. Perfect.
I initially had painted the ceiling gray, as a compromise over the ideal black for the whole room, and blue for the walls. Over the years, I decided I really didn't like the gray ceiling, and wanted a more elegant navy blue for the walls, so new paint.
Over the years I have been replacing all the floors in the house. The home theater was the last room with the original carpeting, in bad shape. I planned to use the same Cali Bamboo natural color flooring in the home theater that was in much of the rest of the house, and still had about 95 square feet of that flooring, but discovered it was now no longer available. (Moral of the story is to buy enough for everything you want to do at the same time.) I did find some darker Cali Bamboo click-style flooring at Home Depot (left-over stock?), and at one time I had thought a darker floor would be more appropriate for the home theater, so I installed that.
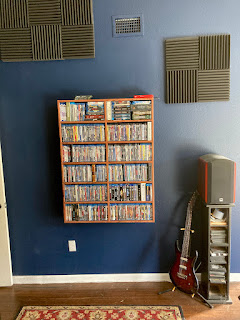
By now my blu-ray collection had grown enough to be scattered all over the house in drawers and cardboard boxes. I needed dedicated shelf storage in the home theater for all of those discs. So I went to work.
Here's the usual plywood joint I use for cabinets and drawers.
At around the same time I was recycling a table I built in the early 1970s out of cabinet-grade plywood available at that time. What a difference a half-century makes in the quality of materials available now in our "cut cost" compete-with-China world! Here's the old cabinet-grade plywood compared to what we get now.
Anyway, plywood edges must be covered, and since I am now in a use-what-I already-have phase, I found a piece of rosewood in my inventory that was the perfect size to cover all the edges. Love those gravity clamps!
On the wall it went.
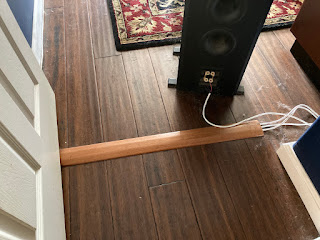
So time to run the speaker cables (nine speakers). Initially I just stuffed the cables that crossed the doorway under the carpet, but with a wood floor . . . I needed a cable channel to accommodate three cables. I had some more rosewood that was a good match for the new floor, but it was not quite long enough. I also had a piece of mahogany that was just the right size, and rationalized that it would be good that it contrasted with the floor, so better to not accidentally stumble on it. Hmm.
So, the centerpiece of any home theater is the TV. The TV I had in there was a 60" Panasonic plasma. It had the best picture quality eight years ago, but we're now in the era of 4K and OLED screens, high dynamic range, expanded color gamut, and BIG! I was going to move up to 65", but the LG OLED 65" was about the same physical size as my old plasma, with its wide frame. That wouldn't do. I got out my tape measure and discovered LG's 77" 4K OLED would fit! Yes!! Just bonkers! Picture is jaw-dropping!
I'm almost 6'3", and my old chair didn't really fit. I had to slide down and sideways, etc. so I decided to build a custom lounge. Seemed it would be straightforward. I made a template based on by car seat reclined a bit, then built a mock-up, without a cushion, which seemed promising. Then built the prototype. I sized it to use a twin-size bed 3" memory foam topper for a cushion. But when I tried it, I discovered the memory foam was too soft for a chair, and after two hours, my underside was suffering. And the angle wasn't optimal.
So I ordered a 2" latex foam topper to put under the memory foam. Better, but not there. Now waiting for some firm 2" upholstery foam for under my seat only. I also adjusted the angles two times, and then went through about five iterations for a head rest. After I find the right solution, I will enclose all the foam in black cotton duck.
Next time, I will report on the construction of a retaining wall at the back of my back yard—to level the steeply sloping (useless) yard. Many truckloads of topsoil. And a new fence. Finally found a contractor after a long search.


No comments:
Post a Comment