Every place I've ever lived has been designed for that "average American family," with lots of bedrooms, living room, dining room, family room, etc. The problem was that I was a single person, not an average family. I needed space, but for hobbies, not people. And because I'm over 6'2", bending over to use sinks designed for children was a constant frustration. Over the years, I collected a list of things I would change if I could have my dream house. As I approached retirement, I realized time was running out for that house; it was now or never.


Dreams are not always perfect, however. I could never afford my dream house, a spacious Southern California home overlooking the Pacific Ocean. But I could afford a modest ranch house, with a 20-mile drive to the beach. It was a very long way from perfect, but it had potential.


This blog documents the process of turning that small average house into something that matches my lifestyle. It will be as close to my dream house as I can make it. I'm doing all the work myself to stretch my resources. By not hiring contractors, I can afford high quality materials, and I'll know the job is always done right. The remodeling will be my primary avocation for a few years, even as I try to fit in my writing and other hobbies.


It promises to be an interesting journey, and a challenging one!

Sunday, September 6, 2015

Workshop — Part 2

First, I don't think there was officially a "Workshop — Part 1" post, but I did say something about installing new florescent ceiling lights in there, so close enough. 

Second, I finished the floor and baseboards in the north half of the pottery studio, and took a photo today.  This part of the studio will be where the pottery wheel is located, and shelves for the new pots to sit while drying, etc.  The other half of the studio is where the kiln will be, counter space for applying glazes, lots of drawers for storage, and of course the sink for cleaning up.  Back in the wheel half, there will be some built-in shelves to the left of the wheel, and also a built-in car stereo, since music frequently seems to be a part of pottery studios. 


Third, back to the workshop.  To recount, this post deals with removing two old ill-placed and inferior windows with one new one in a different location, to wit, in the center of the south wall.  To start, I removed the old drywall where new electrical receptacles are going, where the new window will be, and around the old two windows.  This is the first part of that process:


A new low workbench (designed for sitting) will go along this south wall.  I'm installing several 120 volt receptacles and one 240 volt receptacle that will be a little higher than the workbench surface.  Here are the first boxes going in.  The lower blue box is a junction box.  These 20-amp circuits originate in the laundry room subpanel.


Here's the first old window laid bare.  This room was originally converted from the back of the garage to a bedroom, and the windows added.  Rather than properly restructure the wall to support the window and the roof above it, the contractor just cut a big hole in the wall and stuck the window in.  There should be a full height stud on both sides of the window, and then a jack stud just inside that to support the header running over the top of the window (to support the roof over the width of the window).  None of this!  I was shocked!  And the "header" was undersized, and not even fastened to the studs above it.  I can't begin to describe how bad this is :-(


In this following photo, I have added new full-height studs to the existing upper and lower ends of the old studs.  I left those in, because the stucco is fastened to those elements — but only by staples!  No nails, no screws!  More shock!  I've also framed for the new window, using the proper structural elements.


I should note (again) that the original builders did not fasten any sort of plywood sheathing to the studs, to provide strength and a solid foundation for the stucco.  They just stretched some wire across the framing, applied roofing felt on top of that, then wire mesh, then the stucco.  I'm using plywood to cover the old window holes, and cutting down the studs to 3" width, so with the added 1/2" plywood, the base for the new stucco will be flush with the old studs.

Here's a photo of the wall with the new Andersen window installed.  I used a circular saw with a diamond masonry blade to cut out the big square of stucco to make the opening for the new window.  At the left of this photo, you can see the second old window that will be removed. 


And from the outside:


When I removed the drywall from around the second window, I discovered the structural deficiencies were even worse than with the first window.  Not only were the tops and bottoms of the old studs not fastened to the rudimentary window frame, they were not even touching!  The top:


And the bottom:


This photo (above) also shows the old vent for the garage that was not removed during the conversion, but simply drywalled over on the inside.

Here is the first coat (scratch coat) of stucco going on the outside of where the first old window was:


And further along in the process, with the stucco complete around the new window and over the old window opening:


And finally, where I am now, with the second window opening sheathed and just about ready for stucco.


I still have to remove the old square ventilation vent and fill that space in.  There's also a circular opening at the lower left of the window; that is for an 6" exhaust vent for the hood over the three cat litter boxes — getting rid of the dust and odors.  The blower for that is motion activated.

The next steps (after stucco) will be to finish insulating the wall, apply drywall, and trim out the new window on the inside.  Add two coats of elastomeric stucco paint on the whole wall outside after the new stucco has cured for a month.  I'm also going to be finishing the baseboard installation in the south half of the pottery studio.

I took delivery of a truckload of plywood and drywall today, so I will soon be starting to build the rest of the kitchen cabinets.  I'll have Home Depot fabricate and install the Corian countertop after those cabinets are finished.  Then kitchen sink, cooktop, and dishwasher.  Unfortunately, the sink and dishwasher will not be operable until I finish the new water supply system (waiting for cooler weather for that, when work in the attic will be tolerable).

Progress, bit by bit.

Thursday, August 27, 2015

Pottery Studio — Part 7

The new floor tile in the pottery studio is all down and grouted, but some work remains, to wit, cleaning the white efflorescence off the grout and installing baseboards.  To finish the floor in the south half of the studio, I had to remove all the stuff stored in there, and most of it ended up in the north half, which means I haven't yet gotten around to the sulfamic acid scrub to clean the grout.  I've also been working on the windows in the workshop (removing two old ones and installing a new one in a different place).  But I'm getting ahead of myself.
First, I did manage to apply the elastomeric stucco paint (two coats) on the outside front of the pottery studio, and stain/paint the fascia/eves along the front of the house.  For this photo, I've placed some new shingles along the edge of the roof, showing the future lighter color.


Back to the floor tile.  Did I mention I had to order more tile?  And that the colors were different with the adobe brown.  Well, same thing with the gray tile — three different shades — so some artistic adaptations were required, not only to accommodate the different shades of tile, but I also adjusted patterns to minimize how much tile I had left.  In other words, if I needed a little more tile to finish the floor, I would use what I had rather than buy another box of the perhaps ideal size/color. 

As I mentioned before, it's an art studio :-)

Here's getting the pattern sorted out and the tile starting to go down:


The walls were still yellow in that photo.  Here's what the tile looks like all laid down and grouted (the walls now off-white).  The cabinets and counter on the left have yet to be installed; there will be a cubby between the cabinets for a stool to slide under the counter. 


I did try out the sulfamic acid scrub on a portion of the grout in the north section of the studio.  Here you can see the difference between the treated grout and the grout with the white efflorescence.  It really works.  (The colors in the photo are not accurate, but you can see that the cleaned grout color matches the tile color.)


I lay the tile and grout a section at a time, and it doesn't take too long to do a section, but then I let it dry for a day before doing the next section.  So I've been working on the windows in the workshop during the rest of the day.  I will post on that progress within a few days.  The workshop had been a bedroom, and before it was converted to a bedroom, it had been the back half of the garage.  That conversion, as I discovered when I removed the drywall, was a celebration of structural incompetence (but more on that in the next post). 

They installed two of those flimsy aluminum single-pane windows in the corner of the room.  I wanted a single window in the middle of the wall, so I am removing the two old windows and adding a new one.  Because the outside of the wall is covered with stucco, I needed to do a lot of masonry cutting with a diamond blade in a circular saw.  Well, this is what it looks like:


At this point, one of the old windows has been removed and the wall restructured and prepared for a new application of stucco.  I also restructured the wall where the new window is, cut out a big square of stucco, and installed the new Andersen window (needs stucco patch around its frame).  To run my power tools, I cut a small hole in the corner of the screen in the old window on the right for an extension cord.

Unfortunately, it was big enough for my two favorite (indoor-only) cats to squeeze through, ripping the opening bigger in the process.  I had left the window open for some fresh air, and only realized they could get through the hole Monday evening before bed.  I closed the window then, assuming they were still inside (with five cats, it's not always easy to keep track).

Between 3 and 4 a.m., I heard cat screams from out back, and searching the house, found two missing.  I then opened the window they had used, and enlarged the opening in the screen enough for them to re-enter.  I also set out my cat trap, with a small bowl of cat food inside.  I should note my cats are all rescued ferals, trapped to have them spayed/neutered, vaccinated, de-wormed, etc., which is why I have a feral cat trap. 

But why am I telling you about this?  The two escapees are my favorites, my oldest (I've had nine years), a small female who had a hard life before I rescued her, and my youngest — Sami (I've had 4.5 years, my only male), rescued as a 4-5 month-old malnourished kitten (with a big head and tiny body).  They're my children.  And Southern California is not a safe place for outdoor cats and small dogs, because of the coyote population. 

Photo from my last east-coast house (Sami in front and my number one relaxing in the background):


Having them missing has been traumatic, and remodeling work has suffered.  The good news is my first cat returned the next night at 2:45 a.m., meowing outside the sliding screen door next to my bed.  She wouldn't come in by herself; I had to go outside and carry her in.  That was a huge emotional relief. 

Feral cats aren't the same as domestic; they're physically the same, but psychologically, they obey a different set of rules.  They're territorial.  If they leave the group—their territory, and want to be accepted in again, they feel they have to ask and be invited back in.  Males are routinely expelled when they reach maturity, and have to find and defend their own territory. 

Sami got out once before, back east, and stayed relatively close to the house.  I could tell because I could hear his run-ins with the dominant neighborhood feral.  He didn't come back on his own; I put my trap out and he took the bait in the middle of the night after about a week (I heard the trap door slam shut and went out, thinking I had gotten the dominant feral, and planning to relocate him).  But it was Sami.  Took him a couple of days to readjust to domestic life. 

If they're used to coming to your door for food every day for many months, they are more likely to return to the house (like my small female).  I trapped Sami within days of starting to feed him, and brought him inside immediately.  If he's able to stay alive for two or three weeks, he likely will return looking for food or water, or security.  I don't think he'll come in though the window, but the trap may work.

Until he returns, I will be distracted.


Tuesday, August 11, 2015

Apple-Cranberry Pie

I try to eat healthy, and conventional pies (for my tastes) have too much sugar, and the crust—well, white flour and butter are not exactly the apple of my eye.  I use whole wheat flour and olive oil in my cooking, and thought those ingredients could make a good pie crust. 

When I started to research alternative pie crusts, I found a recipe that used olive oil, so I tried it, and then began experimenting.  Ultimately I did not get the results I wanted, and concluded the reason was the recipe was trying to imitate a butter pie crust—rolling out dough with a solid cold fat (butter) that would layer with the flour, to get a flaky crust.

The original olive oil recipe called for freezing the olive oil to make it solid, and then chilling it again before rolling it out.  The olive oil always wanted to revert to a liquid, however, and there was too much of it, so the dough oozed olive oil.  So I reduced the proportion of oil in the dough, and pretty much gave up on getting a flaky crust.   I also stopped the futile exercise of freezing the olive oil before starting the process. 

Two notes:  One, for the best flaky crusts in any kind of baked pastries (fruit croissants or tarts or whatever), you're better off using commercial filo dough sheets.  Two, you can certainly get a flaky pie crust with white flour and butter, but the taste by itself is nothing special (unless you like the taste of white flour and butter, and I know there are some of you out there :-). 

Over time, I added new ingredients and varied the proportions.  My crust does not attempt to imitate a traditional crust.  It is something different, just as a graham cracker crust is its own thing.  I find I like the whole wheat flour and olive oil crust used in this pie enough that I can eat it all by itself (your results may vary, but here we go). 

The filling.  Apples and cranberries.  I use Fuji apples, which are sweeter than the perhaps more traditional tart Granny Smith apples, but with a sweeter apple, you can get by with less sugar.  The cranberries provide the tanginess.  Three large apples and 1.5 cups of cranberries.  I use a lot of cranberries, mostly for my chocolate banana-nut cranberry bread (with oatmeal and grated carrot), and fill my freezer with fresh cranberries when they are in season (November), enough to last a year. 


Peel the apples, core and cut them up.  I use a tool to do this in one step, yielding eight pieces, but you can of course do it the old fashioned way (four pieces per apple or whatever).  I then feed the pieces into my food processor, using a slicing blade.


With this method, the apple pieces end up in slices and a lot of lesser bits, which gives the filling a more blended texture.  If you cut the slices by hand, you will likely end up with more uniform slices, but you can tailor the mix to your taste.  This is what the food-processed apples look like:


Add the rest of the ingredients with the apple slices, mix them up, and put the bowl in the refrigerator to allow them to meld.  Here's what you need:

     3 large apples.
     1.5 cups of cranberries.
     1/3 cup apricot preserves, heated so it's runny (you can substitute another flavor).
     1/2 cup sugar (I use white for this).
     3 tablespoons all-purpose flour.
     1 teaspoon cinnamon.
     1 teaspoon vanilla extract.

The dough.  The ingredients:

     1.5 cups whole wheat flour.
     1 cup all-purpose flour.
     1/2 cup olive oil. 
     1/4 cup sugar (I use turbinado raw cane sugar for this but any kind will work).
     1 egg.
     1 teaspoon baking soda.
     1 teaspoon salt.
     1/2 cup water.

Mix the dry ingredients in a food processor (using the regular blade), then add the remaining ingredients and process until the dough comes together.


Pull the ball of dough out and put on a floured surface (I use whole wheat).  Form the dough into a rough cylinder which will make splitting the ball in two parts, bottom and top.  A ratio of 55% for the bottom and 45% for the top works well. 


Using enough flour so the dough doesn't stick to your counter or rolling pin, roll the bottom a little bigger than your pie pan.  I use my offset spatula to help lift the dough off the counter, fold it in half and lift it in the pan. 


Then load the filling into the pie.  It should look like this.  Because the pieces are a mix of sizes, it's not necessary to load the filling in a big pile because it doesn't settle much. 


Traditionally, pie dough is draped over the edge of the pie pan (both bottom and top), and then pinched together along the edge.  Of course, you are then advised to cover the protruding fluted edge with foil so it doesn't burn.  My approach is to eliminate the over-exposed edge so you can eliminate the foil.  Nobody eats the dried-out crust edge anyway. 

Now put the top on, tucking the edge down into the bottom crust—nothing on the lip of the pan, like this:


Put the pie in the oven on a middle shelf, with a pan on the lowest shelf to collect any drippings, like this:


I use a glass pan, and use the "Pie" mode on my oven, which cycles the convection fan on and off.  I bake at 350˚ for 45 minutes.  Metal pans require a hotter temperature (or longer time), and your oven will likely be different.  Out of the oven:


On the remodeling front, I continue to work on the pottery studio floor tile, mostly on the south end now.  I needed to order more floor tile and am waiting for that.  I don't want to end up with a bunch of tile left over, so I've been making adjustments on the tile patterns to minimize waste (I'm using four colors/sizes of tile).  Here's where I am now.  I just installed the cabinet bases today.


Monday, August 3, 2015

Pottery Studio — Part 6

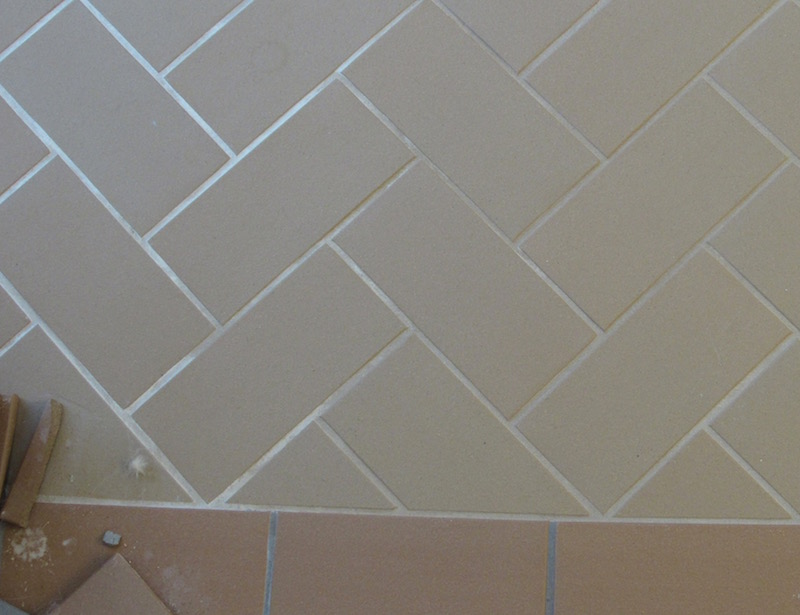
At the end of Pottery Studio — Part 5 I was removing the old floor tile in preparation for the new tile going down.  If you recall, when I ordered the remainder of the tile I needed, I discovered the new batch was not a match for the same color/stock number I already had, so I needed to figure out some way to blend or coordinate the two shades.  I had already planned to use a gray border around the adobe brown field, and after some experimentation, decided to have a double border — a gray outer border, and a reddish brown inner border surrounding the tan-brown field. 

Not sure how it would end up, but just went ahead with it.  Here the gray tile is down, and I'm test fitting the inner border. 


While I was using a staggered brick pattern for the inner border, I chose to put down the field in a herringbone pattern.  Here most of the tile laid down, before grouting. 


At this point, I made two decisions.  First, the bold tile pattern clashed with the bold yellow walls.  I decided to repaint using the same neutral off-white that I'm using for most of the rest of the house. 

Second, I had initially intended to use gray grout for the whole floor, but on a whim, decided to use a light brown grout for the field tiles, and found a grout color that seemed to match.  I did the same thing for the foyer, and that looked good.  I used gray grout for the whole floor in the kitchen, and that presented a more commercial look.  For the pottery studio, with its artsy three-color floor, the matching grout for the center section seemed like a good idea.  (I've now reconsidered.)


You may notice that the grout in the center section does not match the tile.  Hmm.  First, the gray grout went on without incident.


But as the light brown grout dried, it developed what is called efflorescence.  That is when the water in the grout dissolves minerals in the grout (portland cement), which minerals then rise to the surface and turn white.  Sometimes additives to the grout (polymers) do the same thing.  Adding too much water can be the problem.  Since the gray grout gave me no trouble, and I didn't mix the brown grout any thinner, it may be the additives that were the culprit.  Here is a photo of the dried grout compared to a batch of grout just applied — the difference is dramatic.


I had the same problem with the tan grout in the foyer, and learned that scrubbing with a sulfamic acid cleaning solution would correct the apparently common problem.  I need to wait three weeks for the grout to harden before doing this, so no photos of the finished floor with baseboard for now. 

In the meantime, I will be cleaning out the other (south) half of the pottery studio, and extending the new tile floor into that part.  I've started relocating stuff in the house to accommodate the shuffle.  The temporary kitchen counter you see on the left gets taken apart and reassembled in the workshop; I've had to clear out that room for this.  The workshop is soon to have its two windows filled in, and a new window installed in a different place. 


I'm still waiting for the stucco to cure on the outside wall of the pottery studio before I can apply the stucco paint.  That result will have to wait a few weeks for the Pottery Studio — Part 7 post.  My next post will therefore be another cooking venture (the pizza post has been more popular than my remodeling trials :-).  Apple-cranberry pie with a whole wheat/olive oil crust.  Really good!


Thursday, July 16, 2015

Pizza!

I've been busy doing prep work for the new tile floor in the pottery studio, and painting the stucco on the back of the house, but like everyone, much of what I do revolves around the basic maintenance of life—for my dog and five rescued cats, and me.  That of course includes feeding everybody.  The dog eats dog food, and the cats eat, well, cat food—not too appetizing from my perspective.  Luckily, there's also pizza!

Home made, of course, and here's how:

The dough is pretty much the same as your basic yeast bread.  For one 12" pizza, these are the ingredients.
  - Flour.  230 grams, about 55-60 grams of which is whole wheat and the rest is white bread flour.  Bread flour is made from "hard" wheat (high protein, high gluten—to make it stretchy).  Soft wheat flour is used for cakes; "all purpose" flour is a mix of hard and soft.
  - Sugar.  ½ tablespoon.
  - Salt.  1 teaspoon.
  - Yeast.  Active dry.  About ½ teaspoon.
  - Optionally, I add a few shakes of oregano.
  - Olive oil.  About 1 tablespoon (I don't measure)
  - Water.  4 ounces.

Mix the dry ingredients, then add the oil and water, then mix and knead.  I use my 37-year-old stand mixer for this, and use the regular beater bar (because the amount of dough is too small for the dough hook—if you're making dough for two or more pizzas, then you can use the dough hook).  Machine knead for five minutes, or hand knead for 10 minutes.


Take the dough out and compress and round it to make a uniform and smooth ball (actually this is important, so it will stretch out properly).  Put the ball of dough in a container and cover, then put in the refrigerator for 24 - 36 hours.  In other words, make it a day before you need it.


It slowly rises and comes out the next day looking like this:


Your oven and pizza stone should be preheating.  Ovens are different, so you'll need to experiment, so the pizza top cooks at the same speed as the bottom of the crust.  The last oven I had was really hot on top, so I had to put the pizza in at the bottom of the oven, with the temperature set around 480˚.  My current Bosch oven has lots of modes and different heat, so some experimentation was needed.  I now put the pizza in at the hotter top of the oven, and at 450˚.  I use a pizza stone, so the pizza goes in the oven naked on the stone, put in and taken out using an aluminum "peel."  You can get by using a pan, and skip the peel and stone, but your results may vary :-)

Once you stretch out the dough, you don't want it to sit for a long time, or it will tend to stick to whatever it's on.  So prepare everything ahead of time, and don't dawdle.  I make my own sauce.  I start with a can of crushed Italian (plum) tomatoes (with basil).  I add some olive oil, plus a little sugar, salt, and oregano, then blend in a food processor.  I use part-skim mozzarella cheese, grated myself, of course.  If you buy cheese already grated, it has cellulose added to keep it from sticking (cellulose=sawdust).


Stretching out the dough takes a little practice, and your dough has to be correct (strong and elastic, but not too—that is, not like a rubber band).  It can't stick to your working surface, so you must use flour or corn meal to keep it sliding.  Some people use regular flour, some people use corn meal.  I use a half and half mixture of whole wheat flour and semolina flour, the latter being Bob's Red Mill, made with No. 1 Durum Wheat, and ground to a sandy texture (Semolina flour may be hard to find; I get mine from amazon.  Semolina flour is used to make pasta.)  The whole wheat/semolina mixture works great to prevent sticking and it also tastes good.

So spread your counter with the stuff and plop your ball of dough into the middle. You can't have too much; what doesn't stick to the dough will be there for the next pizza (if you're doing more than one).  After awhile, you'll figure out how much you need.


This is the final result.  My pizza takes about five minutes total in the oven.  As always, your results may vary.  For further (professional) advice, the worldpizzachampions series on youtube is recommended.


Saturday, July 11, 2015

Pottery Studio — Part 5

When last we left, the new windows were installed in the front of the pottery studio, the interior finished, and two layers of roofing felt applied to the exterior wall in preparation for stucco.  The next step was to attach a metal weep channel at the bottom of the wall; this allows for any water that manages to get behind the stucco to run down the roofing felt and exit at the bottom of the wall.  The channel also provides a neat ledge for the stucco to sit on at the bottom of the wall. 

Next the wire mesh goes on, fastened with special furring nails that have spacers to keep the wire about a quarter-inch off the wall.  I also use galvanized 1/4" crown staples in between the nails to provide further support.  Then the corners are reinforced with heavy wire corner bead.


Here's a closeup:


Here's a photo of the first (scratch) coat starting to go on.  It's called the scratch coat because before it has hardened, a special tool is used to scratch horizontal grooves into the soft stucco.  The grooves give the second coat something to adhere to. 


With the scratch coat on, the second coat is applied (it's called the "brown" coat, which must have some historical significance . . .).  I'm still developing my technique, so I'm calling the resulting texture "rustic."  After each batch of stucco goes on, it's a good idea to mist it with a fine spray of water every couple of hours so that it doesn't dry too quickly and crack. 


Here both coats of stucco are on, and the plastic sheet removed from the windows.  Tomorrow I'll apply a very thin coat of finish stucco to even out the texture a little.  After that, it all cures for a month before I can apply two coats of elastomeric stucco paint.  Like the name implies, it's a flexible coating that keeps out moisture and bridges any small cracks that may develop.  It also makes all the walls the same color :-)


While I'm waiting, I'm going to put down the new floor tile in the pottery studio, scrape and stain the fascia and eves on the front of the house (will match the front door frame), and continue to apply stucco paint to the back of the house.  And work on the new water supply system . . .  Here's the old tile in the pottery studio getting blasted off the floor.


Tuesday, June 23, 2015

Pottery Studio — Part 4

And so it goes.  This time new windows in the north side of the pottery studio, replacing the old single-glazed slider and tall skinny fixed side windows (with their flimsy aluminum frames) with an insulated Andersen picture window over an awning window (same pair as in the kitchen).

As seems to be the case with my window replacements, the new windows are different sizes, different types, and in new locations than the old windows, so it's never a matter of removing the old window and sliding in the new one.  I end up reframing the wall.

To see what's inside the wall, I first remove the drywall.


In this case, I was happy to find out I could leave the old header in place, saving a lot of work.  I needed to relocate an electrical receptacle for the pottery wheel to a more convenient place (the old location will be behind a shelf unit).  I discovered that someone had drilled holes through multiple studs for an electrical cable where mine needed to go, but for some reason had not actually routed a cable through said holes (but more work saved).  The old receptacle box becomes a junction box.


I removed the side windows first, and discovered the builders had not covered the studs with sheathing, but had applied the masonite shingles directly to the studs.  I applied plywood sheathing.


With the side windows removed and covered over, I tackled the center slider.  I needed to remove all the framing in the center section to make way for new framing to accommodate the new windows.  Left a big hole . . .


Then the new framing went in.


Then sheathing, black roofing felt, waterproof rubber membrane, and the windows . . .


Back inside, I insulated the new wall and put up drywall.  Here some of the joint compound has already been applied.


After finishing the taping (joint compound, etc.), and a first coat of paint, I started installing the window jambs and trim (but have run out of trim stock at this point).


So the inside needs some more trim on the picture window, caulking, installation of the electrical receptacle, and semi-gloss white on the trim, and another coat of eggshell yellow on the walls.  Outside—just getting started.


I've put on a second layer of roofing felt.  Now in preparation for the stucco, I need to add metal weep channel along the bottom of the wall, and then the wire mesh can go on.  With that on, I'll put on corner reinforcement wire, and then start applying the stucco.

After that, I'll likely start putting down the new tile floor, at least in the front of the pottery studio, and continue with the wiring and water supply lines in the new master bathroom.  I'd also like to get the new windows installed in the workshop and master bedroom, but that may get put off.  Sigh.