Every place I've ever lived has been designed for that "average American family," with lots of bedrooms, living room, dining room, family room, etc. The problem was that I was a single person, not an average family. I needed space, but for hobbies, not people. And because I'm over 6'2", bending over to use sinks designed for children was a constant frustration. Over the years, I collected a list of things I would change if I could have my dream house. As I approached retirement, I realized time was running out for that house; it was now or never.


Dreams are not always perfect, however. I could never afford my dream house, a spacious Southern California home overlooking the Pacific Ocean. But I could afford a modest ranch house, with a 20-mile drive to the beach. It was a very long way from perfect, but it had potential.


This blog documents the process of turning that small average house into something that matches my lifestyle. It will be as close to my dream house as I can make it. I'm doing all the work myself to stretch my resources. By not hiring contractors, I can afford high quality materials, and I'll know the job is always done right. The remodeling will be my primary avocation for a few years, even as I try to fit in my writing and other hobbies.


It promises to be an interesting journey, and a challenging one!

Friday, January 2, 2015

New Laundry/Mechanicals Room - Part 9

The washer/dryer platform is in.  First I did the design, then cut out the pieces of 3/4" cabinet-grade plywood, then started assembly in the garage.


Once basic assembly was complete (glued and screwed), I temporarily screwed the top on and moved the platform into position on its base in the laundry/mechanicals room.  I took off the top so that I could screw the platform to the base and to the studs in the walls.  You can see that the platform is extensively cross-braced to resist out-of-balance loads during the washing machine's spin cycle (although when the machine detects unbalanced spinning, it stops and slowly rotates the drum in an attempt to redistribute the load).


With the platform securely fastened, I screwed the top on, added reinforcing pieces of 2x4 lumber to the front edge, and put on trim pieces.  A coat of sanding sealer followed that.


After that, two coats of semi-gloss paint.  No fancy wood trim; this is a laundry room, and future home to the water heater and air handler.  I also finished applying joint compound and paint to the walls (everywhere except where the washing machine hot and cold water lines will be installed inside the wall).


There are four openings in the front of the base.  The two narrower ones (painted on the inside) are cubbies for laundry detergent and bleach (on the left), and for a small wastebasket for lint (middle right).  The two wider openings will each (eventually) get two drawers.

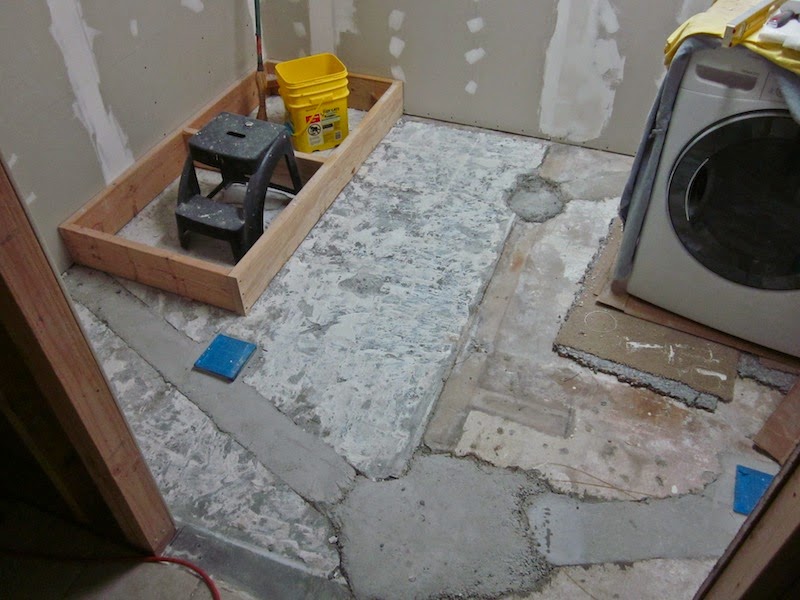
I'm going to let the paint harden for a week before I loft the clothes dryer up onto the platform (easier said than done, but still much easier to do than lifting the much heavier washing machine).  When the dryer is in place, I'll start putting down the floor tile.  In the photo below, I've put the pieces of tile I have (still need to order much more) on the floor for a first look.  Notice the floor is flat in the foreground, but in back, there is a rise that is bad enough to need more remedial work than adding some extra mortar.  Can't escape that awful dusty grinding . . .  Ugh!


Wednesday, December 24, 2014

New Laundry/Mechanicals Room - Part 8

I've been plugging away on the laundry room, finishing off the drywall (as in joint compound and paint, not as in actually finishing it), installing trim on the window, and finally addressing the out-of-level floor.

I've been putting bullnose corner bead on all the drywall corners, 1) because I think it looks better, and 2) because I tend to cut corners when I'm walking in a house, with my shoulder often colliding with the sharp corner, finished with metal edging, and it hurts.  The round corner edge is much nicer.  This is what it looks like before joint compound and paint:


I finished the electrical panel installation, but before closing it in, I installed a flexible plastic conduit from the breaker panel recess through the wall up to the attic.  The breaker box now has one empty breaker slot, so if I want to add another circuit in the future, I won't have to cut open the wall—I can just unscrew the panel (see second photo below), and snake a new electrical cable through the conduit.


The second photo above also shows the bare concrete floor before leveling.  The left half of the floor needed to be raised about a half-inch to be flush with the floor on the right side of the room.  I used two types of masonry products to level the floor.  The "floor leveler" is a product that is mixed very thin and is poured out over the floor to be leveled.  It flows out like water, but thicker.  You have to spread it around over the area you want to level, but once you do that, it flows out flat.  I would have used just that product, but I would have needed about a bag and a half, and didn't want to buy two 50-pound bags (at about $30/bag) and have half-a-bag left over.

So first I mixed some thin-set mortar (used to install ceramic tile on a floor) and roughly applied about a quarter-inch layer on the part of the floor to be raised.  This didn't need to be level, because the leveler would go on top.  But it meant my one bag of leveler would be all that was needed.

This is the floor after the thin-set mortar went on:


And this is with the thinner leveler poured on top:


Nice and smooth!  The rest of the floor isn't all flat and level, but close enough to level the tiles by making adjustments to the thickness of the mortar.

Now I need to order the rest of the tile.  While waiting for that to come in, the plan is to build the platform for the washer and dryer, and scrape and stain the underside of the roof eves and fascia on the back of the house.

Friday, December 12, 2014

Window Work on the Back of the House

We got about an inch of rain today, after getting a couple of inches ten days ago, and they're forecasting more rain for the middle of the week (another five days).  After having almost no rain for the last eight months or so, this is amazing, and my yard has turned green overnight.  Today was also memorable as the first day in five-and-a-half weeks when there was no gas bubble inside my eyeball—nice!

I've been working on three windows in the back of the house.  The living room window has been in for some time, and finished off on the inside, but I've just repaired the stucco on the outside.  You can see it at the left edge of the photo.


Near the center of the photo above, high up on the wall, is the rear window for the guest bathroom.  There has been a sliding window in that location, above the bathtub; I had to inconveniently climb up on the tub to open or close it.  I bought a new fixed window to go there, with privacy glass; I'm recycling the old window for the laundry room.  In the photo below, I've cut through the stucco around the old window with a diamond-bladed circular saw, then blasted out the stucco with my electric demolition hammer.  I had to add spacers to each side of the opening because the new window is not a wide as the old one.


Amazingly, there is no plywood/sheathing under the stucco in this house.  They just strung wires tightly across the studs, and stapled roofing felt over the wires, then wire mesh (like heavy chicken wire), and then applied the stucco.  So from the inside the stucco is not flat (lots of bulges), which was a nuisance when reframing the wall for the new laundry room window (I had to cut down the new studs to fit over the high spots).  Making big holes in a concrete house is also a pain.  Cutting a new opening for a window in a wood house would have been much easier.  With stucco, it's diamond blade cutting and the demolition hammer again.  Demo in progress:


Putting the old recycled bathroom window in the opening was straightforward after removing the big stucco slab (deftly deflecting it as it fell, happily avoiding serious injury).  The window from the inside (no trim yet):


Then for all three windows, the exposed perimeter was filled with roofing felt, wire mesh, and two coats of stucco (scratch coat and brown coat).  Normally, a top/color coat goes on over that, but since I am coating the whole house with an "elastomeric" stucco paint, I will add the top coat stucco mix only where needed for touch-up and mild texturing.

The following two photos are of the living room window before and after stucco patching.  The stucco needs to cure for a month before I can apply the paint.


I plugged the clothes dryer vent hole in the laundry room, both inside with new drywall and outside with new stucco (I'm moving the dryer).  I'm putting the front-loading washer and dryer on a 24" high platform, and just installed the base for that platform.  I had to finally get around to blasting the old tile and mortar off the floor to do that, a prerequisite for pouring floor leveler over the left (garage) side of the floor to bring it up half-an-inch to match the right half of the floor.

Unfortunately, after the tile and mortar were removed, I discovered that the left side was lower only at the front of the room.  At the back of the room, it was higher!
I'm still trying to get my head around that one, and figure out how to fix that (short of renting a big water-lubricated concrete-grinding machine).  Sigh.


I may just kick that can down the road.  My laundry basket is overflowing and I need to get the clothes dryer back in operation, i.e. cutting a new hole in the wall in its eventual location.  I haven't decided whether to temporarily put the dryer up on the platform base (on a piece of plywood), or to move quickly to build the final cabinet/platform.

Or something else.  Stay tuned . . .

Saturday, December 6, 2014

New Laundry/Mechanicals Room - Part 7

I saw my eye surgeon a few days ago, four weeks after my detached retina was repaired.  He pronounced my eye fully healed.  The bubble inside my eye is getting to be pretty small; the gas should be completed absorbed within the next few days.  My vision will then be back to normal.  Hooray!

Work on my house remodel has just about returned to a normal pace.  After stripping out the circuits from the old laundry room sub-panel breaker box, I started running the new circuits, and hooked up a temporary 240 volt, 30 amp circuit for the clothes dryer.  The photo shows the old box on the left, and the nice new one on the right.  The new laundry window will be installed above the old breaker panel.  You can also see the furring strips for the new ceiling attached to the roof trusses.


This next photo shows the wall framed for the new window and new electrical cables routed through the studs underneath.  Some of the wires go through to the workshop on the other side of the wall on the left (where I've started stripping the drywall off the wall, and installing boxes for electrical receptacles above where the future workbench will go).  At this point, I've also put up the new ceiling drywall in the laundry room.


Once the new wiring was run through the walls, I added insulation.


And then put up drywall.  You may recall that I recently had (among other things) twelve sheets of drywall delivered.  It didn't last long, and I've run out again.  On the left side of the laundry room, I did not have a full sheet left for the last panel, but that worked out okay because I still need to install the new hot and cold water supply lines to the washer outlet box.  They go behind the wall.  The drywall on the right side of the room has been up for a week or so; I painted that part so I could finish installing the electrical receptacles over there (trying to get past running extension cords all over the house).  In the middle of the left-side photo, you can see the blue plastic electrical boxes for the washing machine and clothes dryer.  They are high up because the washer and dryer will sit on a 24" high platform.


  We're going to have good weather for the next five days (sunny and high in the 70s), so I'm going to work on putting in new windows (including the one in the laundry room).  After that, I'm hoping to resume progress on the laundry room floor.

Sunday, November 23, 2014

New Laundry/Mechanicals Room - Part 6

Work has again wandered off from my planning, but I suppose it all has to be done, so the order may not matter too much in the long run.  In the short term, however, I'm not getting the gratification of seeing any more rooms actually finished.

I did manage to pull down the old ceiling in the new laundry/mechanicals room, and put up furring strips on 16" centers  for attaching the new drywall.  The reason I had to take down the old ceiling was that the half that had been part of the original garage was about 3/4" lower than the half that had always been part of the house proper.  Besides that, the roof trusses are spaced 24" apart (not ideal for attaching drywall), and they are not all at the same level.  Shimming the furring strips yields a nice flat level ceiling.

I also built in a new attic access hatch; the old one is in the hall, and would interfere with the placement of the new water supply lines.


You can also see in the photo a 48" fluorescent fixture (two T-8 1" tubes), temporarily installed because it was dark in there (after putting up the new wall section separating the laundry room from the new guest bathroom).  It will stay in that position when the room is finished, but will have to be taken down when I put the ceiling up, then reinstalled.

That light is on the same circuit as the overhead light in the bathroom, and with the wiring needing rerouting, I also put in a new bathroom light and switch.  The old light was a traditional single-bulb fixture (very tacky); the new one is a very cool 10-watt LED unit (equivalent to 65-watt incandescent).  It's the same unit I used for my front porch; three more of them will illuminate my long hall, and another one will go in the master bathroom shower ceiling.  There are no "bulbs" in the light.  The LEDs are the tiny yellow squares on the sealed circuit board—I expect them to last a lifetime (mine, at least).  Photo shows light without translucent cover.


Instead of a regular switch, I used a programmable automatic dimmer switch.  It turns the light on when I enter the bathroom and turns it off after I leave (you can program it to keep the light on between one minute and 30 after the person leaves the room).   The LED fixture was designed be dimmed; I programmed the switch to turn it on at a low level, since the main purpose is to illuminate my middle-of-the-night trips to the bathroom.  The switch can also be operated manually.  It works great!  (The switch is shown mounted temporarily; the guest bathroom will likely be the last room to be finished.)


With the laundry room ceiling down, I had much better access to the wiring coming out of the old electrical sub-panel.  That sub-panel is being replaced with a new bigger one a few feet to its right.  Since I had started doing wiring for the new lights, I decided to continue with the change of circuits for the back of the house.  The added incentive was my desire to get more light into the new laundry room; a new window is going in, but can't be installed until the old electrical box is removed.  The old box circuits mainly served the garage and tool room, but the upgraded circuits for those rooms can't be finished until the new tool room window goes in (new framing needed, through which the wires need to pass), and much of the drywall in that room is removed.  Of course, there are shelves piled with tools in the room . . .

So today I removed the old single-bulb ceiling fixture and installed two new 48" fluorescent fixtures in the tool room (and a new switch location), and will start connecting the other light and receptacle circuits.  Somewhere in there will be reframing walls for window changes.

Then back to the laundry room . . .

Saturday, November 15, 2014

Detached Retina Slows Work

On Sunday, November 2, the day of my last post, I called the UCSD Eye Center and drove down and was examined by the on-call ophthalmologist.  My symptoms were consistent with a detached retina, a condition classified as a medical emergency because it can quickly lead to blindness if not treated.   The peripheral vision in my left eye appeared to be reduced, as compared to my right eye, and there was a dark half-circle beginning to intrude into my field of vision.

The ophthalmologist saw what he thought was a detached retina, and advised that it would likely be treated that afternoon with a laser.  He was not certain, however, because he could not see any retinal tears, so he called in another senior resident who was specializing in the retina.

She arrived soon and, without asking about my symptoms, did what appeared to be a thorough exam of my retina.  Then she said I was fine, to go home and call the next day (Monday) to make a regular appointment for sometime during the next week, whenever they had an opening.

I was shocked, because I had researched the subject after earlier being warned about "dark curtain" symptoms by another doctor who had looked at my retinas a few days earlier, after I reported seeing flashes.  Flashes and floaters are symptoms of the eye's vitreous gel pulling away from the retina, a common occurrence that happens to almost everyone over 60, and also often precipitated by cataract surgery.  It's called posterior vitreous detachment (PVD).  When the vitreous gel that fills the eyeball starts to separate from the retina, it tugs on it, causing flashes.  Bits of the gel break off and are seen as "floaters," spots and shadowy forms moving across your field of view.  If the bond between the retina and vitreous is strong, the gel can pull the retina off the underlying tissue.  When this happens the vitreous liquid can seep behind the retina and peel it off like old wall paper.

I dutifully went home and continued my internet research into my symptoms and possible causes, and the next (Monday) morning called and made an appointment (for Thursday morning).  But during the day the small black half-circle continued to grow, and eventually threatened the center of my vision.  By this time, I knew that if a detached retina reached the eye's macula (the center area of the retina where light receptors are most highly concentrated), the chances are that treatment would likely not be able to restore vision to what it had been.  The longer the wait before treatment, the worse the prognosis.

So Tuesday morning I got up before dawn and made the rush-hour drive to downtown San Diego, arriving at the eye center before it opened.  I waited until they could fit me in; two hours later a triage ophthalmologist confirmed a retinal detachment.  She then ran off to find the eye surgeon.  She returned and said he would treat me, but he was also swamped with appointments and the wait would be two or three hours.

After another two hour wait, they put me in an exam room and dilated my eyes.  After another 30 minutes, the doctor arrived and did a thorough exam, mapping out all the small holes in my detached retina.  He said he would have to seal all of them; if he didn't, the vitreous fluid could get back in behind the retina and it would not reattach.  He then discussed the various procedures that were available.  I had researched all of them, so we quickly agreed on pneumatic, cryo-probe.  If treated the first time I presented myself (Sunday), a simple laser tacking of the retina would have worked well.  But now, with a large detachment and all the holes to repair, the cryo-probe was needed to freeze the holes, which would make the tissue "sticky" and seal the holes.

Furthermore, some gas would be injected into my eyeball.  The many bubbles would coalesce into a single big bubble over a few days.  The bubble of course would float to the top of my eyeball; I would be tasked with positioning my head so that the part of the retina that was detached would be above the bubble.  The bubble would hold the retina against the inside of the eye, forcing out the fluid and allowing the retina to reattach itself.  This procedure would likely work well, since my detachment was near the top of my eye.  I merely needed to hold my head upright and leaning to the left a little—for days and nights.

The doctor promised the surgery would start soon, and assistants began bringing equipment into the exam room.  There was another delay while the surgeon tried to catch up with his regular appointments, and then the procedure started (with local anesthetic, as I needed to assist by moving my eyeball to different positions). But then the cryo-probe would not get cold enough to freeze the tissue (applied to the outside of the eyeball, the freezing had to go all the way through to the retina).  Another delay while technicians replaced an empty gas cylinder, and the surgeon attended to his other patients.

The procedure took about fifteen minutes.  At first I could not see anything (my eyeball was full of tiny bubbles), but then cleared somewhat and I could see in the large portion of my field of view that had been black.  I drove home with my left eye closed, and ate dinner (first food all day), then propped up cushions on my sofa so I could sleep with my head upright (front to back), and tilted to the left about 20 to 30˚.

The next afternoon I returned to see the surgeon (who, by the way, was excellent).  He noted at one point that the resident had mis-diagnosed the retinal detachment (thinking it was just a vitreous detachment).  Everything was looking as it should.  He said to continue maintaining my position (night and day), and to return in two days (on Friday), when everything was still good (but "not yet out of the woods").  I no longer had to tilt my head to the left.

Then back five days later (Wednesday, the 12th).  He then said I could start sleeping on my back again.  I replied that I would prefer to continue sleeping with my head more of less upright, explaining that since the bubble was still there (it would take six to eight weeks to be absorbed), I thought we should keep it working holding my retina in place.  (This whole ordeal has been very stressful to me as I contemplated the prospect of losing vision in one eye.)  He then explained that he wanted to "test" the repair; if the retina pulled away again, he would tack the weakness with a laser.  That didn't appeal to me at all, given that the weekend was approaching.  The idea of again putting my eyesight into the hands of the on-call residents scared me.  The surgeon then negotiated for me to start sleeping in a normal position starting Sunday night (the 16th).  We'll see how that goes.

But back to the remodeling work.  It ground to a halt, and has since resumed at a relaxed pace.  I've completed the living room drywall work (joint compound, etc.), and painted the walls and ceiling.  I've started finishing off the drywall seams in the home theater, and laundry room, and put up another couple of sheets of drywall in the new laundry room.  I want to be able to seal that room off, either with permanent walls of plastic sheeting, so when I pull down the ceiling (opening up the room to the attic temperature extremes), the whole house will not be affected (so much).  I also need to take care of miscellaneous lighting/electrical/telephone circuits that have been languishing.

Most of this work is going slower because my left eye vision is still impaired.  It's okay when I'm looking straight ahead, but because the big bubble is still inside my eyeball, looking either up or down is a problem.  When I look down, the bubble moves up against the back of my eye, center of my retina.  I'm essentially looking through the  image of the bubble (with its dark border).  When I look up, the bubble floats up against the lens (behind pupil), and makes everything a blur.  When there is a bright light, the bubble causes internal flare and reflections.  I don't really mind it, because the bubble gave me my vision back, but it's there.

I'm still seeing some flashes, and still anxious, but hoping the fix holds and I won't need another procedure.  Too much work to do.  Stay tuned.

Sunday, November 2, 2014

Putting up Drywall

Taking a break from the laundry room masonry.  Several other projects have been stalled due to a lack of drywall, but the orientation of the planets recently came into alignment and a truck arrived from Home Depot loaded with "things that would not fit in my car."  To wit:


Up first was the opening between the new laundry room and the home theater.  I had some time ago filled in the space with studs, and then covered that with plastic sheet to keep the clouds of concrete dust out of the home theater (or at least to limit it—the dust goes all over the house).  I couldn't drywall over the studs without first running electrical cables through that wall from the new sub-panel, but running those wires meant I would not be able to get through the stud wall to enter my only bathroom.  That meant taking down the old bathroom wall and putting in a new pocket door for access from the home theater/guest bedroom into the guest bathroom.  Cascading projects.


This next photo shows the restructured wall for the installed pocket door kit (taken from inside the bathroom, looking through the door into the home theater).


Once the wiring was in place inside the wall (laundry room receptacles, plus one facing the home theater, and including a dedicated receptacle circuit for the future heat pump air handler), the drywall went up on the laundry room side.


And a shot from inside the home theater of the other side of the new wall section, plus the new pocket door.


The new drywall still needs to be finished off with joint compound and paint.  The other area that had been waiting for drywall was the south-facing living room wall.  I recently installed a new window there, but I also planned to add an inch of rigid foam insulation over the old drywall, and then put up another layer of drywall.  The extra insulation and mass not only keeps out the heat (and cold), but also attenuates the noise from the busy road behind my back yard.

I added sleepers fastened into the underlying studs, then added the rigid foam insulation, then the new drywall.  After that, the window was trimmed out (with a nice wide sill for the cats).


Lots of joint compound, spackle, caulk, and paint to go, so that's what I'll be doing next.  Complications from my second cataract surgery means no heavy lifting again for awhile, so laundry room masonry and restructuring will have to wait.